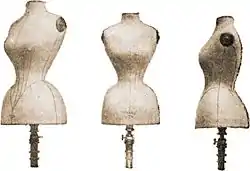
A dress form is a three-dimensional model of the human torso used for fitting clothing that is being designed or sewed. When making a piece of clothing, it can be put on the dress form so that one can see the fit and drape of the garment as it would appear on a body and make adjustments or alterations. Dress forms come in all sizes and shapes for almost every article of clothing that can be made. Dress forms in the standard clothing sizes are used to make patterns, while adjustable dress forms allow garments to be tailored to fit a specific individual.
This type of model is often colloquially referred to as a Judy for the female form and a James for the male form.
Structure
Preparatory Structure - Mold Creation
Before making the dress forms, exact measurement and natural shape built prototype are the keys to creating two side fiber molds. The prototype can be built by either traditional handmade; such as either a vest with a zipper that allows padding to be added and removed to adjust shape or polyester batting,[1][2] or modern digital version from 3D software. After the prototype, the dress forms should make precisely the same as the prototype with functions for fitting purposes.[3]
First Structure - Internal Treatment
To create the fiberglass base as the first step, putting entirely thick fiberglass, filling up in both side molds, and using resin to stick both sides for few hours until dry is the emphasis to prevent deforming in the very beginning. Then, dismantling both molds to polish surplus fiberglass in each edge until the whole body smooth to remain the exact measurements and further treatment.[3]
Second Structure - Accessories
In order to assemble and install accessories on the fiberglass base, the board for fixing position and slingshot for arm/hip joint collapsible movement need to place inside the fiberglass base. The Load-bearing steel bar from the dress forms top to around waist which is for hanging purpose also need to place before surface treatment.[3]
Last Structure - Surface Treatment
The surface of the dress forms has to be as close as possible to make the shape tight. The first layer is needle wool, which uses glue to stick on the fiberglass, then wraps needle wool around the whole body to make the dress form pinnable. The second layer is linen after the cloth cropping, sewing, and wrapping process that makes the surface smooth and more durable during the garment wearing. Lastly, putting measurement line and surface joint accessories to complete the dress forms.[3] Dress forms are often fragile and should be treated with care, it is advisable to not insert pins and needles in a dress form[4] or tightly wrapping an un-padded dress form in fabric, known as "Mummy Wrapping," which can lead to the dress form to shrink.[5]
Basic Instructions
All dress forms must have specific measurements of shoulders across front, halfway down armscye across front also called "front width," base of neck, center front (CF) of neck to waist, around chest, around waist, shoulders across back, halfway down armscye across back also called "back width," center back (CB) of neck to waist, center of shoulder seam to waist back, around hips, shoulder seam, armscye, and underarm to waist which is also called the "side seam."[6]
- Women's dress forms must have specific measurements from center of shoulder seam to bust point, bust point to waist, bust point to bust point, and around underbust.[6]
- Men's dress forms must have center of shoulder seam to waist front and have a slightly larger dress form than the model for "breathing room."[7]
- Locations of tattoos and piercings of the model individual should be considered by the designer so they can mark locations of these bodily embellishments on the dress form, whether if they are to be hidden or exhibited.[8]
Muslin fabric is most commonly used on dress forms due to its well-behaved manner and strong wrap, except if the outfit requires to be flowy, in which case a softer fabric should be used on the dress form.[9][10] Half muslin should be draped on the dress form's right side if the designer is right-handed and left side if the designer is left-handed.[11]
See also
References
- ↑ Sobel, Sharon (2013). Draping Period Costumes: Classical Greek to Victorian. Focal Press. pp. 5–6. ISBN 978-0240821337.
- ↑ McConnell, Larissa (2022). Foundations of Flat Patterning and Draping: For the Female Form. Routledge, Taylor & Francis Group. p. 37. ISBN 978-0367900984.
- 1 2 3 4 "The Structure of Dress Form - Dress Form | Tak Wai Model - The Dress Form Database". www.takwaimodel.com. Retrieved 2021-06-09.
- ↑ Sobel, Sharon (2013). Draping Period Costumes: Classical Greek to Victorian. Focal Press. p. 6. ISBN 978-0240821337.
- ↑ McConnell, Larissa (2022). Foundations of Flat Patterning and Draping: For the Female Form. Routledge, Taylor & Francis Group. p. 40. ISBN 978-0367900984.
- 1 2 Sobel, Sharon (2013). Draping Period Costumes: Classical Greek to Victorian. Focal Press. pp. 2–4. ISBN 978-0240821337.
- ↑ Sobel, Sharon (2013). Draping Period Costumes: Classical Greek to Victorian. Focal Press. pp. 3–4. ISBN 978-0240821337.
- ↑ McConnell, Larissa (2022). Foundations of Flat Patterning and Draping: For the Female Form. Routledge, Taylor & Francis Group. p. 7. ISBN 978-0367900984.
- ↑ Sobel, Sharon (2013). Draping Period Costumes: Classical Greek to Victorian. Focal Press. p. 7. ISBN 978-0240821337.
- ↑ McConnell, Larissa (2022). Foundations of Flat Patterning and Draping: For the Female Form. Routledge, Taylor & Francis Group. p. 31. ISBN 978-0367900984.
- ↑ McConnell, Larissa (2022). Foundations of Flat Patterning and Draping: For the Female Form. Routledge, Taylor & Francis Group. p. 42. ISBN 978-0367900984.
External links
 Media related to Dress forms at Wikimedia Commons
- The Structure Of Dress Form, an article describes the dress forms structure.