| Battle of Wakde | |||||||
|---|---|---|---|---|---|---|---|
| Part of World War II, Pacific War | |||||||
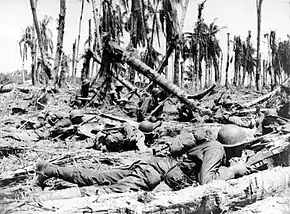
 American troops advancing on a coconut plantation | |||||||
| |||||||
| Belligerents | |||||||
|
|
| ||||||
| Commanders and leaders | |||||||
|
|
| ||||||
| Strength | |||||||
|
~1,500 men 4 Sherman tanks | ~800 men | ||||||
| Casualties and losses | |||||||
|
40 killed 107 wounded 2 tanks lost |
759 killed 4 captured | ||||||
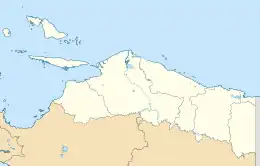
 Location within Papua (province) | |||||||
The Battle of Wakde (Operation Straight Line) was part of the New Guinea campaign of World War II. It was fought between the United States and Japan from 17 May 1944 to 21 May 1944 in Dutch New Guinea (now Papua, in Indonesia). The operation involved an assault on the Japanese-held Wakde island group by a reinforced US infantry battalion, which was transported from a beachhead the Allied troops had established around Arara, on the mainland, the previous day. Following the capture of the island, fighting on the mainland continued until September as Allied troops advanced west towards Sarmi. In the aftermath, the island's airbase was expanded and used to support operations around Biak and in the Marianas.
Background
Wakde is an island group, which lies two miles off the northeastern coast of Western New Guinea. It consists of two islands: Insoemoar and Insoemanai. Of these, Insoemoar is the largest, although it is only 1.5 miles (2.4 km) long, and lies on the outer side of the smaller island, to the northeast. It is largely flat and at its largest point is 3,000 feet (910 m) wide. On the mainland shore, the nearest village at the time of the battle was Toem.[1][2] At the time of the battle, the area's strategic importance lay it is proximity along planned Allied avenues of advance through the southwest Pacific toward the Philippines, offering the Allies an airfield for land-based aircraft to attack facilities at Biak Island, about 180 miles (290 km) away.[3][4]
Initial Allied plans had called for the capture of Sarmi on the mainland, but aerial reconnaissance had later shown that it was unsuitable for heavy bombers. As a result, the Allied commander, General Douglas MacArthur had decided to focus on the capture of Wakde instead, followed by Biak. Allied aircraft operating from this area could also be used to support operations in the central Pacific, including those operations planned as part of the Mariana and Palau Islands campaign.[5] The Allies were able to move against Wakde after the successful completion on 26 April of the Battle of Hollandia, about 120 miles (190 km) to the east. The discovery that the airfields around Hollandia, on the Sentani plain, could not support heavy bombers, accelerated Allied plans to secure Wakde. For the Japanese, the area offered an important line of defense and since late 1943 they had begun developing the area, installing supply dumps and an airfield, and moving in sizeable concentrations of troops.[3][4]
The area had been occupied by the Japanese in 1942 and an airfield had been developed on Insoemoar, consisting of a coral runway as well as buildings and staging facilities. An anchorage suitable for flat or shallow-bottomed vessels lay on the southern side of the larger island, with a small jetty and an area suitable for a landing beach. Along the mainland, to the west, the Japanese were in the process of constructing an airfield around Maffin Bay (west of the Tor River) and had also built an airstrip at Sawar, about halfway between Maffin Bay and the village of Sarmi. The Japanese had installed antiaircraft guns around the three airfields, and had around 11,000 troops in the Sarmi–Sawar–Maffin area, centered around Sarmi where Lieutenant General Hachiro Tagami's 36th Division had established a command post.[6][7]
On Wakde itself, there were about 800 Japanese troops, including a company of infantry from the 224th Infantry Regiment, as well as naval troops, support personnel and a weaponless antiaircraft battery from the 53d Field Antiaircraft Artillery Battalion. There were several 75 mm artillery pieces, some mortars and machine guns, and over 100 bunkers.[7][8] Japanese air assets available to support the defense of Wakde and Sarmi were estimated at 282 fighters and 246 bombers, but the force was in the process of reorganization and was off balance; it was assessed that around half this force would remain in the Philippines and Palaus.[9]
Prelude

Initially, Allied planners had intended to launch the operation on 15 May; however, delays in concentrating logistics and shipping assets resulted in the Allies postponing the operation by several days. Nevertheless, the necessity to conform with plans in the central Pacific meant that it could be carried out no later than 17 May, with operations to capture Biak scheduled to take place 10 days later using most of the same landing craft. The beach frontage on Wakde was considered too narrow to support a full regimental combat team; as a result, it was decided to carry out the operation in three phases. The first phase would entail a landing on the mainland opposite the islands. This would be followed in phase two by a "shore-to-shore" operation across the bight to capture Insoemanai, to secure a base of fire to support the final phase of the assault on Insoemoar.[10]
The main combat forces assigned to the Wakde–Sarmi operation were drawn from Brigadier General Jens A. Doe's 163rd Regimental Combat Team, consisting of 7,800 men,[11] of which about 1,500 took part in the landing on Wakde.[12] This unit had previously taken part in the Landing at Aitape and had been relieved there by the 32nd Infantry Division on 4 May. After embarking at Aitape on 15 May, the troops were initially transported to Hollandia on 16 May in preparation for the operation. Meanwhile, Allied aircraft mounted airstrikes around the target area throughout late April and into May.[13] The naval forces assigned to the operation were detached from Rear Admiral William Fechteler's Task Force 77. These forces were designated the Eastern Attack Group and were commanded by Captain Albert G. Noble, and consisted of three fire support groups, with two heavy cruisers, three light cruisers and 20 destroyers. Fourteen other support vessels were allocated included minesweepers, submarine chasers and several landing craft armed with rockets. The landing craft carrying the assault troops were operated by the 542nd Engineer Boat and Shore Regiment, of the 2nd Engineer Special Brigade.[14]
The pre-invasion naval bombardment allocated to support the first phase of the operation involved two cruiser forces: Task Force 74 and Task Force 75. The first force was commanded by British Rear Admiral Victor Crutchley, and consisted of four Australian ships – the cruisers Australia and Shropshire and the destroyers Warramunga and Arunta – and two US destroyers, Mullany and Ammen. Task Force 75 was commanded by US Rear Admiral Russell Berkey, and consisted of the cruisers Phoenix, Boise and Nashville. While Crutchley's force shelled the mainland around Sawar and Sarmi, Berkley's ships hit Wakde. Ten destroyers under Captain Richard Stout also fired upon targets between Toem and Maffin Bay.[15]
Early on 17 May, after a fifty-minute bombardment, three battalions from the 163rd Infantry Regiment were landed at a beachhead on the mainland around Arara, to the east of the Tor River. Overhead a force of Allied fighters and medium bombers stood ready to provide close air support, but Japanese resistance was light, consisting of only rifle fire. The 3rd Battalion established the beachhead and then secured the western flank while the 2nd Battalion pushed east towards Tementoe Creek. These two battalions secured the coast and would later undertake heavy fighting during the Battle of Lone Tree Hill; meanwhile, a small force of heavy weapons troops built around a company from the 641st Tank Destroyer Battalion occupied Insoemanai. The 1st Battalion was held back around Toem, with orders to be prepared to undertake the landing on Wakde Island around the following day.[16][17]
The British-led Eastern Fleet attacked Surabaya in the Japanese-occupied Netherlands East Indies on 17 May as a diversion from the landing at Wakde.[18] This attack, which was designated Operation Transom, was undertaken by aircraft flying from an American and a British aircraft carrier. The raid did not have any effect on the Japanese military's deployments as the Eastern Fleet was not seen as a serious threat.[19]
Battle
.jpg.webp)
Throughout the afternoon of 17 May, the U.S. troops on Insoemanai were fired upon by Japanese mortars and machine guns from Insoemoar. In response, throughout the night of 17/18 May, U.S. artillery fired on Wakde from the mainland, while plans were hastily made by Allied commanders for the operation. Deliberate planning for the assault had been belayed as the operation was dependent upon the situation as it developed around Toem. In the end, the order to carry out the landing on Insoemoar, was given by Noble early on 18 May.[20] Three companies from the 1st Battalion (A, B and C) were allocated to make the crossing, along with one company from the 2nd Battalion (Company F). These were organized into six waves, each of which would be transported in LCVPs crewed by engineers from the 542nd EBSR. Four Sherman tanks from the 603rd Tank Company were also assigned, and would be transported across the bight to Insoemoar aboard several LCMs.[21][22]
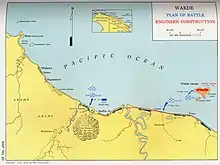
Naval gunfire support was provided by the destroyers Wilkes and Roe, which commenced bombardment around 08:30. Indirect fire support was also provided from mortars and machine guns operated by the troops that had landed on Insoemanai the previous day.[23] The efforts of these forces destroyed the defending Japanese 75 mm gun emplacements and damaged several bunkers.[7] Meanwhile, the landing craft began embarking the assault troops from the beach at Toem, 2 miles (3.2 km) away. Their objective was a 600-yard (550 m) stretch of beach in a sheltered bay south of the jetty in the southwestern part of the island, which was one of the few places around the island where the coral reef did not extend. Their route to the beach would take them to the west of Insoemanai, after which the landing craft would turn northeast for their run to the shore.[24][8]
.jpg.webp)
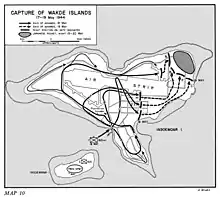
The first US troops landed on the Island at 9:10 on the 18th, coming ashore from their LCVPs on the south western side of the island near the jetty;[25] they were followed at five minute intervals by the other five waves.[26] Shortly after landing, the U.S. troops came under heavy fire from concealed positions. The fire, however, was predominantly aimed at the LCI gunboats and ultimately the Americans reached the beach with only light casualties. By 9:25, the invasion force was ashore with two tanks (one of the others had been lost at sea, while the other had damaged during loading) which the Americans used to secure the beachhead, despite heavy fire from Japanese defenders which killed one of the company commanders.[27] Close air support was provided by a squadron of A-20 attack aircraft, under the direction of a controller in a B-25.[28]
The American companies then split up. Companies B and F took the tanks and headed west along the coast whilst Company A were sent south-west to clear out machine gun nests. Company C was then sent north towards the airfield where they endured heavy fighting coming up against well defended Japanese positions. Even so, the advance north went well for the Allies and by noon they reached the airfield. By 13:30, the Americans reached the northern part of the airfield but failed to take the eastern side where the majority of the remaining Japanese forces were located. Despite the delay in securing the island, throughout the afternoon stores and construction equipment were unloaded at the landing beach so that work could begin on the airfield. Meanwhile, fighting continued throughout the day until the attackers dug-in for the evening at 18:00.[27]

Throughout the night, a small group of Japanese attacked the U.S. battalion's command post, but this was eventually repelled by elements of Company D after a firefight that resulted in 12 Japanese being killed and three Americans wounded. The following day, the U.S. attack continued at 9:15. Eventually, the rest of the airfield was captured despite strong resistance from well entrenched Japanese defenders. Following the capture of the airfield, the surviving Japanese made their way to coral caves on the coast, delaying the Americans for several hours before finally being overcome. The third day of the battle consisted mainly of mopping up operations by American forces who cleared up the last pockets of Japanese resistance in north-eastern corner of the island. The Japanese undertook several suicidal "banzai" charges over the course of the day but the U.S. troops were able to overcome the remaining Japanese resistance by nightfall.[29]
Airfield construction troops from the 836th Engineer Aviation Battalion arrived on 18 May, even while the fighting continued. The following day, they began construction work to repair and extend the airfield while fighting off attacking Japanese troops.[30] The same day, the Kumamba Islands, to the northeast, were also occupied by Allied troops to install search radars to offer early warning to the base at Wakde.[26] After a three-day battle, the island was declared captured on 20 May. Several Japanese snipers still remained on the island; they were eventually cleared out by Company L, which had been detached from the 3rd Battalion, 163rd Infantry to assist with mopping up operations between 22 and 26 May.[31] The capture of Wakde cost the Americans 40 killed, and 107 wounded, while the Japanese lost 759 killed and 4 captured.[26]
Aftermath
Following the capture, Wakde Airfield was quickly expanded to cover the whole island with the airfield being operational on 21 May despite it having only recently been captured and the following day personnel from the 348th Fighter Group arrived, establishing camp on Insoemanai; their aircraft arrived on 26 May. The same day, several PB4Ys (navalized B-24 Liberators) from VB-115 arrived and began conducting reconnaissance missions from Wakde the following day. Later in the month radar and control facilities were established and more aircraft, including day and night fighters and heavy bombers, were flown in. Area command initially fell to an element of the 308th Bombardment Wing before being passed to the 310th Bombardment Wing by the end of the month. Japanese air attacks against Wakde began on 27 May, but were largely ineffective.[32]
Fighting on the mainland continued into early September as Allied troops advanced west along the coast towards Sarmi to clear Maffin Bay and capture the airfield around Sawar; this advance was resisted strongly by the Japanese defenders who were entrenched in strong positions in the Trier Mountains.[33] Developed into a staging area for subsequent operations,[33] the base on Wakde was initially an extremely important airbase for the Allies, providing a landing and taking off base for attacks on the mainland and other islands throughout the rest of 1944, including the Battle of Biak.[31] Eventually, its use faded, and it became an emergency landing field.[26] American troops began their withdrawal from the island in January 1945, with the removal of some equipment at this time; however, operations on Wakde continued until November 1945. The base facilities were later purchased by the Netherlands East Indies government in 1946.[34]
Notes
- ↑ Morison, pp. 92–93
- ↑ Futrell, p. 617
- 1 2 Morison, pp. 93–96
- 1 2 Smith, p. 206–207
- ↑ Keogh, p. 377
- ↑ Morison, pp. 92–94
- 1 2 3 Rickard, John. "Battle of Wakde Island, 18-21 May 1944". History of War. Retrieved 26 January 2018.
- 1 2 Smith, p. 222
- ↑ Futrell, p. 619
- ↑ Keogh, pp. 378–379
- ↑ Morison, p. 96
- ↑ Clodfelter, p. 508
- ↑ Morison, pp. 72 & 96
- ↑ Smith, pp. 213–214
- ↑ Morison, p. 97
- ↑ Smith, pp. 213, 216, 219
- ↑ Morison, pp. 97 & 102
- ↑ Gill, p. 416
- ↑ Kirby, pp. 382–384
- ↑ Morison, p. 98
- ↑ Morison, pp. 97–98
- ↑ Smith, pp. 213, 216, 219 & 222
- ↑ Smith, pp. 220–222
- ↑ Morison pp. 99–100
- ↑ Smith, p. 224
- 1 2 3 4 Morison, p. 101
- 1 2 Smith, pp. 224–228
- ↑ Futrell, p. 628
- ↑ Smith, pp. 229–231
- ↑ Futrell, p. 629
- 1 2 Smith, p. 231
- ↑ Futrell, pp. 629–630
- 1 2 Morison, p. 102
- ↑ Casey, p. 246
References
- Casey, Hugh (1951). Engineers of the Southwest Pacific, 1941–1945. Reports of Operations of the United States Army Forces in the Far East, Southwest Pacific Area, Army Forces, Pacific. Vol. 6. U.S. Government Printing Office. OCLC 875001682.
- Clodfelter, Micheal (2017). Warfare and Armed Conflicts: A Statistical Encyclopedia of Casualty and Other Figures, 1492–2015 (4th ed.). Jefferson, North Carolina: McFarland. ISBN 978-147662-585-0.
- Futrell, Frank (1950). "Final Victory in New Guinea". In Craven, Wesley Frank; Cate, James Lea (eds.). Vol. IV, The Pacific: Guadalcanal to Saipan, August 1942 to July 1944. The Army Air Forces in World War II. University of Chicago Press. pp. 615–670. OCLC 9828710. Archived from the original on 26 November 2006. Retrieved 12 July 2020.
- Gill, G. Hermon (1968). Royal Australian Navy, 1942–1945. Australia in the War of 1939–1945. Vol. Series 2 – Navy. Volume II. Canberra: Australian War Memorial. OCLC 65475.
- Kirby, S. Woodburn (1962). The War against Japan. History of the Second World War. Vol. III: The Decisive Battles. London: HMSO. OCLC 632441219.
- Keogh, Eustace (1965). South West Pacific 1941–45. Melbourne, Victoria: Grayflower Publications. OCLC 7185705.
- Morison, S.E. (1960) [1953]. New Guinea and the Marianas: March 1944 – August 1944. History of United States Naval Operations in World War II. Vol. VIII. Boston: Little, Brown. OCLC 174795561.
- Smith, Robert Ross (1953). The Approach to the Philippines. The United States Army in World War II. Washington, D.C.: United States Army Center of Military History. OCLC 570739529.
Further reading
- Davison, John (2004). The Pacific War Day by Day. New York: Chartwell Books. ISBN 0-7858-2752-8.