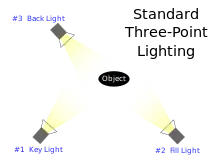
In television, film, stage, or photographic lighting, a fill light (often simply fill) may be used to reduce the contrast of a scene to match the dynamic range of the recording media and record the same amount of detail typically seen by eye in average lighting and considered normal. From that baseline of normality, using more or less fill will make shadows seem lighter or darker than normal, which will cause the viewer to react differently, by inferring both environmental and mood clues from the tone of the shadows.
Natural skylight fill is omnidirectional and diffuse, with lower rate of inverse-square fall-off than artificial sources. A common artificial lighting strategy that creates an overall appearance similar to natural fill places the fill light on the lens axis so that it will appear to cast few if any shadows from the point of view of the camera, which allows the key light that overlaps it to create the illusion of 3D in a 2D photo with the same single-source patterns typically seen with natural lighting where the sun acts as key light and the skylight as the fill. The use of centered near-axis "neutral" fill also prevents dark, unfilled voids in the lighting pattern, which can occur on faces if cheeks or brows block the fill source.
The positioning of the fill affects the overall appearance of the lighting pattern. When a centered fill strategy is used the ratio is created by overlapping the key light over the foundation of fill. A key source of equal incident intensity to the fill, overlapping the even fill, will create a 2:1 reflected ratio (1 key + 1 fill over 1 fill) = 2:1. The same two equal incident strength sources placed on opposite side of a face will work to cancel each other out creating overall dimensionally flat appearance with dark unfilled voids in low areas neither light reach. Part of the learning curve with lighting is experimenting with various highlight:shadow reflected ratios and fill positions, comparing them to baselines and reactions to what is seen by eye, and in doing that learning how to trigger the same reactions in the mind of the viewer.
Ratio measurement and notation
In cinematic and stage work where many lights are used the numerical ratios are typically set per incident strength of each source and referenced similarly. The Highlight:Shadow ratio convention long used in portraiture is based indeed on the reflected light the camera records when the sources overlap. Very early analog ratio meters consisted of a card with two holes, one blank and the other covered with a strip of neutral density. The blank hole would be held over the shadow side of the face and the hole with the filters over the highlight side and adjusted until the appearance matched visually. Each .30 difference in neutral density was equal to a 2x difference in reflected light. In the case of two equal sources overlapping in a key over centered fill strategy the incident strength is 1:1 between them but the overlap creates a 2:1 reflected ratio. So when expressing ratios it is important to make the distinction between incident and reflected to avoid confusion.
Negative fill / subtractive lighting
In cases where the fill light is desired to be darker than what is available without artificial means, a flag or frame may be used to block ambient light and thereby provide what is called negative fill.[1]
In omnidirectional open shade or an overcast day where the light creates few highlight or shadow clues regarding 3D blocking the light on one side will have the net effect of making the light from the other direction the more dominant "key" vector in the lighting pattern using a process also referred to as "subtractive lighting".
Reflectors as fill sources
An alternative to using a direct light source as a fill is to re-direct or "bounce" the key light towards the subject by using a reflector. When used with artificial key light it can be difficult to place a reflector where it can both catch and reflect the light and have it bounce back onto the subject at the ideal "neutral" near-axis angle, often resulting in dark, underfilled areas in the lighting pattern. This is less of a problem outdoors where light usually comes from many directions.
Spill fill
The term "spill fill" refers to fill light which results from the footprint of light sources bouncing off surfaces in the shooting environment. It can, if not observed and understood, lead to erroneous assumptions about lighting strategies and modifier choices. For example, a difference between a softbox and shoot-through umbrella of identical size used in a small reflective space is that the softbox is designed to limit spill and the shoot through umbrella to maximize it. The umbrella will appear to "wrap" the light more, but in terms of actual cause and effect the "wrap" effect results from the light bouncing off ceiling and walls back into the shadows created by the key light from many different directions.
An advantage of a dedicated studio space vs. location shooting is that the "spill fill" becomes a predictable variable in the overall lighting strategies. Some studio photographers aim their dedicated fill source at a white wall behind the camera near the ceiling to intentionally create omnidirectional "wrap around" fill similar to natural skylight and eliminate the reflection "catchlight" a direct fill source will create in the eyes.
With location shooting the spill fill variable will cause the same lighting strategy to produce different result. Outdoors there is no spill fill created by artificial sources which is why cap style speedlight modifiers perform differently outdoors and large indoor spaces which reflect very little spill fill. Skylight outdoors is "spill fill" in the sense it reflects the light of the sun in a way the photographer can't control unless a reflector or flash is used to modify the three f/stop difference in brightness that typically occurs between direct sun and shade.
Cause and effect
A systematic approach for visualizing the cause and effect is to start from a baseline set-up with the testing done outdoors at night or in a large darkened indoor space where there will be no reflected "spill fill". Set a camera on a tripod at the aperture desired for depth-of-field and start with just the fill source located centered and chin level to a subject facing the wearing black and white textured clothing.
Raise fill power until detail is seen in the black clothing. The nose on front of the face will be observed to be lighter than the ears due to the inverse-square fall off of the fill source and it will create a light-to-dark gradient. The contrast of the gradient can be altered by changing the distance of the fill light from the subject. With most recording media (B&W negative being the exception) the white clothing will not be correctly exposed when the fill light is adjusted based on shadow detail. That problem is solved by adding the key light which for this exercise should be placed 45° above the eye line and 45° to the side of the nose of the subject facing squared to the camera.
Raise the power of the off-axis key light until the white clothing is exposed correctly, appearing white but also retaining texture detail. The combination of overlapping key over centered fill works together to change scene contrast to exactly fit the dynamic range of the recording media. Due to the way the photographic process is engineered the response between the black and white extremes in the scene range will be reproduced in a way similar to human perception and the image will look "seen by eye normal" in the flash lit foreground. But if the exercise is done outside where there is no ambient light or bounced spill-fill the rapid fall off and actual footprint of the sources will be seen.
The ratio of key vs. fill in incident terms needed to reproduce both ends of the tonal range on the subject will vary with the dynamic range of a digital sensor or transparency film. In the case of negative / print systems the limiting factor will be the range of the print material, or if the negative is scanned the dynamic range of the scanner. The ratio can be determined numerically after the visual evaluation based on shadow detail for fill and highlight detail for key by measuring each light separately from subject position with an incident meter aimed at the fill then the key light.
From that "baseline" experiment using centered fill and fitting scene range to output media a photographer can systematically change one variable at a time and observe how that affects appearance, such as fill position (watching or shaded fill areas), changing the key:fill ratio using the same pattern, or using different modifiers on the fill source. Repeating the same tests indoors where light bouncing around the room is a factor will make the photographer aware of how the shooting environment will change both the appearance and numerical ratio the same standard "baseline" set-up produced when there was no "spill fill".
Understanding how the cause and effect of the technical variables affect viewer emotional reaction to the content under the lights is what equips the photographer with the skill to pick the lighting strategy and modification techniques which will best meet the goal for how the target audience will react emotionally photograph due to the clues the lighting create about the environment and mood of the subjects.
Techniques

Shoot Thru Umbrella (Shoot-Through) is where light passes through an umbrella as opposed to being reflected by it. The umbrella acts as a light diffuser, softening the light and allowing it to spread over the subject evenly.[2]
See also
References
- ↑ Brighthub.com
- ↑ Arias, Zach. "Shoot Through Umbrella vs. Softbox". zarias.com. Archived from the original on 31 March 2013. Retrieved 18 February 2013.