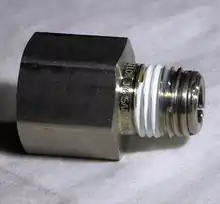
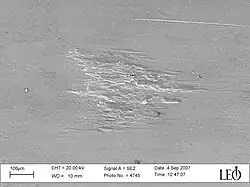
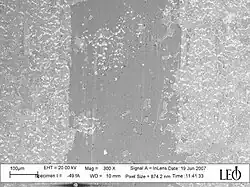
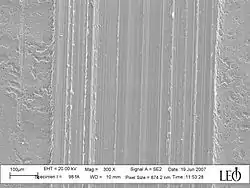
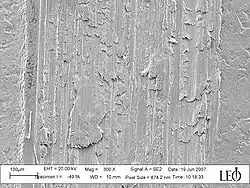
Galling is a form of wear caused by adhesion between sliding surfaces. When a material galls, some of it is pulled with the contacting surface, especially if there is a large amount of force compressing the surfaces together.[1] Galling is caused by a combination of friction and adhesion between the surfaces, followed by slipping and tearing of crystal structure beneath the surface.[2] This will generally leave some material stuck or even friction welded to the adjacent surface, whereas the galled material may appear gouged with balled-up or torn lumps of material stuck to its surface.
Galling is most commonly found in metal surfaces that are in sliding contact with each other. It is especially common where there is inadequate lubrication between the surfaces. However, certain metals will generally be more prone to galling, due to the atomic structure of their crystals. For example, aluminium is a metal that will gall very easily, whereas annealed (softened) steel is slightly more resistant to galling. Steel that is fully hardened is very resistant to galling.
Galling is a common problem in most applications where metals slide in contact with other metals. This can happen regardless of whether the metals are the same or different. Alloys such as brass and bronze are often chosen for bearings, bushings, and other sliding applications because of their resistance to galling, as well as other forms of mechanical abrasion.
Introduction
Galling is adhesive wear that is caused by the microscopic transfer of material between metallic surfaces during transverse motion (sliding). It occurs frequently whenever metal surfaces are in contact, sliding against each other, especially with poor lubrication. It often occurs in high-load, low-speed applications, although it also can occur in high-speed applications with very little load. Galling is a common problem in sheet metal forming, bearings and pistons in engines, hydraulic cylinders, air motors, and many other industrial operations. Galling is distinct from gouging or scratching in that it involves the visible transfer of material as it is adhesively pulled (mechanically spalled) from one surface, leaving it stuck to the other in the form of a raised lump (gall). Unlike other forms of wear, galling is usually not a gradual process but occurs quickly and spreads rapidly as the raised lumps induce more galling. It can often occur in screws and bolts, causing the threads to seize and tear free from the fastener or the hole. In extreme cases, the bolt may seize without stripping the threads, which can lead to breakage of the fastener, the tool, or both. Threaded inserts of hardened steel are often used in metals like aluminium or stainless steel that can gall easily.[3]
Galling requires two properties common to most metals, cohesion through metallic-bonding attractions and plasticity (the ability to deform without breaking). The tendency of a material to gall is affected by the ductility of the material. Typically, hardened materials are more resistant to galling, whereas softer materials of the same type will gall more readily. The propensity of a material to gall is also affected by the specific arrangement of the atoms, because crystals arranged in a face-centered cubic (FCC) lattice will usually allow material-transfer to a greater degree than a body-centered cubic (BCC). This is because a face-centered cubic has a greater tendency to produce dislocations in the crystal lattice, which are defects that allow the lattice to shift, or "cross-slip," making the metal more prone to galling. However, if the metal has a high number of stacking faults (a difference in stacking sequence between atomic planes), it will be less apt to cross-slip at the dislocations. Therefore, a material's resistance to galling is primarily determined by its stacking-fault energy. A material with high stacking-fault energy, such as aluminium or titanium, will be far more susceptible to galling than materials with low stacking-fault energy, like copper, bronze, or gold. Conversely, materials with a hexagonal close packed (HCP) structure and a high c/a ratio, such as cobalt-based alloys, are extremely resistant to galling.[4]
Galling occurs initially with material transfer from individual grains on a microscopic scale, which become stuck or even diffusion welded to the adjacent surface. This transfer can be enhanced if one or both metals form a thin layer of hard oxides with high coefficients of friction, such as those found on aluminum or stainless steel. As the lump grows, it pushes against the adjacent material, forcing them apart and concentrating most of the friction heat energy into a very small area. This, in turn, causes more adhesion and material build-up. The localized heat increases the plasticity of the galled surface, deforming the metal until the lump breaks through the surface and begins plowing up large amounts of material from the galled surface. Methods of preventing galling include the use of lubricants like grease and oil, low-friction coatings and thin-film deposits like molybdenum disulfide or titanium nitride, and increasing the surface hardness of the metals using processes such as case hardening and induction hardening.
Mechanism
In engineering science and other technical aspects, the term galling is widespread. The influence of acceleration in the contact zone between materials has been mathematically described and correlated to the exhibited friction mechanism found in the tracks during empiric observations of the galling phenomenon. Due to problems with previous incompatible definitions and test methods, better means of measurements in coordination with a greater understanding of the involved frictional mechanisms have led to the attempt to standardize or redefine the term galling to enable a more generalized use. ASTM International has formulated and established a common definition for the technical aspect of the galling phenomenon in the ASTM G40 standard: "Galling is a form of surface damage arising between sliding solids, distinguished by microscopic, usually localized, roughening and creation of protrusions (e.g., lumps) above the original surface".[5]
When two metallic surfaces are pressed against each other, the initial interaction and the mating points are the asperities, or high points, found on each surface. An asperity may penetrate the opposing surface if there is a converging contact and relative movement. The contact between the surfaces initiates friction or plastic deformation and induces pressure and energy in a small area called the contact zone.
The elevation in pressure increases the energy density and heat level within the deformed area. This leads to greater adhesion between the surfaces, which initiates the material transfer, galling build-up, lump growth, and creation of protrusions above the original surface.
If the lump (or protrusion of transferred material to one surface) grows to a height of several micrometers, it may penetrate the opposing surface oxide-layer and cause damage to the underlying material. Damage in the bulk material is a prerequisite for plastic flow found in the deformed volume surrounding the lump. The geometry and speed of the lump define how the flowing material will be transported, accelerated, and decelerated around the lump. This material flow is critical when defining the contact pressure, energy density, and developed temperature during sliding. The mathematical function describing acceleration and deceleration of flowing material is thereby defined by the geometrical constraints, deduced or given by the lump's surface contour.
If the right conditions are met, such as geometric constraints of the lump, an accumulation of energy can cause a clear change in the material's contact and plastic behavior, increasing the friction force required for adhesion and further movement.
In sliding friction, increased compressive stress is proportionally equal to a rise in potential energy and temperature within the contact zone. The energy accumulation during sliding can reduce energy loss from the contact zone due to a small surface area on the surface boundary, thus, low heat conductivity. Another reason is the energy continuously forced into the metals, which is a product of acceleration and pressure. In cooperation, these mechanisms allow constant energy accumulation, causing increased energy density and temperature in the contact zone during sliding.
The process and contact can be compared to cold welding or friction welding because cold welding is not truly cold, and the fusing points exhibit an increase in temperature and energy density derived from applied pressure and plastic deformation in the contact zone.
Incidence and location
Galling is often found between metallic surfaces where direct contact and relative motion have occurred. Sheet metal forming, thread manufacturing, and other industrial operations may include moving parts, or contact surfaces made of stainless steel, aluminium, titanium, and other metals whose natural development of an external oxide layer through passivation increases their corrosion resistance but renders them particularly susceptible to galling.[6]
In metalworking that involves cutting (primarily turning and milling), galling is often used to describe a wear phenomenon that occurs when cutting soft metal. The work material is transferred to the cutter and develops a "lump." The developed lump changes the contact behavior between the two surfaces, which usually increases adhesion, and resistance to further cutting, and, due to created vibrations, can be heard as a distinct sound.
Galling often occurs with aluminium compounds and is a common cause of tool breakdown. Aluminium is a ductile metal, which means it possesses the ability for plastic flow with relative ease, presupposing a relatively consistent and significant plastic zone.
High ductility and flowing material can be considered a general prerequisite for excessive material transfer and galling because frictional heating is closely linked to the structure of plastic zones around penetrating objects.
Galling can occur even at relatively low loads and velocities because it is the real energy density in the system that induces a phase transition, which often leads to an increase in material transfer and higher friction.
Prevention
Generally, two major frictional systems affect adhesive wear or galling: solid surface contact and lubricated contact. In terms of prevention, they work in dissimilar ways and set different demands on the surface structure, alloys, and crystal matrix used in the materials.
In solid surface contact or unlubricated conditions, the initial contact is characterized by the interaction between asperities and the exhibition of two different sorts of attraction: cohesive surface-energy or the molecules connect and adhere the two surfaces together, notably even if a measurable distance separates them. Direct contact and plastic deformation generate another type of attraction through the constitution of a plastic zone with flowing material where induced energy, pressure, and temperature allow bonding between the surfaces on a much larger scale than cohesive surface energy.
In metallic compounds and sheet metal forming, the asperities are usually oxides, and the plastic deformation primarily consists of brittle fracture, which presupposes a very small plastic zone. The accumulation of energy and temperature is low due to the discontinuity in the fracture mechanism. However, during the initial asperity/asperity contact, wear debris or bits and pieces from the asperities adhere to the opposing surface, creating microscopic, usually localized, roughening and creation of protrusions (in effect lumps) above the original surface. The transferred wear debris and lumps penetrate the opposing oxide surface layer and cause damage to the underlying bulk material, plowing it forward. This allows continuous plastic deformation, plastic flow, and accumulation of energy and temperature. The prevention of adhesive material transfer is accomplished by the following or similar approaches:
- Low-temperature carburizing treatments such as Kolsterising can eliminate galling in austenitic stainless steels by increasing surface hardness up to 1200 HV0.05 (depending on the base material and surface conditions).[7]
- Less cohesive or chemical attraction between surface atoms or molecules.
- Avoid continuous plastic deformation and plastic flow, for example, through a thicker oxide layer on the subject material in sheet-metal forming (SMF).
- Coatings deposited on the SMF work tool, such as chemical vapor deposition (CVD) or physical vapor deposition (PVD) and titanium nitride (TiN) or diamond-like carbon coatings exhibit low chemical reactivity even in high energy frictional contact, where the subject material's protective oxide layer is breached, and the frictional contact is distinguished by continuous plastic deformation and plastic flow.
Lubricated contact places other demands on the surface structure of the materials involved, and the main issue is to retain the protective lubrication thickness and avoid plastic deformation. This is important because plastic deformation raises the temperature of the oil or lubrication fluid and changes the viscosity. Any eventual material transfer or creation of protrusions above the original surface will also reduce the ability to retain a protective lubrication thickness. A proper protective lubrication thickness can be assisted or retained by:
- Surface cavities or small holes can create a favorable geometric situation for the oil to retain a protective lubrication thickness in the contact zone.
- Cohesive forces on the surface can increase the chemical attraction between the surface and lubricants and enhance the lubrication thickness.
- Oil additives may reduce the tendency for galling or adhesive wear.
See also
- Tribology – Science and engineering of interacting surfaces in relative motion
- Rheology – Study of the flow of matter, primarily in a fluid state
- Surface engineering – Altering the properties of solid surfaces
- Pin on disc tribometer – Instrument that measures friction and wear between surfaces
References
- ↑ Budinksi, Kenneth; Budinski, Steven (2015). "Interpretation of galling tests". Wear. 332 (1): 1185–1192. doi:10.1016/j.wear.2015.01.022.
- ↑ Dohda, Kuniaki (2021). "Galling phenomena in metal forming". Friction. 9 (4): 665–685. doi:10.1007/s40544-020-0430-z. S2CID 228815215.
- ↑ Mechanical Fastening Joining Assembly By James A. Speck — Marcell Dekker 1997 Page 128
- ↑ Surface Engineering for Corrosion and Wear Resistance By J. R. Davis -- ASM International 2001 Page 76
- ↑ ASTM standard G40 (2006)
- ↑ "Stainless Steel Galling / Locking Up / Freezing Up". Estainlesssteel.com. Retrieved 2013-11-04.
- ↑ Surface Hardening of Stainless Steels by Kolsterising by Gümpel P. -- University of Applied Science, Konstanz Germany AIJSTPME (2012) 5(1): 11-18 (PDF)