 Lord Nelson | |
| Class overview | |
|---|---|
| Name | Lord Nelson class |
| Operators | |
| Preceded by | Swiftsure class |
| Succeeded by | HMS Dreadnought |
| Built | 1905–1908 |
| In service | 1908–1926 |
| In commission | 1908–1919 |
| Planned | 3 |
| Completed | 2 |
| Cancelled | 1 |
| Scrapped | 2 |
| General characteristics | |
| Type | Pre-dreadnought battleship |
| Displacement | |
| Length | 443 ft 6 in (135.2 m) (o/a) |
| Beam | 79 ft 6 in (24.2 m) |
| Draught | 30 ft (9.1 m) (extra deep load) |
| Installed power |
|
| Propulsion | 2 shafts; 2 triple-expansion steam engines |
| Speed | 18 knots (33 km/h; 21 mph) |
| Range | 9,180 nmi (17,000 km; 10,560 mi) at 10 knots (19 km/h; 12 mph) |
| Complement |
|
| Armament |
|
| Armour |
|
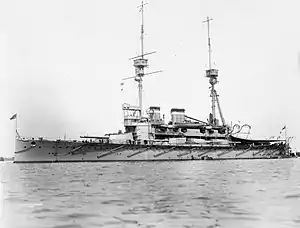
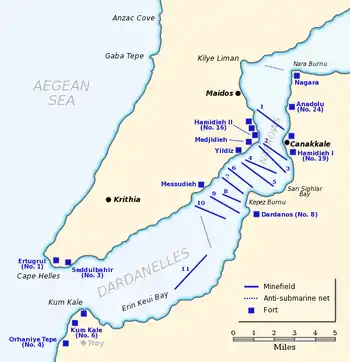
The Lord Nelson class consisted of a pair of pre-dreadnought battleships built for the Royal Navy in the first decade of the twentieth century. Although they were the last British pre-dreadnoughts, both were completed and commissioned well over a year after HMS Dreadnought had entered service in late 1906. Lord Nelson and Agamemnon were assigned to the Home Fleet when completed in 1908, with the former ship often serving as a flagship. The sister ships were transferred to the Channel Fleet when the First World War began in August 1914. They were transferred to the Mediterranean Sea in early 1915 to participate in the Dardanelles Campaign.
They remained there after the end of that campaign in 1916 and were assigned to the Eastern Mediterranean Squadron, which was later redesignated the Aegean Squadron, to prevent the ex-German battlecruiser Yavuz Sultan Selim and her consort, the light cruiser Midilli, from breaking out into the Mediterranean from the Dardanelles, although neither ship was present when the German ships made that attempt in early 1918. Both ships participated in the Occupation of Constantinople in November following the Armistice of Mudros which ended Turkish participation in the war. The sisters returned home in mid-1919 and were placed into reserve upon their arrival. Lord Nelson sold for scrap in 1920, but Agamemnon was converted into a radio-controlled target ship that year and continued in that role until being sold for scrap in early 1927, the last surviving British pre-dreadnought.
Background and design
Pioneering naval gunnery developments by Captain Percy Scott in the early 1900s were already pushing expected battle ranges out to an unprecedented 6,000 yards (5,500 m), a distance great enough to force gunners to wait for the shells to arrive before applying corrections for the next salvo. A related problem was that the shell splashes from the more numerous smaller weapons tended to obscure the splashes from the bigger guns. Either the smaller-calibre guns would have to hold their fire to wait for the slower-firing heavies, losing the advantage of their faster rate of fire, or it would be uncertain whether a splash was due to a heavy or a light gun, making ranging and aiming unreliable. Another problem was that longer-range torpedoes were expected to soon be in service and these would discourage ships from closing to ranges where the smaller guns' faster rate of fire would become preeminent. Keeping the range open generally negated the threat from torpedoes and further reinforced the need for heavy guns of a uniform calibre.[1]
After being appointed Director of Naval Construction in early 1902, Philip Watts and the Third Naval Lord and Controller of the Navy, Vice-Admiral William May conducted studies that revealed the destructive power of smaller guns such as the 6-inch (152 mm) was far smaller than that of larger guns like the 12-inch (305 mm). The greater damage inflicted at greater range by larger guns meant that there was a very real chance that the lightly protected smaller guns would be destroyed before they could open fire and that thicker armour was required over a greater area to resist large-calibre shells.[2]
The Board of Admiralty wished to keep the size of the 1903–1904 Naval Programme battleships to about the 14,000 long tons (14,000 t) of the earlier Duncan class and also required them to be able to use the drydocks at Chatham, Portsmouth and Devonport, even though these had been enlarged before the ships were completed. This latter requirement severely constrained the length and beam of the design. Preliminary design work began in mid-1902 and it became clear that a displacement at least equal to that of the preceding King Edward VII class would be required. Lacking a consensus on the design, May called a conference in November to discuss the way forward. The participants agreed to increase the armour to a maximum of 12 inches and the maximum displacement to 16,500 long tons (16,800 t), eliminated the three-calibre gun armament that had proven so unpopular in the King Edward VIIs in favour of a mix of 12-inch and 9.2-inch (234 mm) guns, and rejected the version armed with only 10-inch (254 mm) guns proposed by Watts.[3]
The Admiralty formally approved a 16,350-long-ton (16,610 t) design armed with four 12-inch and a dozen 9.2-inch guns on 6 August 1903, but revoked it in October when they discovered that it could not be docked at Chatham. As it was now too late to revise the design in time for the 1903–1904 Programme, the Admiralty ordered three more King Edward VII-class ships instead. Watts refined the design to ensure that it could enter the Chatham docks, which required reducing the number of 9.2-inch guns to only 10, and it was approved on 10 February 1904.[4] A planned third ship of the class was cancelled due to financial pressures arising from the purchase of the Swiftsure-class battleships.[5]
Description
_profile_drawing.png.webp)
The Lord Nelson-class ships had an overall length of 443 feet 6 inches (135.2 m), a beam of 79 feet 6 inches (24.2 m) and an extra deep load draught of 30 feet (9.1 m). They displaced 15,358 long tons (15,604 t) at normal load and 17,820 long tons (18,106 t) at deep load. Lord Nelson had a metacentric height of 5.27 feet (1.6 m) at extra deep load.[6] The Lord Nelson class "proved good seaboats and steady gun platforms, with excellent manoeuvrabiling qualities."[7] Their crew numbered 749–756 officers and ratings in peacetime and averaged 800 men during the war.[8]
The ships were powered by a pair of four-cylinder inverted vertical triple-expansion steam engines, each driving one four-bladed, 15-foot (4.6 m) screw, using steam provided by fifteen water-tube boilers that operated at a pressure of 275 psi (1,896 kPa; 19 kgf/cm2). The boilers were trunked into two funnels located amidships. The engines, rated at 16,750 indicated horsepower (12,490 kW), were intended to give a maximum speed of 18 knots (33 km/h; 21 mph), but both ships slightly exceeded their design speed, reaching 18.5–18.7 knots (34.3–34.6 km/h; 21.3–21.5 mph) during their sea trials. The Lord Nelsons were the first British battleships to be built with fuel oil sprayers to increase the burn rate of the coal. They carried a maximum of 2,170–2,193 long tons (2,205–2,228 t) of coal and an additional 1,048–1,090 long tons (1,065–1,107 t) of fuel oil in tanks in their double bottom. At a cruising speed of 10 knots (19 km/h; 12 mph), the ships had a range of 5,390 nautical miles (9,980 km; 6,200 mi) burning only coal and 9,180 nmi (17,000 km; 10,560 mi) using coal and oil.[9]
Armament
_12-inch_gun_replacement_at_Malta_1915.jpg.webp)
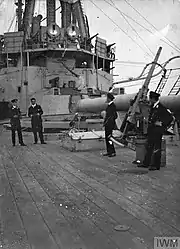
The main armament of the Lord Nelson-class ships consisted of four 45-calibre breech-loading (BL) 12-inch Mark X guns in a pair of twin-gun turrets, one each fore and aft of the superstructure. The guns had a maximum elevation of +13.5° which gave them a range of 16,450 yards (15,042 m). They fired 850-pound (386 kg) projectiles at a muzzle velocity of 2,746 ft/s (837 m/s) at a rate of two rounds per minute.[10] The ships carried 80 shells per gun.[8]
Their secondary armament consisted of ten 50-calibre BL 9.2-inch Mk XI guns. They were mounted in four twin-gun turrets positioned at the corners of the superstructure and a pair of single-gun turrets amidships. The guns were limited to an elevation of +15° which gave their 380-pound (172 kg) shells a range of 16,200 yards (14,800 m). They had a muzzle velocity of 2,875 ft/s (876 m/s) and a maximum rate of fire of four rounds per minute.[11] Each gun was provided with 100 rounds.[8] For defence against torpedo boats, the ships carried two dozen 50-calibre quick-firing (QF) 12-pounder (3 in (76 mm)) 18 cwt guns[Note 1] in single mounts in the superstructure.[12] At an elevation of +20°, their 2,660 ft/s (810 m/s) muzzle velocity gave the guns a range of 9,300 yd (8,500 m) with their 12.5-pound (6 kg) projectiles.[13] The ships were also fitted with 10 QF 3-pounder (47 mm (1.9 in)) Hotchkiss guns, two in the superstructure and the others on the turret roofs.[14] They were equipped with five submerged 18-inch (450 mm) torpedo tubes, two on each broadside and one in the stern,[15] and carried 23 torpedoes for them.[8]
Armour

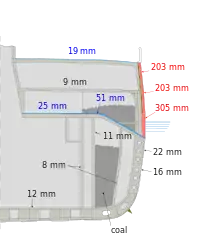
The Lord Nelsons' armour scheme was derived from that of the King Edward VII class, although the vertical armour was generally thicker and the deck armour slightly thinner. The waterline main belt was composed of Krupp cemented armour (KCA) 12-inches thick, although it thinned to 6 inches (152 mm) at its lower edge. It was 7 feet (2.1 m) high of which 5 feet (1.5 m) was below the waterline at normal load. The thickest portion of the belt extended for approximately 190 feet (57.9 m) amidships, from the rear of the forward 12-inch barbette to abreast the rear main-gun barbette. It was 4 inches (102 mm) thick from there to the stern while the portion abreast the forward barbette was 9 inches (229 mm) thick and then reduced to 6 inches to the bow. Below the belt at the stem, a 2-inch (51 mm) strake of armour projected downwards to support the ship's plow-type ram. The middle strake consisted of 8-inch (203 mm) armour plates; it continued forward to the bow, albeit in 6- then 4-inch thicknesses. Aft it terminated in an oblique 8-inch bulkhead that connected the armour to the aft barbette. The upper strake of armour was also 8 inches thick, but only covered the area between the main-gun barbettes with oblique bulkheads of the same thickness connecting the side armour to the barbettes to form the armoured citadel.[16]
The main gun turret faces and sides were 12 inches thick and their roofs were protected by 3- and 4-inch plates. Their barbettes also had 12 inches of armour on their external faces down to the main deck. Below this the forward barbette's armour reduced to 8 inches down to the middle deck while the aft barbette retained its full thickness down to the middle deck. The inner faces of the barbettes were 3 or 4 inches thick for the forward barbette and 3 inches thick for the aft barbette. The 9.2-inch gun turret faces had 8-inch armour plating, their sides were 7 inches (178 mm) thick and they had 2-inch thick roofs. The turrets sat on 6-inch thick armoured bases and their ammunition hoists were protected by 2-inch armoured tubes.[17]
The upper deck over the citadel was 0.75 inches (19 mm) thick and the main deck forward of the citadel to the bow had a thickness of 1.5 inches (38 mm) inches. The middle deck inside the citadel was 1 inch (25 mm) thick on the flat, but 2 inches thick where it sloped downwards to meet the bottom edge of the waterline belt. The lower deck was 4 inches thick where it sloped upwards to meet the bases of the main-gun barbettes, but was otherwise 1 inch thick forward of the citadel. Aft it ranged in thickness from 2 inches on the flat and 3 inches on the slope to protect the steering gear.[17] The forward conning tower was protected by 12 inches of armour on its sides and it had a 3-inch roof. The aft conning tower had 3-inch armour plates all around. The Lord Nelsons were the first British ships fitted with unpierced watertight bulkheads for all main compartments with access gained by using lifts. In service the inconvenience of this feature for the crew, especially in the engine and boiler rooms, led to its abandonment in the next generation of battleships.[18]
Naval historian R. A. Burt assessed the greatest weaknesses of their armour scheme as the waterline belt being submerged at deep load and the reduction in the thickness of the barbette armour below the upper deck. He believed that this made the ships' magazines vulnerable to plunging fire from long range.[19]
Modifications

Modifications to the sisters before 1920 were relatively minor. In 1909 the number of 3-pounders was reduced to four in Agamemnon and two in Lord Nelson. In 1910–1911 a rangefinder was installed of the roof of the forward turret in both ships and another was added to the spotting top in Agamemnon. The following year Lord Nelson had her spotting top modified to accommodate one as well. In 1913–1914 the ship had an additional rangefinder added to her bridge. The remaining 3-pounders were removed from the ships in 1914–1915 as were the rooftop and bridge rangefinders. A pair of 12-pounders were removed from the after superstructure in exchange for a pair of 3-pounder Hotchkiss guns on high-angle mounts. In 1916–1917, four 12-pounders were removed from the forward superstructure in Agamemnon while Lord Nelson only lost two. That ship lost two more from her aft superstructure in 1918.[20]
Early in 1919 the Admiralty decided that the Navy needed a radio-controlled target ship to properly train gunnery officers. It conducted tests to evaluate the effectiveness of 15-inch (380 mm) shells on armour plates as thick as the typical pre-dreadnought deck armour. At an equivalent range of 25,230 yards (23,070 m), the plates were completely destroyed and the Admiralty realized that 15-inch shells would do much the same to any of the surplus early dreadnoughts. It then limited all gunnery practice against the target ships to a maximum of 6-inch shells. Agamemnon was selected as the target ship in 1920 and was modified to suit her new role, including the installation of wireless equipment. She was disarmed and her 9.2-inch gun turrets were removed, but not her main-gun turrets. Most of her internal openings were plated over and much internal equipment was removed. Concerned about her stability with the loss of a lot of topweight, 1,000 long tons (1,016 t) of ballast were added low in the ship and Agamemnon was inclined to measure her stability. With a displacement of 14,185 long tons (14,413 t), the ship had a metacentric height of 8.56 feet (2.6 m).[21]
Ships
| Name | Builder[22] | Laid down[22] | Launched[22] | Commissioned[23] | Fate[24] | Cost (including armament)[25] |
|---|---|---|---|---|---|---|
| Lord Nelson | Palmers, Jarrow | 18 May 1905 | 4 September 1906 | 1 December 1908 | Sold for scrap, 4 June 1920 | £1,651,339 |
| Agamemnon | Beardmore, Dalmuir | 15 May 1905 | 23 June 1906 | 25 June 1908 | Sold for scrap, 1927 | £1,652,347 |
Service history

Construction of the ships was seriously delayed when their main-gun turrets were transferred to HMS Dreadnought, then under construction, to allow her to be finished more quickly.[26] Both ships commissioned in 1908, the last pre-dreadnoughts in the Royal Navy to do so, and were assigned to the Home Fleet until 1914. Lord Nelson became flagship of the vice-admiral commanding the Nore Division of the Home Fleet at the beginning of 1909, but became a private ship in early 1914. After the First World War began later that year, the sisters were assigned to the Channel Fleet, with Lord Nelson becoming the fleet flagship. The fleet was initially tasked with covering the passage of the British Expeditionary Force across the English Channel. Both ships were transferred to the Mediterranean in 1915 to support Allied forces in the Dardanelles Campaign and to help blockade the German battlecruiser Goeben. Lord Nelson became flagship of the Dardanelles Squadron, later redesignated as the Eastern Mediterranean Squadron in January 1916 and then the Aegean Squadron in August 1917, a few months after her arrival.[23]
_9.2-inch_gun_firing_on_Sedd_el_Bahr_4_March_1915.jpg.webp)
The sisters participated in numerous bombardments of Turkish forts and positions between their arrival in February and May during which they were slightly damaged by Turkish guns. Agamemnon was withdrawn to Malta for repairs that lasted several months while Lord Nelson was repaired locally. After the evacuation of Gallipoli at the beginning of 1916 they were assigned to the Eastern Mediterranean Squadron which was tasked to guard against a breakout attempt by Goeben and Breslau, now transferred to the Ottoman Navy and renamed Yavûz Sultân Selîm and Mdilli, respectively, support the Allied forces in the Macedonian front and defend the various Greek islands occupied by the Allies. Lord Nelson was mostly based in Salonica, Greece, while Agamemnon was mainly based at Mudros on the island of Lemnos, although they sometimes alternated. The latter ship shot down the German Zeppelin LZ85 during a bombing mission over Salonica in mid-1916. When Yavuz Sultan Selim and Midilli attempted to sortie into the Mediterranean at the beginning of 1918, neither battleship was able to reach Imbros before the Ottoman ships sank the two monitors based there during the Battle of Imbros. While heading towards Mudros, the ships entered a minefield; Midilli sank after striking multiple mines and Yavuz Sultan Selim struck several, but was able to withdraw back to the Dardanelles.[23]
On 30 October 1918 the Ottoman Empire signed the Armistice of Mudros on board Agamemnon and she participated in the occupation of Constantinople the following month. Agamemnon remained there until she returned home in March 1919, while Lord Nelson spent a short time in the Black Sea before returning two months later. Both ships were reduced to reserve upon their arrival. Lord Nelson was sold for scrap in June 1920, but Agamemnon was converted into a radio-controlled target ship in 1920–1921. She was sold for scrap in her turn in early 1927, the last surviving British pre-dreadnought.[23]
Notes
- ↑ "Cwt" is the abbreviation for hundredweight, 18 cwt referring to the weight of the gun.
Citations
- ↑ Brown, pp. 180–182
- ↑ Burt, p. 312
- ↑ Burt, pp. 312–313; McBride, pp. 66–67
- ↑ McBride, pp. 69–71
- ↑ Dodson, p. 102
- ↑ Burt, pp. 319, 321
- ↑ Parkes, p. 454
- 1 2 3 4 Burt, p. 319
- ↑ Burt, pp. 319, 324–325
- ↑ Friedman 2011, pp. 59–61.
- ↑ Friedman 2011, pp. 72–73
- ↑ Burt, pp. 319–320
- ↑ Friedman 2011, pp. 112–113
- ↑ Friedman 2019, p. 416
- ↑ "Lord Nelson Class Battleship (1906)". www.dreadnoughtproject.org. The Dreadnought Project. Retrieved 28 June 2019.
- ↑ Burt, pp. 324–325
- 1 2 Burt, p. 325; Parkes, p. 452
- ↑ Burt, pp. 321, 324–325; Parkes, p. 452
- ↑ Burt, p. 321
- ↑ Burt, pp. 326–327
- ↑ Burt, pp. 328–329
- 1 2 3 Roberts, p. 40
- 1 2 3 4 Burt, pp. 331–332
- ↑ Burt, p. 332
- ↑ Parkes, p. 451
- ↑ McBride, p. 72
Bibliography
- Brown, David K. (1997). Warrior to Dreadnought: Warship Development 1860–1905. London: Chatham Publishing. ISBN 1-84067-529-2.
- Burt, R. A. (2013). British Battleships 1889–1904 (2nd ed.). Annapolis, Maryland: Naval Institute Press. ISBN 978-1-59114-065-8.
- Dodson, Aidan (2018). Before the Battlecruiser: The Big Cruiser in the World's Navies 1865-1910. Barnsley, South Yorkshire, UK: Seaforth. ISBN 978-1-47389216-3.
- Friedman, Norman (2015). The British Battleship 1906–1946. Barnsley, UK: Seaforth Publishing. ISBN 978-1-84832-225-7.
- Friedman, Norman (2011). Naval Weapons of World War One. Barnsley, UK: Seaforth. ISBN 978-1-84832-100-7.
- McBride, Keith (2005). "Lord Nelson and Agamemnon". In Jordan, John (ed.). Warship 2005. London: Conway. pp. 66–72. ISBN 1-84486-003-5.
- Parkes, Oscar (1990). British Battleships (reprint of the 1957 ed.). Annapolis, Maryland: Naval Institute Press. ISBN 1-55750-075-4.
- Roberts, John (1979). "Great Britain (including Empire Forces)". In Gardiner, Robert (ed.). Conway's All the World's Fighting Ships 1860–1905. Greenwich: Conway Maritime Press. pp. 1–113. ISBN 0-8317-0302-4.