| Operation Chronicle | |||||||
|---|---|---|---|---|---|---|---|
| Part of World War II, Pacific War | |||||||
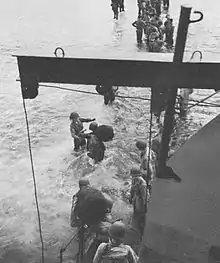
 American troops disembarking from an LCI | |||||||
| |||||||
| Belligerents | |||||||
|
|
| ||||||
| Commanders and leaders | |||||||
| Walter Krueger | Hatazō Adachi | ||||||
| Strength | |||||||
| ~16,800 | 0 | ||||||
| Casualties and losses | |||||||
| 0 | |||||||
Operation Chronicle was the Allied invasion of Woodlark and Kiriwina Islands, in the South West Pacific, during World War II. The operation was a subordinate action that formed part of the wider Operation Cartwheel, the advance towards Rabaul. An early planning name for this operation was Operation Coronet. Preliminary actions commenced on 23–24 June 1943 when small reconnaissance parties were landed on both islands. The main operation was executed without opposition on 30 June 1943. Around 16,800 personnel took part, divided into two forces. The United States Army provided the majority of ground troops, which were supported by a United States Marine Corps defense battalion as well as U.S. and Australian aircraft and naval vessels.
The two islands were subsequently developed by U.S. naval construction battalions and engineers who constructed airfields and PT boat bases. United States Army Air Force aircraft arrived on Woodlark in mid-July, while Royal Australian Air Force aircraft began operations from Kiriwina in August. Ultimately, though, the islands played only a limited role in the Allied offensive against Rabaul as the Allied advance pushed further west.
Background
Planning and readiness
By mid-1943, the fighting in New Guinea was turning in favor of the Allies after a period of hard fighting. The Japanese drive on Port Moresby during mid-1942 and early 1943 had been defeated during the Battle of the Coral Sea and the Kokoda Track campaign,[1] while the Japanese beachhead at Buna–Gona had also been destroyed, albeit with heavy casualties on both sides.[2] Subsequently, the Japanese had been forced to abandon their efforts on Guadalcanal and the Allies had secured the Salamaua region,[3][4] and began planning their advance towards the main Japanese base around Rabaul.[5]
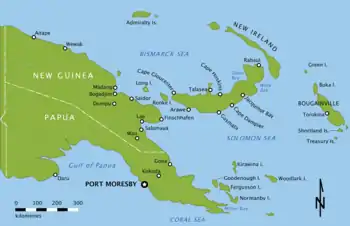
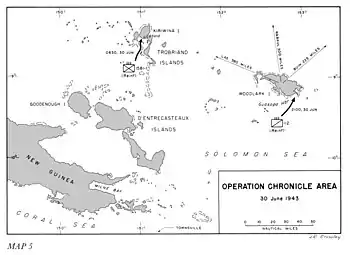
Kiriwina and Woodlark Islands are situated in the Solomon Sea, in a group of islands that lie northeast of the Papuan coast. Kiriwina lies about 125 miles (201 km) from New Britain while Woodlark is 200 miles (320 km) from Bouganville. The location of these islands drew the attention of Allied planners who sought bases closer to Japanese targets in the Solomon Islands and around Rabaul, in order to increase the payloads Allied bombers could carry and to provide these aircraft with fighter escorts.[6]
During the planning stage, the operation was initially designated as "Coronet", but eventually the codename "Chronicle" was adopted.[7] Initial planning for the seizure of Woodlark and Kiriwina was undertaken in May 1943 at General Walter Krueger's Sixth Army headquarters in Brisbane, Australia. General Douglas MacArthur gave command of the landings to Krueger as well as responsibility for the co-ordination of ground, air, and naval planning. Woodlark and Kiriwina were required as future airfield sites to support operations in both New Guinea, New Britain and the Solomon Islands as part of the wider Operation Cartwheel, during which the Allies planned to advance towards the main Japanese base around Rabaul. The invasion was the first amphibious movement undertaken by the Allies in the South West Pacific Area with thorough and comprehensive planning, which became standing operating procedure for future invasions.[8]

Assigned forces
Japanese forces in the New Guinea area were drawn from the 18th Army. This formation was commanded by General Hatazō Adachi, and was headquarters at Madang. This force was focused upon the mainland where it was attempting to defend a broad area between Wewak, Madang, Finschhafen, Salamaua and Lae, while also preparing to carry out offensive operations around Wau, its surrounds and in the Markham and Sepik Valleys. There were no Japanese troops on either Woodlark or Kiriwina at the time of the operation.[9]
In total 16,800 Allied personnel were assigned to the operation, with the majority of ground troops coming from Krueger's Sixth Army, which had been designated as Alamo Force. Naval support was provided by Rear Admiral Victor Crutchley's Task Force 74, which served as the covering force, while Rear Admiral Daniel E. Barbey's Task Force 76 served as the amphibious landing force. While the majority of the ships assigned were supplied by the United States Navy, Crutchley was a Royal Navy officer and his force included four Royal Australian Navy vessels.[7][10] Air support for the operation was split between the United States Army Air Forces V Bomber Command and the Royal Australian Air Force (RAAF) 1st Tactical Air Force and No. 9 Operational Group. The V Bomber Command was to bomb the Japanese airfields at Rabaul, each night from 25 through 30 June and be called upon to support the invasion fleet and provide close infantry support as required. The RAAF was to provide fighter cover as requested.[11]
Prelude
Reconnaissance parties landed on Woodlark and Kiriwina in May and reported that there were no Japanese troops occupying the islands. Due to a delay in gathering the units assigned to the operation together, as they were spread across the north of Australia and New Guinea, D-Day was set for 30 June 1943.[12] In the interim, an RAAF radar unit was established on Kiriwina in May,[13] while the landings were timed to take place in conjunction with similar operations at Nassau Bay, in New Guinea, and on Rendova, in New Georgia.[14]
While the Sixth Army did not expect any Japanese troops to contest the landings, they were conducted as combat operations. Krueger and Barbey chose this approach to test their amphibious tactics and as a precaution in case the landings were opposed. The Allied soldiers assigned to the attack were encouraged to believe that Japanese troops would be encountered.[15] It was expected that the Japanese would conduct air attacks on the invasion forces and logistical bases in New Guinea, and No. 73 Wing RAAF with three fighter squadrons was transferred to Goodenough Island to provide air defence for the region. RAAF aircraft were also assigned to conduct anti-submarine patrols.[16]
An advance party of 112th Cavalry Regiment under the command of Major D. M. McMains, left Milne Bay at 16:00 on 22 June 1943 aboard the destroyer transports Brooks and Humphreys bound for Woodlark. Arriving at Guasopa at 00:32 on 23 June, the U.S. troops landed in six Landing Craft, Personnel (Ramped) (LCP(R)). The destroyer transports left at 04:00 for Milne Bay. An Australian coastwatcher, not having been informed of the landing, almost attacked the landing force with his locally recruited guerrilla force until overhearing the troops' broad accents.[17] The advance party undertook reconnaissance, established defenses and facilities for the invasion force, marked the landing beaches, and cleared obstructions in preparation for the main landing.[18][19]
The 158th Infantry Regiment's advance party, under the command of Lieutenant Colonel Floyd G. Powell, departed Milne Bay at 18:10 on 23 June aboard the returned Brooks and Humphreys. They were accompanied by a detachment of the 59th Combat Engineer Company and the 158th Infantry Regiment's communication platoon.[17] Arriving at Kiriwina at midnight on 24 June, they landed in several LCP(R)s via a channel that passed through the reef to the beach at Losuia, on Kiriwina. The unloading proved slow, due to inexperience, and the ships had not been emptied before daylight came. This brought the threat of air attack and meant that the ships were forced to depart partially loaded. Nevertheless, they returned three nights later to unload the heavy communication and engineer equipment left in their holds. The advance party built a coral causeway across the reef to allow landing.[18]
Landings

Woodlark
On 25 June 2,600 troops of Woodlark Force, led by Colonel Julian W. Cunningham, consisting of units of the 112th Cavalry Regiment, the 134th Field Artillery Battalion, the Marine 12th Defense Battalion (Lieutenant Colonel William H. Harrison) and quartermaster, port, ordnance, medical, and engineer units, a naval base unit and a construction battalion departed Townsville, Australia, aboard six LSTs, with one subchaser SC-749 and two destroyers, Bagley and Henley, as escort.[18]
After arriving at Woodlark, the landing began at 21:00 on 30 June. The operation was unopposed and unloading was completed quickly. Prior to embarkation, all equipment had been loaded aboard trucks, which meant that they could be driven straight off the LSTs. This allowed the quick turn around of the transport force, which was able to depart Woodlark before sunrise, thereby avoiding possible air attack.[18]
Meanwhile, Brooks and Humphreys carrying other troops from Milne Bay arrived at 01:00 on 1 July. The process of embarking troops aboard the Landing Craft Infantry (LCI) amphibious assault ships was delayed over an hour, while the run ashore was slowed as the coxswains on the LCIs became disoriented and had trouble locating the correct landing beach. As a result, the two transports remained off shore until 06:00. Further supply echelons subsequently arrived in LCIs and LSTs throughout 1 July.[18]
Kiriwina
On 30 June, 2,250 troops of Kiriwina Force, led by Colonel J. Prugh Herndon, consisting of the 158th Infantry Regiment (less the 2d Battalion) the 148th Field Artillery Battalion with other artillery, engineer, ordnance, medical, antiaircraft, and quartermaster troops departed Milne Bay aboard twelve LCIs. They were escorted by two destroyers and two small coastal transports. Arriving at Red Beach near Losuia, Kiriwina, the landing commenced around dawn. Although the landing was unopposed, as it was on Woodlark, the unloading process proved slow. The LCIs coming ashore became grounded several hundred yards short of the beach, and only one of the LCTs was able to pass over the sandbar that lay offshore. Heavy rain and a low tide also hampered the movement of vehicles, stores and equipment ashore. Subsequent waves were diverted to the northern shore, where a coral causeway had been constructed by the advance party to aid the unloading of vehicles. A supply echelon arrived on 30 June consisting of twelve LCTs and seven LCMs, having laid up overnight at Goodenough Island, and having been screened by other four destroyers and the Australian survey ship Benalla.[20][19]
Aftermath
Japanese reaction
Except for reconnaissance flights and two small bombing attacks against Woodlark, the Japanese took no further action in relation to the occupation of the islands.[21] According to historian Samuel Eliot Morison, this was due to the operation being timed to coincide with other operations in New Guinea and New Georgia.[19] An air raid conducted by two Japanese aircraft on 2 August resulted in four members of the 112th Cavalry Regiment being wounded; these were the regiment's first combat casualties.[22] Due to the modest scale of the Japanese air attacks, the three Australian fighter squadrons at Goodenough Island were not required, much to the surprise of their pilots.[23]
Base development
On Woodlark, the construction of Woodlark Airfield was begun by 20th and 60th U.S. Naval Construction Battalions on 2 July and by 14 July the airfield consisted of single 3,000-by-150-foot (910 by 50 m) runway which could accommodate Douglas C-47 Skytrains. By 21 July the runway was expanded to 5,200 feet (1,580 m) of runway and a coral surface with the 67th Fighter Squadron arriving on 23 July. The airfield was ultimately extended to 6,500 by 225 feet (1,980 by 70 m) with a parallel runway of 6,000 by 60 feet (1,830 by 20 m) with 110 hardstands. The airfield was used as a stopover point and refueling point.[24] Defensive positions were set up around Woodlark with antiaircraft and coastal artillery pieces of the 12th Defense Battalion being installed, and machine gun and 37 mm beach positions established. A PT boat and landing craft repair base was also constructed at Guasopa Bay and the island was also used as a supply base.[25] The 112th Cavalry Regiment remained at Woodlark until late November 1943; during this time it received additional amphibious training.[26] Little other training was conducted, however, and most of the regiment's troopers did not fire their rifles while they were on the island.[27]

On Kiriwina, due to the difficulty of landing heavy engineering equipment the construction of Kiriwina airfield was delayed. With heavy rains hindering construction, Krueger became unhappy with the progress of the works and replaced Herndon in command of Kiriwina Force with Colonel John T. Murray. By 20 July a single 1,500-by-150-foot (460 by 50 m) runway was cleared and roughly graded. By the end of July the runway was 5,000 feet (1,500 m) long and ready to be surfaced with coral. No. 79 Squadron of the RAAF began operations on 18 August.[21] A seaplane base was also constructed at Losuia, consisting of an anchorage and jetty. A PT boat base was also constructed at Louisa in October 1943, but was closed in February 1944. The island was also used as a supply base.[13]
Ultimately, the progress of the Allied advance in the Pacific, with the fighting moving further west, meant that none of these bases played a significant role in the Allied war effort. Nevertheless, Morison argues that the landings were successfully undertaken and served the purpose of providing the Allied amphibious forces with the opportunity to test theories and gain experience that would prove vital later in the war.[19] Australian official historian G. Hermon Gill reached a similar conclusion.[28] In contrast, American historian James Scott Powell has noted that Operation Chronicle had mixed effects on the 112th Cavalry Regiment: while the operation improved its ability to conduct amphibious landings and operate in jungle terrain, the demands of landing on and garrisoning Woodlark limited the opportunities its men had to conduct other forms of training before entering combat.[29]
Order of battle
|
|
Citations
- ↑ James (2013), p. 202
- ↑ Keogh (1965), pp. 271–277
- ↑ Miller (1959), p. 6
- ↑ James (2014), pp. 186–209
- ↑ Keogh (1965), p. 290
- ↑ Morison (1950), p. 132
- 1 2 Chant, Christopher. "Operation Coronet". Operations of World War 2. Retrieved 27 June 2020.
- ↑ Miller (1959), pp. 49–50
- ↑ Miller (1959), pp. 55 & 63
- ↑ Miller (1959), p. 51
- 1 2 Miller (1959), p. 53
- ↑ Miller (1959), p. 54
- 1 2 Rottman (2002a), p. 171
- ↑ Morison (1950), pp. 132 & 134
- ↑ Powell (2006), pp. 52–55
- ↑ Odgers (1968), p. 33
- 1 2 Miller (1959), p. 55
- 1 2 3 4 5 Miller (1959), p. 56
- 1 2 3 4 Morison (1950), p. 134
- ↑ Miller (1959), p. 57
- 1 2 Miller (1959), p. 59
- ↑ Powell (2006), pp. 61–62
- ↑ Odgers (1968), p. 34
- ↑ Miller (1959), p. 58
- ↑ Rottman (2002a), p. 172.
- ↑ Rottman (2009), p. 22
- ↑ Powell (2006), p. 62
- ↑ Gill (1968), p. 285
- ↑ Powell (2006), pp. 63–64
- ↑ Bureau of Yards and Docks (1947), p. 291
- ↑ Rottman (2002b), p. 290
- ↑ Miller (1959), pp. 53–54
- ↑ Shaw & Kane (1963), p. 62
- ↑ Miller (1959), pp. 51 & 54
- ↑ Morison (1950), pp. 133–134
- ↑ Chant, Christopher. "Operation Chronicle". Operations of World War 2. Retrieved 27 June 2020.
References
- Bureau of Yards and Docks (1947). Building the Navy's Bases in World War II. History of the Bureau of Yards and Docks and the Civil Engineer Corps, 1940–1964. Vol. II. Washington DC: Department of the Navy. OCLC 921920587.
- Gill, G Herman (1968). Royal Australian Navy, 1942–1945. Australia in the War of 1939–1945. Vol. Series 2 – Navy. Volume II. Canberra: Australian War Memorial. OCLC 65475.
- James, Karl (2013). "On Australia's Doorstep: Kokoda and Milne Bay". In Dean, Peter (ed.). Australia 1942: In the Shadow of War. Port Melbourne, Victoria: Cambridge University Press. pp. 199–215. ISBN 978-1-10703-227-9.
- James, Karl (2014). "The 'Salamaua Magnet'". In Dean, Peter (ed.). Australia 1943: The Liberation of New Guinea. Port Melbourne, Victoria: Cambridge University Press. pp. 186–209. ISBN 978-1-107-03799-1.
- Miller, John Jr. (1959). "Cartwheel: The Reduction of Rabaul". United States Army in World War II: The War in the Pacific. Office of the Chief of Military History, U.S. Department of the Army. OCLC 494892065. Retrieved 5 December 2009.
- Morison, Samuel Eliot (1958). Breaking the Bismarcks Barrier, vol. 6 of History of United States Naval Operations in World War II. Castle Books. ISBN 0-7858-1307-1.
- Odgers, George (1968) [1957]. Air War Against Japan, 1943–1945. Australia in the War of 1939–1945. Vol. Series 3 – Air. Volume II. Canberra: Australian War Memorial. OCLC 1990609.
- Powell, James Scott (2006). Learning Under Fire: A Combat Unit in the Southwest Pacific (PhD dissertation). College Station: Texas A&M University. hdl:1969.1/4237. OCLC 86115462.
- Rottman, Gordon L. (2002a). World War II Pacific Island Guide: A Geo-military Study. Westport: Greenwood Press. ISBN 0-313-31395-4.
- Rottman, Gordon L. (2002b). U.S. Marine Corps World War II Order of Battle: Ground and Air Units in the Pacific War, 1939–1945. Greenwood. ISBN 978-0-31331-906-8.
- Rottman, Gordon L. (2009). World War II US Cavalry Units: Pacific Theater. Oxford: Osprey Publishing. ISBN 978-1-84603-451-0.
- Shaw, Henry I.; Douglas T. Kane (1963). "Volume II: Isolation of Rabaul". History of U.S. Marine Corps Operations in World War II. OCLC 80151865. Retrieved 27 June 2020.