| Siege of Stirling Castle | |||||||
|---|---|---|---|---|---|---|---|
| Part of Jacobite rising of 1745 | |||||||
 Stirling Castle | |||||||
| |||||||
| Belligerents | |||||||
|
|
| ||||||
| Commanders and leaders | |||||||
|
|
| ||||||
| Strength | |||||||
| 8,000 - 9,000 | 700 | ||||||
The siege of Stirling Castle took place from 8 January to 1 February 1746, during the 1745 Rising, when a Jacobite force besieged Stirling Castle, held by a government garrison under William Blakeney.
Despite defeating a relief force under Henry Hawley at Falkirk Muir on 17 January, the siege made little progress; when Cumberland's army began advancing north from Edinburgh, it was abandoned and on 1 February the Jacobites withdrew to Inverness.
Background

One of the strongest fortifications in Scotland, Stirling Castle controlled access between the Highlands and the Lowlands.[1] In September 1745, the Jacobite army passed nearby en route to Edinburgh, but had neither the time nor the equipment needed to take it.[2] Leaving Viscount Strathallan in Perth to recruit additional forces, the main army crossed into England on 8 November and reached Derby on 5 December before turning back, entering Glasgow on 26 December.[3]
While its only tangible result was the capture of Carlisle, advancing into central England and successfully returning was a significant achievement. In late November, Strathallan was replaced by his cousin John Drummond, who arrived from France with additional weapons, money and 150 Irish and Scots regulars. As a serving officer in the French army, he had been ordered not to enter England until all fortresses held by British government troops in Scotland had been taken.[4]
Victory over pro-government militia at Inverurie on 23 December gave the Jacobites control of the North-East and by early January 1746, their military strength and morale was at its peak.[5] Charles wanted to relieve Carlisle, pinning his hopes on a letter from his brother Henry with details of a proposed French landing in Southern England. However, the Scots no longer believed his assurances and in early January, two officers from the garrison brought news of Carlisle's surrender. Since its relief was now irrelevant, they agreed to build on Inverurie and take control of the Central Lowlands.[6]
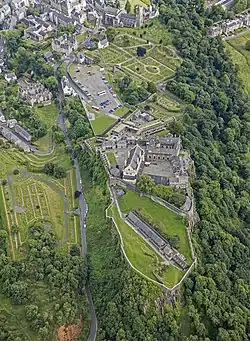
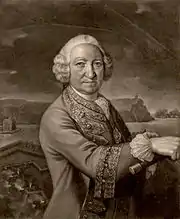
Their objective was Stirling, whose capture would provide a strong base and secure port for a second invasion of England.[7] As was then usual, its defences were divided between the castle and the town, which was only intended to resist for a few days. The castle was a far greater challenge; its natural defences were enhanced by strong modern fortifications, with a garrison of 600 to 700 commanded by William Blakeney. An experienced and determined Irish veteran, he wrote to Prime Minister Henry Pelham on 18 October stating his confidence it would be held.[8]
Crucially, the Jacobites lacked siege equipment; they failed to take Edinburgh Castle despite holding the town for nearly two months, while Carlisle, a decayed former border fortress defended by 80 elderly pensioners, surrendered when they were on the verge of ending the siege.[9] Stirling was significantly stronger and better defended than either, while even the vastly better equipped government army found retaking Carlisle far from easy. Many senior Jacobites, including James Johnstone, considered the attempt futile.[10]
The siege

The Jacobite field artillery was commanded by Colonel James Grant, a Scots-born officer in French service who had arrived in October with a number of trained gunners; but these were too few and too light to make any impact on the castle walls.[11] In November, Mirabel de Gordon, a French engineer of Scots descent, landed at Montrose with a small number of heavier guns, including two 18 pounders. De Gordon arrived at Stirling on 6 January to supervise siege operations, but his artillery did not arrive until 14 January and in the end never saw action.[12] He was widely regarded as incompetent, a view reinforced by the failure to capture Fort William in March.[13]
On 17 January, an attempt by Henry Hawley to break the siege was defeated at Falkirk, a battle that started late in the afternoon in falling light and heavy snow and which was marked by confusion on both sides. The bulk of Hawley's troops retreated to Edinburgh in good order, assisted by the Highlanders stopping to loot the baggage train; it caused considerable embarrassment and led to disciplinary action, but neither Hawley nor Cumberland viewed it as a defeat.[14]
It has been suggested a better option for the Jacobites would have been to pursue Hawley, thus isolating Stirling and forcing it to surrender. Lord Elcho recorded this was the opinion of the clan chiefs, although most historians feel it was unlikely to have changed the outcome. Failure to achieve a decisive victory led to recriminations between Lord George Murray, Prince Charles and John O'Sullivan.[15] In the end, the battle did little to change the strategic position, but further damaged the strained relationship between Charles and his Scottish officers, who were left in Falkirk with the clan regiments.[16]
When the heavy guns arrived on 14 January, Grant proposed emplacing them near the town cemetery, where they would be nearly level with the castle fortifications, but Charles opted for De Gordon's recommendation they be located on Gowan Hill. This allowed them to fire on the castle in relative safety, but the shallow bedrock at this location meant the gun positions had to be built using sacks of earth and wool. Transporting these was slow, difficult and dangerous, while the walls at this point were above a near vertical cliff, almost impossible to assault.[17]

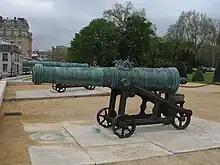
The troops employed on construction duties suffered daily casualties from mortar fire, although Blakeney reportedly minimised this, not wishing to discourage them from investing so much effort in poorly-sited positions. By now, opinion among the Jacobites was allegedly divided as to whether De Gordon was incompetent or had been bribed.[18] Although the garrison was on short rations, the besiegers were also low on supplies and Gordon finally opened fire on 30 January, with only three of his six guns in place. Blakeney promptly responded with highly accurate counter-battery fire; the Jacobite guns were soon dismounted and in less than half an hour the battery was abandoned, as "no one could approach it without meeting certain destruction".[19] One of the cannon was found afterwards to have been hit no less than nine times, some gouges being "of surprising depth".[20]
On 30 January, Charles learned Cumberland was advancing north from Edinburgh; seeing an opportunity for a decisive battle, he sent John Murray of Broughton to ask Lord George Murray to prepare a battle plan.[21] However, the clan chiefs had been unable to prevent large numbers of their Highlanders returning home for the winter; they told Charles the army was in no state to fight a battle, and advised they retreat to Inverness, providing them time to rest and recruit more soldiers.[22] Charles reluctantly complied, but this destroyed the last remnants of trust between the two parties; on 1 February 1746, the siege was abandoned, and the Jacobite army withdrew.[23]
Aftermath

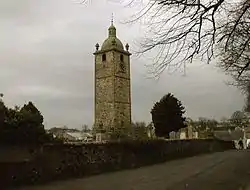
The Jacobites had been using the nearby church of St Ninians to store munitions, which blew up during the retreat; despite later claims it was deliberate, it seems more likely the explosion was due to carelessness when moving the stores.[24] John Cameron, minister to Lochiel's regiment, was passing the church in a carriage with Murray of Broughton's wife when it blew up; she was thrown from the chaise and concussed, while nine townspeople and a number of Jacobites were buried in the ruins.[25]
Cumberland's army advanced along the coast, allowing it to be resupplied by sea, and entered Aberdeen on 27 February; both sides halted operations until the weather improved. By spring, the Jacobites were short of food, money and weapons and when Cumberland left Aberdeen on 8 April, Charles and his senior officers agreed that giving battle was their best option. The Battle of Culloden on 16 April lasted less than an hour and ended in a decisive government victory.[26]
An estimated 1,500 survivors assembled at Ruthven Barracks, but on 20 April Charles ordered them to disperse, arguing that French assistance was required to continue the fight and they should return home until he returned with additional support. He was picked up by a French ship on 20 September but never returned to Scotland.[27]
Blakeney, who previously found promotion extremely slow, was rewarded for his defence by promotion to Lieutenant-General and appointment as Lieutenant-Governor of the then British-held island of Menorca. He was in command when it was captured by the French in June 1756, an event that led to the trial and execution of Admiral John Byng.[28]
References
- ↑ Henshaw 2014, p. 121.
- ↑ Duffy 2003, p. 191.
- ↑ Riding 2016, p. 334.
- ↑ Fugrol 2006.
- ↑ Riding 2016, p. 339.
- ↑ Riding 2016, p. 340.
- ↑ Duffy 2003, p. 404.
- ↑ "Letter from Brigadier William Blakeney [later 1st Baron Blakeney], Stirling Castle [Scotland], to Henry Pelham; 18 Oct. 1745". Manuscripts and Special Collections; University of Nottingham. Retrieved 28 March 2019.
- ↑ Oates 2011, pp. 117–118.
- ↑ Riding 2016, p. 332.
- ↑ Reid 2006, pp. 39–40.
- ↑ Royle 2016, pp. 62–63.
- ↑ Royle 2016, p. 65.
- ↑ Historic Environment Scotland. "Battle of Falkirk II (BTL9)". Retrieved 12 April 2019.
- ↑ Riding 2016, p. 349.
- ↑ Chambers 1827, pp. 353–354.
- ↑ Duffy 2015, pp. 174–175.
- ↑ Riding 2016, p. 343.
- ↑ Johnstone 1821, p. 138.
- ↑ Duffy 2003, p. 429.
- ↑ Riding 2016, pp. 356–357.
- ↑ Riding 2016, p. 359.
- ↑ Stair-Kerr 1928, p. 131.
- ↑ Riding 2016, p. 360.
- ↑ Duffy 2003, p. 433.
- ↑ Gold & Gold 2007, pp. 11–12.
- ↑ Riding 2016, p. 493.
- ↑ Regan 2000, p. 35.
Sources
- Chambers, Robert (1827). History of the Rebellion of 1745–6 (2018 ed.). Forgotten Books. ISBN 978-1333574420.
- Duffy, Christopher (2015). The Fortress in the Age of Vauban and Frederick the Great 1660-1789. Routledge. ISBN 978-1138924581.
- Duffy, Christopher (2003). The '45: Bonnie Prince Charlie and the Untold Story of the Jacobite Rising. Orion. ISBN 978-0304355259.
- Fugrol, Edward (2006). "Maclachlan, Lauchlan". Oxford Dictionary of National Biography (online ed.). Oxford University Press. doi:10.1093/ref:odnb/17634. (Subscription or UK public library membership required.)
- Gold, John R; Gold, Margaret M (2007). "'The Graves of the Gallant Highlanders': Memory, Interpretation and Narratives of Culloden". History and Memory. 19 (1): 5. doi:10.2979/his.2007.19.1.5. S2CID 154655376.
- Henshaw, Victoria (2014). Scotland and the British Army, 1700-1750: Defending the Union. Bloomsbury 3PL. ISBN 978-1472507303.
- Johnstone, James (1821). Memoirs of the Rebellion in 1745 and 1746. Longman.
- Oates, Jonathan (2011). The Jacobite Campaigns: The British State at War. Routledge. ISBN 978-1848930933.
- Reid, Stuart (2006). The Scottish Jacobite Army 1745-46. Osprey. ISBN 978-1846030734.
- Regan, Geoffrey (2000). Brassey's Book of Naval Blunders. Brassey's. ISBN 978-1574882537.
- Royle, Trevor (2016). Culloden; Scotland's Last Battle and the Forging of the British Empire. Little, Brown. ISBN 978-1408704011.
- Riding, Jacqueline (2016). Jacobites: A New History of the 45 Rebellion. Bloomsbury. ISBN 978-1408819128.
- Stair-Kerr, Eric (1928). Stirling Castle: Its Place in Scottish History (Classic Reprint) (2018 ed.). Forgotten Books. ISBN 978-1331341758.