| Battle of Nablus | |||||||
|---|---|---|---|---|---|---|---|
| Part of the Middle Eastern theatre of World War I | |||||||
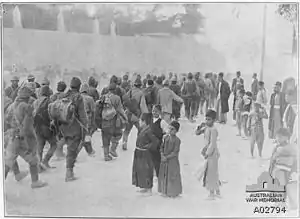 Ottoman prisoners march under escort through Nablus | |||||||
| |||||||
| Belligerents | |||||||
|
|
| ||||||
| Commanders and leaders | |||||||
|
|
| ||||||
| Units involved | |||||||
|
Egyptian Expeditionary Force XX Corps Chaytor's Force |
Yildirim Army Group Seventh Army Asia Corps (Eighth Army) Fourth Army | ||||||
The Battle of Nablus took place, together with the Battle of Sharon during the set piece Battle of Megiddo between 19 and 25 September 1918 in the last months of the Sinai and Palestine Campaign of the First World War. Fighting took place in the Judean Hills where the British Empire's XX Corps attacked the Ottoman Empire's Yildirim Army Group's Seventh Army defending their line in front of Nablus. This battle was also fought on the right flank in the Jordan Valley, where Chaytor's Force attacked and captured the Jordan River crossings, before attacking the Fourth Army at Es Salt and Amman capturing many thousands of prisoners and extensive territory. The Battle of Nablus began half a day after the main Battle of Sharon, which was fought on the Mediterranean section of the front line where the XXI Corps attacked the Eighth Army defending the line in front of Tulkarm and Tabsor and the Desert Mounted Corps which rode north to capture the Esdrealon Plain. Together these two battles, known as the Battle of Megiddo, began the Final Offensive of the war in the Sinai and Palestine campaign.[1]
By the afternoon of 19 September, it was clear that the breakthrough attacks in the Battle of Sharon by the XXI Corps had been successful, and the XX Corps was ordered to begin the Battle of Nablus by attacking the well-defended Ottoman front line, supported by an artillery barrage. These attacks continued late into the night and throughout the next day, until the early hours of 21 September when the continuing successful flanking attack by the XXI Corps, combined with the XX Corps assault and aerial bombing attacks, forced the Seventh and Eighth Armies to disengage. The Ottoman Seventh Army retreated from the Nablus area down the Wadi el Fara road towards the Jordan River, aiming to cross at the Jisr ed Damieh bridge, leaving a rearguard to defend Nablus. The town was captured by the XX Corps and the 5th Light Horse Brigade, while devastating aerial bombing of the Wadi el Fara road, blocked that line of retreat. As all objectives had now been won, no further attacks were required of the XX Corps, which captured thousands of prisoners in the area and at Nablus and Balata.
Defending the right flank and subsidiary to the Nablus battle, the Third Transjordan attack began on 22 September when Meldrum's Force, a section of Chaytor's Force captured the 53rd Ottoman Division on the Wadi el Fara road, running from Nablus to the bridge at Jisr ed Damieh over the Jordan River. Further sections of the retreating Seventh Army column were attacked and captured, during the subsequent battle for the bridge when several fords were also captured along with the bridge, cutting this main Ottoman line of retreat eastwards. As the Fourth Army began its retreat, Chaytor's Force supported by reconnaissance and attacking aircraft, advanced from Jisr ed Damieh to the east to capture Es Salt on 23 September. This force continued its advance eastwards, to capture Amman on 25 September, after a strong Fourth Army rearguard was defeated there. The southern Hedjaz section of the Fourth Army was captured to the south of Amman, at Ziza on 29 September, ending military operations in the area.
Following the victory at Megiddo, the Final Offensive continued when Damascus was captured on 1 October, after several days of pursuit by the Desert Mounted Corps. A further pursuit resulted in the occupation of Homs. On 26 October, the attack at Haritan, north of Aleppo, was under-way when the Armistice of Mudros was signed between the Allies and the Ottoman Empire, ending the Sinai and Palestine campaign.
Background
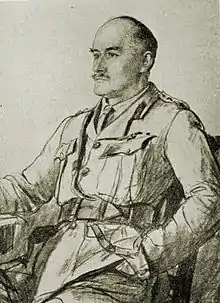
After the Ottoman Army's defeat at the Battle of Beersheba, the loss to the Central Powers of southern Palestine, the retreat to the Judean Hills and the loss of Jerusalem at the end of 1917, several Ottoman army commanders in Palestine were replaced. The Yildirim Army Group's German commander, General Erich von Falkenhayn, was replaced by the German General Otto Liman von Sanders. The commander of the Eighth Army, Kress von Kressenstein, was replaced by Djevad Pasha and Cemal commander of the Ottoman Army, appointed Cemal Kucjuk Pasha to command the Fourth Army.[2] Mustafa Kemal had resigned as commander of the Seventh Army in 1917 but was back by early September 1918.[3]
Following the Treaty of Brest-Litovsk in March 1918, which ended the war on the Eastern Front between Imperial Russia and Imperial Germany, the main focus of the Ottoman Army turned to the Anatolian provinces and territories lost in 1877–1878 during the Russo-Turkish War.[4] The Ottoman Army embarked on a series of territorial conquests in the Caucasus beginning in northern Persia. Erzerum which had been captured by the Russians in 1916, was retaken on 24 March 1918, followed by Van on 5 April and later Batum, Kars and Tiflis. Reoccupation of these former possessions brought little strategic advantage to the Ottoman Empire, compared with the potential benefits of military success in Palestine.[4]
Major offensive operations in Palestine also became a low priority for the British Army in March; being postponed because of the German spring offensive in France, but by July, it was clear that the German offensive had failed resulting in a return to the battle of attrition in the trenches. This coincided with the approach of the campaign season in Palestine.[5][6] General Edmund Allenby, commander of the Egyptian Expeditionary Force (EEF) was "very anxious to make a move in September" when he expected to capture Tulkarm and Nablus, the headquarters of the Seventh and Eighth Armies, along with the road to Jisr ed Damieh and Es Salt. "Another reason for moving to this line is that it will encourage both my own new Indian troops and my Arab Allies."[7]
Reorganisation of EEF infantry
To replace British losses suffered during the Spring Offensive the 52nd (Lowland), the 74th (Yeomanry) Divisions and nine British infantry battalions from each of the 10th, 53rd, 60th and the 75th Divisions were sent to France between April and August 1918. The resulting vacancies in the divisions were filled by British Indian Army battalions.[8][9][10][11] The 75th Division had received the first Indian battalions in June 1917.[12][Note 1] Infantry brigades were now reorganised with one British battalion and three Indian battalions.[13] Except one brigade in the 53rd Division which had one South African and three Indian battalions.[14] The British Indian Army's 7th (Meerut) Division arrived from the campaign in Mesopotamia in January 1918 followed by the 3rd (Lahore) Division in April, 1918.[15][16][17][Note 2] Only the 54th (East Anglian) Division remained, as previously, an all British division.[18]
By April 1918, 35 infantry and two pioneer battalions were being prepared to move to Palestine.[19] Some of these battalions, numbered from 150 upwards, were formed by removing complete companies from experienced regiments then serving in Mesopotamia and forming new battalions. The 2/151st Indian Infantry, was one such battalion formed from one company each from the 56th Punjabi Rifles, the 51st, 52nd and 53rd Sikhs. One regiment the 101st Grenadiers formed a second battalion by dividing itself into two with two experienced and two new companies in each battalion. The parent battalions also supplied first line transport and experienced officers with war time service. The 3/151st Indian Infantry, had the commanding officer, two other British and four Indian officers included in the 198 men transferred from the 38th Dogras.[20] The sepoys transferred were also very experienced, in September 1918 the 2/151st Indian Infantry had to provide an honour guard for Allenby, among the men on parade, were some who had served on five different fronts since 1914, and on eight pre war campaigns.[20]
Of the 54 Indian battalions deployed to Palestine, 22 had recent experience of combat, but had each lost an experienced company, which had been replaced by recruits. Ten battalions were formed from experienced troops who had never fought or trained together. The other 22 had not seen any prior service in the war, in total almost a third of the troops were recruits.[21] Within 44 Indian battalions, the "junior British officers were green, and most could not speak Hindustani. In one battalion only one Indian officer spoke English and only two British officers could communicate with their men."[22] Not all of the Indian battalions served in the infantry divisions, some were employed in defence of the lines of communication.[23]
Front line
In September 1918, the front line began near sea level on the Mediterranean coast about 12 miles (19 km) north of Jaffa and Arsuf, extending about 15 miles (24 km) south-eastward across the Plain of Sharon, then eastward over the Judean Hills for about 15 miles (24 km), rising to 1,500–2,000 feet (460–610 m) above sea level along the way. From the Judean Hills, the front line dropped down to 1,000 feet (300 m) below sea level, to cross the Jordan Valley for approximately 18 miles (29 km), ending in the foothills of the Mountains of Gilead/Moab.[24][25]
Railway
The Ottoman railway from Istanbul travelled south to Deraa where it branched into two lines. One line continued east of the Jordan River in a southerly direction to supply the Ottoman Fourth Army headquarters and the garrisons and forces scattered along the southern Hedjaz railway several hundred miles to the south. The second railway line turned westward to supply the Ottoman Seventh and the Eighth Armies in the Judean Hills. This second line crossed the Jordan at Jisr Mejamie, ran southwards down the west bank of the Jordan River to Beisan, then turned westward to run parallel to the front line in the Judean Hills, across the Esdraelon Plain to Afulah. From Afulah the railway forked again into two lines: a branch line running north-westerly to Haifa, while the main line turned south to Jenin. From Jenin the railway wound through a narrow pass in the foothills to climb to Messudieh Junction in the Judean Hills where it again branched into two lines. One line ran westward to Tulkarm and the Eighth Army headquarters before turning south to reach railhead behind the Eighth Army' front line on the coastal plain, while the second line continued south-eastward to Nablus. Here, the headquarters of the Seventh Army was located, north of Jerusalem on the main road to Nazareth and Damascus.[26]
Prelude
"Concentration, surprise, and speed were key elements in the blitzkrieg warfare planned by Allenby."[27][Note 3] Victory at the Battle of Megiddo depended on the success of an intense British Empire artillery barrage to cover the front line infantry attack and drive a gap in the line so the cavalry could advance to quickly reach the Esdraelon Plain 50 miles (80 km) away during the first day of battle. Control of the skies was achieved and maintained by destroying or dominating German aircraft activity and reconnaissances, and constant bombing raids by the Royal Flying Corps (RAF) and Australian Flying Corps (AFC) on Afulah and the Seventh and Eighth Army headquarters at Tulkarm and Nablus respectively and cutting communications with their commander, Liman von Sanders at Nazareth.[24][28]
During the first 36 hours of the Battle of Megiddo's Battle of Sharon, between 04:30 on 19 September and 17:00 on 20 September, the German and Ottoman front line had been cut by infantry, and the cavalry had passed through the gap to reach their objectives at Afulah, Nazareth, and Beisan. Without communications, no combined action could be organized by the Ottoman forces. The continuing British Empire infantry attack from the south forced the Ottoman Seventh and Eighth Armies in the Judean Hills to withdraw northwards towards Damascus, along the main roads and railways from Tulkarm and Nablus which ran through the Dothan Pass northwards to Jenin. Having captured the town, the 3rd Light Horse Brigade were to wait for them.[29][30][31][Note 4]
British Empire deployments
XX Corps
The XX Corps commanded by Lieutenant General Phillip Chetwode consisting of the 10th and 53rd Divisions, was deployed on both sides of the road from Jerusalem to Nablus, in the Judean Hills.[32]
Chetwode was to capture Nablus by launching attacks on both Ottoman flanks, with the aim of converging about 7 miles (11 km) to the north. The 10th Division on the left was to attack the inter-army boundary with the XXI Corps 5 miles (8 km) east of Furkhah, heading for Nablus along a spur parallel with the 53rd Division on the right, which was to move east following the watershed to the Wadi el Fara. Between these two divisions was a 7 miles (11 km) gap lightly held by Watson's Force; a detachment improvised from Corps Troops' 1/1st Worcestershire Yeomanry, two Pioneer battalions, and details from the Corps Reinforcement Camp.[32][33][34]
Chaytor's Force
On 5 September 1918 the New Zealand Mounted Rifles Brigade took over the left sector of the valley defences, continuing active patrolling.[35] And on "the 16th September the General Officer Commanding Anzac Mounted Division took over command of the whole of the Jordan Valley defences as well as Desert Mounted Corps camps at Talaat ed Dumm and Kilo 17 Jericho Jerusalem Road and Desert Mounted Corps Reinforcement Camp, Jerusalem, the force being designated 'Chaytor's Force.'"[36]
Chaytor's Force commanded by Major General Edward Chaytor, consisted of the Anzac Mounted Division, 20th Indian Brigade, 1st and 2nd Battalions British West Indies Regiment, 38th and 39th Battalions Royal Fusiliers (Jewish Volunteers), A/263 Battery Royal Field Artillery (RFA), 195th Heavy Battery Royal Garrison Artillery (RGA), 29th and 32nd Indian Artillery Mountain Batteries, No. 6 (Medium) Trench Mortar Battery, three anti-aircraft sections Royal Artillery (RA), two sections of captured 75 mm Ottoman guns, one section of captured 5.9 Ottoman guns and No. 35 Army Troops Company Royal Engineers (RE).[37]
On establishment, the force consisted of one mounted division, one infantry brigade and four infantry battalions (equivalent to a second infantry brigade without brigade support troops or a command structure), five batteries, six sections of artillery and transport consisting of 20 lorries, 17 tractors, 34 trucks, 300 donkeys, 11,000 horses and mules.[36] Eight days later an additional 70 donkeys, 65 lorries in the 1040 Motor Transport Company, 110 camels in 'M' Company Camel Transport Corps, were added.[36]
Chaytor's Force was detached from the Desert Mounted Corps for independent operations.[38] Primary responsibilities included the continuing occupation of the Jordan Valley and the protection of the eastern flank of the EEF's front line. Further, Chaytor's Force was to exploit any withdrawal by the Ottoman Fourth Army from their positions at Shunet Nimrin, Es Salt and their headquarters at Amman.[36][39]
Air support
On 18 September, the Royal Air Force's 5th (Corps) Wing and the 40th (Army) Wing, both headquartered at Ramle, were deployed to the area and responsible for cooperation with artillery and contact patrols, tactical and strategic reconnaissance, photography, escorts, offensive patrols and bombing operations. No. 1 Squadron Australian Flying Corps (AFC), No. 111 Squadron RAF and a flight of No. 145 Squadron RAF were based at Ramle, while No. 144 Squadron RAF was based at Junction Station.[40]
Tactical reconnaissance up to 10,000 yards (9,100 m) in advance of the XXI Corps, XX Corps and Chaytor's Force, was provided by corps squadrons; No. 14 Squadron RAF operating out of Junction Station was assigned to XX Corps. Operating out of Sarona was No. 113 Squadron RAF, along with No. 21 Balloon Company, both assigned to XXI Corps. No. 142 Squadron RAF, also operating out of Sarona, had orders to move forward to Jenin aerodrome as soon as it was captured and was assigned to Desert Mounted Corps. One flight from No. 142 Squadron was attached to Chaytor's Force and operated out of Jerusalem.[41][Note 5]
No. 1 Squadron (AFC), consisting of Bristol Fighters, was to carry out bombing and strategic reconnaissance, as well as provide general oversight of the battlefield and report developments. Nos. 111 and 145 Squadrons of S.E.5a aircraft were to patrol over the main Jenin aerodrome all day, bombing and machine gunning targets in the area to prevent any aircraft leaving the aerodrome. No. 144 Squadron, consisting of D.H. 9 aircraft, was to bomb the Afulah telephone exchange and railway station, the Messudieh Junction railway lines, as well as the Ottoman Seventh Army headquarters and telephone exchange at Nablus. The newly arrived Handley–Page O-400 bomber (armed with sixteen 112-pound [51 kg] bombs) and piloted by the Australian, Ross Smith, was to support No. 144 Squadron's bombing of Afulah.[42][43][44][Note 6]
Medical support
A total of 54,800 beds were available in Palestine and Egypt, including convalescence and clearing hospitals; 22,524 beds were made available in Egypt, and a hospital centre in the Deir el Belah and Gaza region, along with stationary hospitals between Kantara and Ludd, could accommodate another 15,000 casualties. No. 14 Australian General Hospital on the Suez Canal was full of malaria cases from the Jordan Valley with the overflow in the No. 31 British General Hospital at Abbassia, Cairo. The Australian Stationary Hospital at Mosacar only had a few beds available.[45]
By August, casualty clearing stations or clearing hospitals were located at Ludd, at Jaffa and at Jerusalem, supported by medical stores depots at Ludd and Jerusalem.[46]
British Empire plan
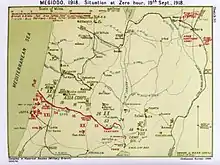
The timing of the attacks by the XX Corps and Chaytor's Force were dependent on the progress made by the XXI Corps during 19 September.[47]
Chetwode's XX Corps would continue holding more than 20 miles (32 km) of front in the Judean Hills, until the XXI Corps had succeeded in breaking through the Ottoman defences and was advancing north to its secondary objectives. Then, the 10th and the 53rd Divisions would launch their attacks on both sides of the road from Jerusalem to Nablus. In particular, the XX Corps right flank was to swing towards the north and north-east of Nablus to capture all remaining escape routes eastwards from the Judean Hills to the Jordan River.[48][49][50]
In the Jordan Valley, Chaytor's Force would hold the occupied area and the right flank against attack by the Ottoman Fourth Army and prevent that force from withdrawing troops, which could be sent to reinforce the Seventh and Eighth Armies in the Judean Hills. When the Ottoman force began its withdrawal, they were to capture the Jisr ed Damieh bridge.[48][49][50]
Allenby's plan was focused on capturing the Ottoman line of communication and retreat between the Fourth Army east of the Jordan river and the Seventh and Eighth Armies in the Judean Hills west of the Jordan:
I am very anxious to make a move in September, on the lines which I have already indicated to you ... Nablus and Tulkeram are the Headquarters of the VII and VIII Armies, joined by a lateral line of railway. The possession by the Turks of the road Nablus–Jisr ed Damie–Es Salt is of great advantage to them; and, until I get it, I can't occupy Es Salt with my troops or the Arabs. Another reason for moving to this line is that it will encourage both my own new Indian troops and my Arab Allies.
— Allenby in a letter dated 24 July 1918[51]
Chaytor's Force would then attack and pursue the Fourth Army, intercept and capture the 4,600 strong garrison from Maan and capture Amman.[52][53][54][55]
Yildirim Army Group
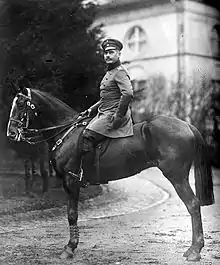
In August 1918, the Yildirim Army Group commanded by von Sanders consisted of 40,598 front line infantrymen, organised into twelve divisions and deployed along 90 kilometres (56 mi) of front line. They were armed with 19,819 rifles, 273 light and 696 heavy machine guns; the high number of machine guns reflecting the Ottoman Army's new tables of organization and the high machine gun component of the German Asia Corps.[56][Note 7]
The Ottoman front line in the Judean Hills was well entrenched south of Nablus in terrain which favoured defence. The area consisted of "very difficult and broken ground" in a rugged area of the Judean Hills. The defenders were supplied by two railways, one from Haifa and the main railway via Beisan across the Jordan to Deraa, Damascus and on to Istanbul as well as good roads from Haifa and Damascus, via Nazareth.[24][57]
Eighth Army
The Eighth Army of 10,000 soldiers supported by 157 artillery guns, with its headquarters at Tulkarm and commanded by Cevat Çobanlı, held a line from the Mediterranean coast just north of Arsuf to Furkhah in the Judean Hills. Its XXII Corps consisted of the 7th, 20th and 46th Infantry Divisions. The Asia Corps, also known as the "Left Wing Group", consisted of the 16th and 19th Infantry Divisions, three German battalion groups from the German Pasha II Brigade and the 2nd Caucasian Cavalry Division, which was held in reserve. This corps-sized German formation was commanded by German Colonel Gustav von Oppen.[3][58][59][60][61]
These divisions holding the front line from the Mediterranean Sea where they faced the XXI Corps, and into the Judean Hills where they faced the XX Corps, were highly regarded veteran formations in the Ottoman Army. In particular, the 7th and 19th Infantry Divisions, had fought with distinction in the Gallipoli Campaign as part of Esat Pasa's III Corps.[62]
Seventh Army
The Seventh Army of 7,000 soldiers supported by 111 guns, and commanded by Mustafa Kemal Pasha, had its headquarters at Nablus. This army, comprising the III Corps' 1st and 11th Infantry Divisions and the XXIII Corps' 26th and 53rd Infantry Division, held the line in the Judean Hills from Furkhah eastwards to Baghalat 6 miles (9.7 km) west north-west of Jericho on the west bank of the Jordan River.[58][59][60][61][63][Note 8]
Fourth Army
The Fourth Army of 6,000 infantry and 2,000 cavalry supported by 74 guns, headquartered at Amman, was commanded by Cemal Kucjuk Pasha. The Fourth Army held the line from Baghalat, across the Jordan Valley and southwards along the Hedjaz railway, where an additional 6,000 Ottoman soldiers, with 30 guns, were scattered from Maan southwards towards Mecca garrisoning the railway line.[Note 9] The Fourth Army was made up of two corps; the VIII Corps' 48th Infantry Division, a composite division which included a German battalion group, the Caucasus Cavalry Brigade and the division sized Serstal Group, while the II Corps (known as the Seria Group or Jordan Group) consisted of the 24th and the 62nd Infantry Divisions, with the 3rd Cavalry Division in reserve.[2][58][59][60][61][Note 10]
Reserves
The 2nd Caucasian Cavalry Division and the 3rd Cavalry Division were the only divisional formations available for reserve duty at the operational level. They were held in reserve for the Eight and Fourth Armies respectively.[59]
Other views of this force
An English language assessment describes the Fourth, Seventh and Eighth Ottoman Armies fighting strength as 26,000 infantry, 2,000 mounted troops and 372 guns.[64] Another states the 45 miles (72 km) of front line in the Judean Hills, was defended by 24,000 Ottoman soldiers with 270 guns against the British Empire's 22,000 infantry, 3,000 cavalry and 157 guns.[65]
The nine infantry battalions of the 16th Infantry Division, had effective strengths equal to a British infantry company of between 100 and 250 men, while 150 to 200 men were "assigned" to the 19th Infantry Division battalions which had had between 500 and 600 men at Beersheba.[56][Note 11]
Claims have been made that the Ottoman armies were under strength, overstretched, "haemorrhaging" deserters, suffering greatly from a strained supply system and overwhelmingly outnumbered by two to one by the EEF.[61][66] It is claimed the Ottoman supply system was so bad in February 1918, that the normal daily ration for the Yildirim Army Group in Palestine, consisted of 125 grains (0.29 oz) of bread and boiled beans three times a day, without oil or any other condiment.[67]
Battle
Preliminary attack
On 18 September, the 53rd Division attempted to seize the Samieh basin overlooking the Ottoman road system behind their front lines. From this watershed, the Wadi Samieh flowed gradually to the west into the Judean Hills and the Wadi el Auja flowed down steeply to the east into the Jordan River. The area was required for the construction of a road to link the British road system with the newly captured Ottoman road system. Some objectives were captured but a position known to the British as "Nairn Ridge" was held by the Ottomans until late on 19 September.[68]
The 53rd Division's attack began shortly after 18:30 on the evening of 18 September when three battalions of the 160th Brigade, with the 21st Punjabis as vanguard, moved down into Wadi es Samieh in a wide flanking manoeuvre across rocky terrain towards the rear of the Ottoman positions. After cresting the wadi, they turned to the left and attacked a series of Ottoman positions from the east capturing small posts until an artillery bombardment between 21:52 and 22:20 enabled them to continue their advance. At 22:30, the 159th Brigade began its advance but almost immediately encountered strong Ottoman defences and the only five Hindustani-speaking British officers were wounded. Despite the casualties, the brigade captured its objectives under the command of an Adjutant Captain. The 159th Brigade advanced again and captured the Hindhead position at 04:40 after a red rocket, from the 160th Brigade indicating it had captured most of their objectives, was sighted. Meanwhile, the 160th Brigade had met increasing machine gun and artillery fire until a five-minute artillery bombardment at 04:45 enabled the capture of the Square Hill position. The southern end of Nairn Ridge was not captured, having "withstood three assaults".[69]
At 04:30, intense bombardment by artillery, trench mortars and machine guns, targeted the German and Ottoman front and second line trenches ahead of XXI Corps towards the Mediterranean coast. Additional fire support came from three siege batteries, which provided counter-battery fire, and the destroyers HMS Druid and HMS Forester, which fired on Ottoman trenches north of Nahr el Faliq; beginning the Battle of Sharon.[25][70]
Nairn Ridge remained in Ottoman hands until about 19:00 on 19 September, when it was finally captured and the road works could begin, and the 53rd Division could start their attempt to block the line of retreat, to the Jordan River at Mafid Jozele.[71]
19 September
Instead of attempting a frontal assault on the strongly entrenched Ottoman positions, the two divisions of the XX Corps were to carry out a converging movement. The 10th Division on the left of the main road was to capture Nablus, while the 53rd Division on the right was to move east of Nablus along a watershed to cut the lines of retreat from the Judean Hills to the Jisr ed Damieh and converge on Nablus.[72][73]
At 12:00 on 19 September, Chetwode received orders from GHQ to launch the XX Corps' attack that night on both sides of the road to Nablus. At 19:45 after a 15-minute bombardment, the 10th Division was to begin the attack on the inter army boundary between the Asia Corps (Eighth Ottoman Army) and the Seventh Ottoman Army, 5 miles (8 km) east of Furkhah at the "western end of the Fukhah spur." The 53rd Division's attack, which would not begin until after they had captured Nairn Ridge, was to move eastwards following the watershed to the Wadi el Fara to block the Roman road to the Jordan River at Mafid Jozele.[32][74][75][76]
Mustafa Kemal, the commander of the Seventh Army, reported to Liman that his army had repulsed practically all attacks on its front, but was about to withdraw to its second-line position between Kefar Haris and Iskaka, to conform with von Oppen's Asia Corps (Eighth Army) retirement.[77]
The XX Corps artillery bombardment began at 19:30 and fifteen minutes later two battalions of the 29th Brigade (10th Division) began to advance on either side of the Wadi Rashid against strongly entrenched Ottoman positions. After being reinforced and supported by a further artillery barrage, Furkhah village was captured and the advance continued towards Selfit, which was occupied in the "early hours of the morning" of 20 September.[78]
Meanwhile, in the Jordan Valley, Chaytor's Force faced stiff opposition from the Ottoman front line troops. As a consequence of progress made by the 160th Brigade during the afternoon of 19 September, one of the brigade's mountain batteries was able to get in a position to fire on Bakr Ridge. At 14:25, supported by the 160th Brigade's battery, three companies of the 2nd Battalion British West Indies Regiment (Chaytor's Force) destroyed Ottoman outposts and captured a ridge to the south of Bakr Ridge, despite intense artillery and machine gun fire. Under heavy fire, they dug in and held their position while two regiments of 2nd Light Horse Brigade were able to advance towards Shunet Nimrin.[79][80]
20 September
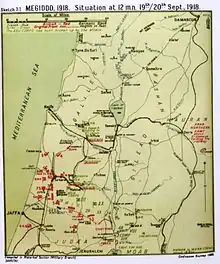
The 10th Division advanced 7 miles (11 km) before dawn on 20 September, before encountering "solid resistance" which required artillery support, to defeat. Artillery support was delayed for some time due to the lack of a track to transport the guns. Meanwhile, the attack by the 53rd Division along the "ridge proved difficult to negotiate and progress was relatively slow."[57][76][81][82]
By 04:30, the left column of the 10th Division was near Kefr Haris, while the right column was at Selfit, but further advances were slowed by effective Ottoman rearguards.[57][83] On the right, the 29th Brigade launched an attack at 06:45 but met strong resistance from German machine gunners a mile north of Selfit. The 31st Brigade began their advance at 08:45 but were held up in the woods east of Haris and south of Kefar Haris. At 15:00, the 29th and 31st Brigades renewed their attacks supported by artillery from the LXVII and LXVIII Brigades RFA. Haris was subsequently captured by an infantry charge into the village.[84]
In the centre between the 10th and 53rd Divisions, Watson's Force sent the 1/1st Worcestershire Yeomanry (XX Corps Troops) forward at 05:30, to advance northwards up the Jerusalem to Nablus road. The road was found to be heavily mined; two battalions of pioneers cleared 78 unexploded devices before the yeomanry advanced 1.5 miles (2.4 km) where they were fired on. By the evening they had advanced 3.5 miles (5.6 km) to Es Sawiye, encountering only small rearguards which were captured. The 10th Heavy Battery and 205th Siege Battery, pulled by four-wheel-drive lorries with ammunition and detachments in lorries, advanced as far up the road as possible, at a rate of 6 miles (9.7 km) per hour to be in action by evening near El Lubban, south of Es Sawiye.[85]
Strong Ottoman rearguards were encountered by the 53rd Division throughout the day which substantially slowed progress.[57][83] At 04:40, after a ten-minute bombardment the 160th Brigade attacked Kh. Jibeit, but was counter-attacked at 08:00 by a battalion of the Ottoman 109th Regiment, which drove them back with heavy losses. By 11:00, the 158th Brigade was half way towards its objective 2,000 yards (1,800 m) south of Kh. Birket el Qusr, but could not breach the defences without artillery support. However, between 12:25 and 12:45 the 160th Brigade succeeded in recapturing Kh. Jibeit and at 15:00 the 159th Brigade captured Ras et Tawil.[86]
On the western bank of the Jordan River, the gains made on the previous day were consolidated and Bakr Ridge captured at dawn by the 2nd Battalion British West Indies Regiment. The 38th Battalion Royal Fusiliers faced heavy rifle and machine gun fire from Mellaha, which was still strongly held by Ottoman forces and in the late morning a large Ottoman force was seen south of Kh. Fusail. Jericho was shelled again in mid afternoon and at 19:00 the New Zealand Mounted Rifles Brigade began their advance towards Tel sh edh Dhib. Meanwhile, on the eastern bank of the Jordan River, the 6th and 7th Light Horse Regiments (2nd Light Horse Brigade, Chaytor's Force) with a company of Patiala Infantry attacked well-defended positions on the Ottoman left flank, but patrols towards Shunet Nimrin and Derbasi were shelled by guns from El Haud.[79][80]
General situation
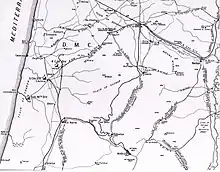
More than 40 hours after the fighting began, the EEF XXI Corps had forced the Ottoman Eighth Army from the coastal Plain of Sharon, and the Desert Mounted Corps had cut the Ottoman Seventh and remnants of the Eighth Armies main lines of communication and retreat at Jenin on the Esdrealon Plain.[83][87]
By 17:00 20 September, about 25,000 prisoners had been captured and the Eighth Ottoman Army had ceased to exist excepting von Oppen's Asia Corps which, together with the Seventh Ottoman Army, withdrew north-eastwards through the Judean Hills between Nablus and Beisan (See Capture of Afulah and Beisan) towards the Jordan River losing most of their guns and transport. The Desert Mounted Corps had already captured Lejjun, Afulah, Beisan and, at about 17:30, Jenin, while Nazareth would be captured the following morning. The coastal Plain of Sharon had been "cleared" by the XXI Corps and the Desert Mounted Corps controlled all the main Ottoman lines of retreat.[29][83][87][88][89] A group of 100 soldiers retreating from Mount Ephraim to Beisan were captured in the afternoon of 20 September, and 700 soldiers were captured in the evening, attempting to cross the line of piquets established in the Esdrealon Plain by the 4th Cavalry Division from Afulah to Beisan.[90]
My Battle is a big one; and, so far, very successful. I think I have taken some 10,000 prisoners and 80 or 90 guns ... This morning my cavalry occupied Afuleh, and pushed thence rapidly south–eastwards, entered Beisan this evening, thus closing to the enemy his last line of escape.
My infantry yesterday captured Tulkeram, and are now pursuing the enemy eastwards to Nablus ... I was at Tulkaram today, and went along the Nablus road. It is strewn with broken lorries, wagons, dead Turks, horses and oxen; mostly killed and smashed by our bombing aeroplanes.
The same bombing of fugitives, on crowded roads, continues today. I think I ought to capture all the Turks' guns and the bulk of his Army ... My losses are not heavy, in proportion to the results gained. I hope to motor out, tomorrow, to see the Cavalry in Esdraelon. The Cavalry Headquarters are at Armageddon, at the present moment.
21 September
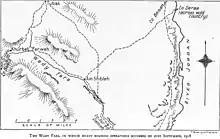
Chetwode ordered the continuation of the XX Corps' attacks; the 10th Division was to capture Nablus, the 53rd Division was to advance towards the high ground north and north-east of Nablus, in the direction of the Wadi el Fara road, to capture and control this line of retreat to the Jordan Valley.[92][93]
At 23:30 20 September, the 29th and 31st Brigades of the 10th Division resumed their advance; the 29th Brigade supported by the Hong Kong Battery with the LXVII and LXVIII Brigades RFA on the left. The 30th Brigade concentrated west of Selfit in preparation of a follow-up advance through the 29th Brigade when it reached Quza on the Damascus road.[94]
A strong Ottoman rearguard at Rujib, 2 miles (3.2 km) south of Nablus, delayed the infantry attack for "no more than an hour" after which the defenders were outflanked from the east and the rearguard position captured at 11:00.[95] Most of the garrison had already retreated from Rujib when the 1/1st Worcestershire Yeomanry, the Corps Cavalry Regiment, galloped in and captured several hundred prisoners.[96]
The Worcester Yeomanry continued their advance north-east of Nablus to Askar where they were stalled by machine gun fire. The 31st Brigade advanced to the hills south of Nablus, while the 29th and 30th Brigades went on to Balata where they captured some prisoners, but by this time, fighting had already ceased and the Seventh Army was in full retreat.[95]
Meanwhile, at Tabsor the 3rd (Lahore) Division (XXI Corps) continued a flanking advance to reach Rafidia at 05:00, 2,000 yards (1,800 m) west of Nablus on 21 September where they occupied a 5.5 miles (8.9 km) long line, which stretched to 1.5 miles (2.4 km) east of Burqa.[97]
Capture of Nablus
After cutting the railway north of Nablus, the 5th Light Horse Brigade (attached to the 60th Division) camped near Tulkarm for the night of 20 September. The brigade, consisting of the 14th and 15th Light Horse Regiments and the Régiment Mixte de Marche de Cavalerie, was ordered to assist in the capture of Nablus on the morning of 21 September. To reach Nablus, they had to negotiate around and through the wreckage caused by aerial bombing on the road from Tulkarm to Nablus. (See Battle of Sharon and Battle of Tabsor for movements of this light horse brigade.)[98][99]
Dead men and animals, torn about with ruthless bombs, swollen and distorted, stank fearfully. Many of the animals still lived in speechless agony, and some of the wretched wounded were in many cases pinned down by carrion, but there was no time to stop and help them. That was for others who came behind. War is hell, and looks well only in a picture show.[98]
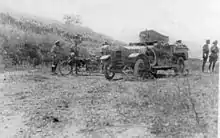
The 5th Light Horse Brigade with the 2nd Light Armoured Motor Battery, had advanced quickly along the Tulkarm-to-Nablus road to attack the last resistance outside Nablus and capture the town, between 800 and 900 prisoners and two field guns. The Régiment Mixte de Marche de Cavalerie, with two armoured cars, entered Nablus[100] while the 14th Light Horse Regiment linked with the 29th and 30th Brigades (10th Division, XX Corps) at Balata.[97][101][102][Note 12]
"[T]he 10th Division reached Nablus by noon, where they were met by the Fifth Australian Light Horse Brigade which had entered the town from the west at about the same time."[103] The light horse rode through the streets of Nablus (the ancient Shechem) and camped on the plain beyond the town, where they received orders to rejoin the Australian Mounted Division at Jenin.[97][101]
Outflanked, Nablus fell to the French regiment, to the usual demonstrations of allegiance to the conquerors—of whatever side. The Turkish troops had abandoned it for the surrounding country and the civic leaders formally surrendered to Onslow. The 5th then collected about 900 of the former garrison in the hinterland.[104]
Before advancing on Nablus and Balata, the 10th Division fought and marched for two days through the hills and gulleys of Mount Ephraim, suffering about 800 casualties but capturing 1,223 prisoners.[105]
Chetwode wrote:
I was able to motor into Nablus where I was joined by Allenby the same evening also in a motor, both of us being well ahead of our advance guards. The country was a mass of half starving bodies of Turks, some armed and some not, and it was quite ordinary to see an Indian havildar [sergeant] emerging from the mountains followed by 20 or 30 fully armed Turks who had surrendered to him.
— Chetwode Letter to Falls of 15 August 1929[106]
Allenby wrote:
I cannot estimate total number of prisoners, but 18,000 have been counted. I motored to Lejjun, today; 65 miles N. of here, overlooking the plain of Esdraelon. A beautiful view across the flat vale. Nazareth, high in hills, to the N.; Mount Tabor opposite; Mount Gilboa to the E., overlooking Jezreel. Some of the Indian cavalry got into Turks with the lance, in the plain yesterday, and killed many. I ... passed through thousands of prisoners today ...
— Allenby Letters to King Hussein of the Hedjaz and Lady Allenby 21 September 1918[107]
Advance towards Wadi el Fara road
The 53rd Division maintained pressure during the day in an attempt to capture the high ground north and north-east of Nablus to seal the lines of retreat to the Jordan River crossing at Jisr ed Damieh.[108]
While the 160th Brigade guarded a water supply at Samiye, the 158th and 159th Brigades, advanced 3.5 miles (5.6 km), suffering 690 casualties but captured 1,195 prisoners and nine guns. At 01:00, the 5th/6th Battalion, Royal Welch Fusiliers[93] occupied Kh. Birket el Qusr unopposed. A follow-up advance gained them 'Aqrabe at 10:45 and after a further 10 miles (16 km) advance to the north, unopposed, it became apparent that enemy forces had disengaged. Chetwode sent orders to "stand fast" as an advance to the now blocked Wadi el Fara road was unnecessary. The road was subsequently bombarded by the RAF and artillery of 'A' Battery LXVIII Brigade RFA, the 10th Heavy Battery and two batteries of the 103rd Brigade RGA.[109]
German and Ottoman retreat
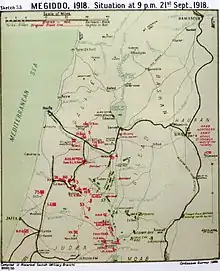
By early afternoon of 21 September, organised Yildirim Army Group resistance in the Judean Hills had ceased, most of the Ottoman Eighth Army had surrendered while the Seventh Army was retreating east down the Wadi el Fara road hoping to cross the Jordan River by the bridge at Jisr ed Damieh.[57][110]
Liman von Sanders withdrawal
Liman von Sanders had no units available to stop the cavalry advance up the coast and across the Esdrealon Plain, Allenby's attack having forced the Yildirim Army Group to retreat.[111] In the early hours of 20 September, Liman fled from Nazareth to Damascus, via Tiberias, Samakh to Deraa. When he arrived in Deraa on the morning of 21 September he ordered the Fourth Army to withdraw to the Deraa-to-Irbid line without waiting for the southern Hedjaz troops.[112][113]
Asia Corps
During the night of 20/21 September, the 16th and the 19th Divisions marched to the west of Nablus, under Liman von Sanders orders, where they linked up with von Oppen's Asia Corps. The next morning, von Oppen reorganised the Asia Corps by amalgamating the remnants of the 702nd and 703rd Battalions into one, with a rifle company, a machine gun company and a trench mortar detachment, while the 701st Battalion with its machine gun company, six guns, a troop of cavalry, an infantry-artillery platoon with two mountain guns or howitzers and a trench mortar section with four mortars and a cavalry squadron, remained intact.[114]
At 10:00, von Oppen was informed that the EEF was approaching Nablus and the Wadi el Fara road was blocked. Consequently, he decided to retreat via Beit Dejan 7 miles (11 km) east-south-east of Nablus and cross the Jordan River at Jisr ed Damieh, but this route was cut shortly afterwards. Von Oppen then ordered a retreat without guns or baggage via Mount Ebal during 21 September, which was largely successful although they suffered some casualties when fired on by British Empire artillery. von Oppen bivouacked at Tammun, with the 16th and the 19th Divisions at Tubas, unaware that Desert Mounted Corps had already occupied Beisan.[115]
On 22 September, with about 700 German and 1,300 Ottoman soldiers of the 16th and 19th Divisions, von Oppen was moving northwards from Tubas towards Beisan when he learned it had already been captured. He decided to advance during the night of 22 September to Samakh where he correctly guessed Liman von Sanders would order a strong rearguard action; however, Jevad, the commander of the Eighth Army, ordered him to cross the Jordan instead. Von Oppen successfully got all the Germans and some of the Ottoman soldiers across the Jordan River, before the 11th Cavalry Brigade attacked, capturing those who failed to cross the river.[116][Note 13]
Seventh Army
The Seventh Army retreated down the Wadi el Fara road towards the Jordan River abandoning its guns and transports. This large column of Ottoman soldiers was seen about 8 miles (13 km) north of Nablus moving down the road towards Beisan and was heavily bombed and machine gunned by British and Australian aircraft of the RAF's Palestine Brigade. When the defile became blocked, the Ottoman forces were subjected to four hours of sustained attack, which destroyed at least 90 guns, 50 motor lorries and more than 1,000 other vehicles. The remnants of the Army then turned north at 'Ain Shible, still moving towards Beisan, except for the Ottoman 53rd Division which managed to escape before the defile was blocked but were later captured by Chaytor's Force in the Jordan Valley on 22 September. On 23 and 24 September, 1,500 prisoners were captured by Chetwode's XX Corps in the Judean Hills.[112][117]
Chaytor's Force 21–25 September
On 21 September, the Auckland Mounted Rifles Regiment advanced on the western bank of the Jordan River to capture Kh. Fusail on the road to Jisr ed Damieh. An Ottoman defensive line covering the Jisr ed Damieh bridge, was subsequently discovered and the Seventh Army was seen moving along the Wadi el Fara towards Jisr ed Damieh. At 23:30, Meldrum's force of the New Zealand Mounted Rifles Brigade, mobile detachments of the 1st and 2nd Battalions of the British West Indies Regiment, the 29th Indian Mountain Battery and Ayrshire (or Inverness) Battery RHA, arrived at Kh. Fusail.[118][119][120] Early in the morning of 22 September, Meldrum's force captured the bridge at Jisr ed Damieh and the fords at Umm esh Shert and Mafid Jozele, cutting that line of retreat.[89][121]
The Fourth Ottoman Army began to retreat towards Deraa during the night of 22 September, while Chaytor's Force was advancing towards Es Salt. The New Zealand Mounted Rifles Brigade advanced up the Jisr ed Damieh track, the 1st Light Horse Brigade advanced up the Umm esh Shert track and the 2nd Light Horse Brigade moved round the southern flank of the Shunet Nimrin position, which had been evacuated. The three brigades converging on Es Salt, which was occupied during the evening of 23 September. The next day, Chaytor's Force began their advance from Es Salt to attack Amman, which was captured on 25 September.[121][122] The Southern Hedjaz II Corps of the Fourth Army was captured near Ziza on 29 September 1918.[123]
Chaytor's Force suffered 27 killed, 7 missing, 105 wounded in battle and captured 10,322 prisoners, 57 guns and 147 machine guns.[124]
Air support
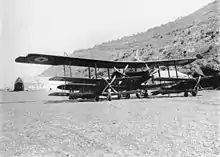
The Royal Air Force provided Allenby with timely aerial reconnaissance reports, and its attacks with bombs and machine guns spread "destruction, death, and terror behind the enemy's lines. All the nerve-centres had been paralysed by constant bombing."[125]
On 18 September the Royal Air Force's 5th (Corps) Wing headquartered at Ramle was deployed to provide support with No. 14 Squadron attached to the XX Corps stationed at Junction Station and one flight of No. 142 Squadron being attached to Chaytor's Force operating from Jerusalem. These aircraft were responsible for cooperation with artillery, contact patrols and tactical reconnaissance up to 10,000 yards in advance of XX Corps and Chaytor's Force.[126]
One of the seven squadrons of the Palestine Brigade RAF, the Australian squadron had been allotted the Handley-Page bomber three weeks before the offensive began. This squadron carried out bombing, offensive patrols and strategic reconnaissances, while the Handley–Page bomber piloted by Ross Smith bombed the central telephone exchange at Afulah, before the artillery bombardment signalled the beginning of battle.[127]
Although aircraft flying over the Jisr ed Damieh to Beisan road, the Jisr ed Damieh bridge, Es Salt and Beisan as far as Tubas, reported all quiet at dawn on the morning of 20 September, RAF Bristol Fighters would later attack a convoy of 200 vehicles withdrawing from Nablus, blocking the road, causing many horses to bolt over a precipice on one side of the road while men scattered into the hills on the other side.[128] The last reconnaissance on 20 September reported the whole Ottoman line alarmed, three large fires were burning at Nablus railway station and at the Balata supply dumps, while a brigade of British cavalry was seen entering Beisan.[129]
Dawn aerial scouting on 21 September returned reports of the previous day's attacks on roads leading towards the Jordan River, which was only a precursor to the follow-up attacks that day.[130] From midday on 22 September, and in particular from 15:00 to 18:00, aerial reconnaissance found Ottoman troops at Es Salt and in the surrounding areas withdrawing towards Amman.[131]
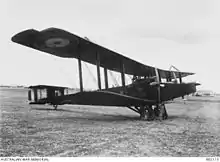
On 23 September, the first bombing formation attacked, expending large amounts of munitions on the retreating columns on the Es Salt to Amman road, returning about 07:00 when a rout resulted. Amman was attacked from the air during the day and retreating columns from Amman and another column moving from Es Salt to Amman were attacked. An Australian aircraft saw columns retreating from Deraa and Samakh, where trains appeared ready to leave for Damascus.[132] By the afternoon of 24 September, virtually all the area west of Amman was clear of Ottoman soldiers but on 25 September a column moving from Amman was seen at Mafrak. The column was attacked between 6:00 and 08:00 by ten Australian aircraft, with attacks continuing throughout the day expending four tons of bombs and almost 20,000 machine gun rounds.[133]
Aftermath
On 23 and 24 September, troops from the Corps Cavalry Regiment and the Desert Mounted Corps cleared the hills between Nablus and Beisan capturing 1,500 prisoners. In total, XX Corps captured 6,851 prisoners, 140 guns, 1,345 machine guns and automatic rifles suffering 1,505 casualties in the process.[134]
The remnants of the Ottoman II Corps, previously in the Maan region, surrendered to Chaytor's Force at the end of September. By 29 September, the remaining soldiers of the Fourth, Seventh, and Eighth Ottoman Armies, in total 6,000 men, were retreating towards Damascus.[135]
Notes
- ↑ The divisions 232nd and 233rd Brigades were formed in April and May 1917 from four British battalions. The 234th Brigade only had two British battalions until two Indian battalions joined in July and September 1917. when it was formed. [75th Division, The Long Long Trail] Other sources claim on establishment the 75th Division was made up of Territorial and Indian battalions. [Falls 1930 Vol. 1 p. 319]
- ↑ Allenby had been informed after the capture of Jerusalem in December 1917 that "the 7th Indian Division would arrive from Mesopotamia" and on 1 April it relieved the 52nd Division which sailed for France, the "3rd Indian Division" arrived from Mesopotamia on 14 April 1918. [Falls 1930 Vol. 2 pp. 293, 350, 413]
- ↑ The issue of whether or not it was Allenby's plan has been raised in the literature. [Erickson 2007 pp. 141–2] According to Chauvel, Allenby had already decided on his plan before the Second Transjordan attack in April/May which had confirmed the Ottoman determination to defend the Deraa railway junction and the difficulties for mounted operations in the area. [Hill 1978 p. 161]
- ↑ Nazareth has been mentioned as the objective of the 3rd Light Horse Brigade, who were to await the retreating Turks beginning to stream back through the Dothan pass. [Keogh 1955 p. 248]
- ↑ See Battle of Sharon (1918) for operations of XXI Corps and Desert Mounted Corps.
- ↑ Ross Smith was apparently no relation to Charles Kingsford Smith, with whom he and his brother Keith, flew after the war. Archived 16 September 2012 at the Wayback Machine accessed 28.4.12
- ↑ The only German and Ottoman sources available to the British official historian were Liman von Sanders' memoir and the Asia Corps war diary. Ottoman army and corps records seem to have disappeared during their retreat. [Falls 1930 Vol. 2 pp. 494–5]
- ↑ In October 1917, the III Corps had defended Beersheba.
- ↑ The commander has been identified as Djemal the Lesser and the army consisted of the II Corps (24th Division and Third Cavalry Division) and the VII Corps (48th and Composite Divisions, including the 146th German Regiment). [Bruce 2002 p. 236]
- ↑ The Fourth Army headquarters had moved forward from Amman to Es Salt before the Second Transjordan attack, when the Shunet Nimrin position was heavily entrenched. The headquarters had been at Amman during the First Transjordan attack.
- ↑ These low numbers of soldiers, probably reflect the high number of machine guns. [Erickson 2007 p. 132]
- ↑ Here Vespasian killed 11,000 inhabitants in 67 AD. [Powles 1922 pp. 241–2]
- ↑ Liman von Sanders was very critical of Jevad's intervention, which considerably weakened the Samakh position, but von Oppen's force would have had to successfully breakthrough the 4th Cavalry Division's cordon of picquets to get to Samakh. [Falls 1930 Vol. 2 p. 546]
Citations
- ↑ Battles Nomenclature Committee 1922 p. 33
- 1 2 Kinloch 2007 p. 303
- 1 2 Falls 1930 Vol. 2 p. 674
- 1 2 Bruce 2002 pp. 207–8
- ↑ Woodward 2006 p. 190
- ↑ Bruce 2002 p. 207
- ↑ Allenby letter to Wilson 24 July 1918 in Hughes 2004 pp. 168–9
- ↑ Wavell 1968 p. 183
- ↑ Cutlack 1941 p. 121
- ↑ Gullett 1941 pp. 653–4
- ↑ Falls 1930 Vol. 2 p. 350
- ↑ "75th Division". The Long Long Trail. Retrieved 30 August 2012.
- ↑ Falls 1930 Vol. 2 pp. 662–5, 668–671
- ↑ "53rd (Welsh) Division". The Long Long Trail. Retrieved 29 August 2012.
- ↑ Woodward 2006, p. 170
- ↑ Perrett, pp.24–26
- ↑ Falls 1930 Vol. 2 pp. 413, 417
- ↑ Falls 1930 Vol. 2 pp. 670–1
- ↑ Roy 2011, pp.170–171
- 1 2 Roy 2011, p. 174
- ↑ Erickson, p. 126
- ↑ Woodward 2006 p. 182
- ↑ Roy 2011, p. 170
- 1 2 3 Gullett 1919 pp. 25–6
- 1 2 Wavell 1968 p. 205
- ↑ Keogh 1955 pp. 243–4
- ↑ Woodward 2006 p. 191
- ↑ Falls 1930 Vol. 2 pp. 487–8
- 1 2 Blenkinsop 1925 p. 241
- ↑ Massey 1920 pp. 155–7
- ↑ Wavell 1968 p. 211
- 1 2 3 Carver 2003 p. 232
- ↑ Wavell 1968 pp. 203–4
- ↑ Falls 1930 Volume 2 p. 471
- ↑ Powles 1922 p. 231
- 1 2 3 4 Anzac Mounted Division War Diary Admin Staff, Headquarters September 1918 AWM4-1-61-31
- ↑ Powles 1922 p. 236
- ↑ General Edmund Allenby (4 February 1922). "Supplement to the London Gazette, 4 February, 1920" (PDF). London Gazette. Retrieved 29 August 2012.
- ↑ Hill 1978 p. 162
- ↑ Falls Vol 2 pp. 460–1
- ↑ Falls Vol 2 p. 460
- ↑ Cutlack 1941 pp. 151–2
- ↑ Carver 2003 pp. 225, 232
- ↑ Maunsell 1926 p. 213
- ↑ Downes 1941 p. 764
- ↑ Downes 1941 p. 696
- ↑ Wavell 1968 p. 199
- 1 2 Falls 1930 Vol. 2 pp. 455–6
- 1 2 Bruce 2002 p. 231
- 1 2 Wavell 1968 pp. 199, 203–4, 211
- ↑ in Hughes 2004 pp. 168–9
- ↑ Powles 1922 pp. 233–4
- ↑ Preston 1921 pp. 200–1
- ↑ Blenkinsop 1925 p. 242
- ↑ Pugsley 2004 p. 143
- 1 2 Erickson 2007 p. 132
- 1 2 3 4 5 Keogh 1955 p. 250
- 1 2 3 Carver 2003 p. 231
- 1 2 3 4 Erickson 2001 p. 196
- 1 2 3 Keogh 1955 pp. 241–2
- 1 2 3 4 Wavell 1968 p. 195
- ↑ Erickson 2007 p. 146
- ↑ Falls 1930 Vol. 2. p. 548
- ↑ Keogh 1955 pp. 242
- ↑ Wavell 1968 p. 203
- ↑ Bou 2009 pp. 192–3 quoting Erickson 2001 pp. 195,198
- ↑ Erickson 2007 p. 133
- ↑ Falls 1930 Vol. 2 pp. 471–2, 488–491
- ↑ Falls 1930 Vol. 2 pp. 489–91
- ↑ Falls 1930 Vol. 2 p. 485
- ↑ Falls 1930 Vol. 2 p. 491
- ↑ Keogh 1955 p. 247
- ↑ Wavell 1968 pp. 199, 203–4
- ↑ Falls 1930 Vol. 2 pp. 491–3
- ↑ Hill 1978 p. 168
- 1 2 Wavell 1968 p. 212
- ↑ Falls 1930 Vol. 2 p. 495
- ↑ Falls 1930 Vol. 2 pp. 493–4
- 1 2 Falls 1930 Vol. 2 p. 549
- 1 2 War Diary of Anzac Mounted Division AWM4-1-60-31 Part 2 pp. 2–3
- ↑ Bruce 2002 pp. 209–10, 231–2
- ↑ Blenkinsop 1925 p. 243
- 1 2 3 4 Bruce 2002 p. 232
- ↑ Falls 1930 Vol. 2 p. 498
- ↑ Falls 1930 Vol. 2 p. 497, note
- ↑ Falls 1930 Vol. 2 pp. 496–7
- 1 2 Cutlack 1941 p. 157
- ↑ Falls 1930 Vol. 2 pp. 519–521, 526–7, 530–2
- 1 2 Wavell 1968 p. 216
- ↑ Falls 1930 Vol. 2 p. 521
- ↑ in Hughes 2004 pp. 179, 180
- ↑ Wavell 1968 pp. 212–3
- 1 2 Falls 1930 Vol. 2 p. 499
- ↑ Falls 1930 Vol. 2 p. 500
- 1 2 Massey 1920 pp. 182–3
- ↑ Falls 1930 Vol. 2 p. 501
- 1 2 3 Falls 1930 Vol. 2 p. 509
- 1 2 Powles 1922 pp. 240–1
- ↑ Falls 1930 Vol. 2 p. 668
- ↑ Terraillon, Marc (16 April 2006). "Régiment mixte de Marche de Cavalerie du Levant" [Régiment mixte de Marche de Cavalerie du Levant at Nablus]. Forum pages14-18 (in French). Retrieved 29 July 2020.
- 1 2 Powles 1922 pp. 241–2
- ↑ 5th Light Horse Brigade War Diary September 1918 AWM4-10-5-2
- ↑ Bruce 2002 p. 233
- ↑ Baly 2003 p. 253
- ↑ Falls 1930 Vol. 2 p. 502
- ↑ in Woodward 2006 p. 198
- ↑ Hughes 2004 pp. 181–2
- ↑ Bruce 2002 pp. 232–3
- ↑ Falls 1930 Vol. 2 pp. 499–500, 502
- ↑ Carver 2003 p. 239
- ↑ Erickson 2001 p. 199
- 1 2 Keogh 1955 p. 251
- ↑ Wavell 1968 p. 223
- ↑ Falls 1930 Vol. 2 pp. 511–2, 675
- ↑ Falls 1930 Vol. 2 pp. 511–2
- ↑ Falls 1930 Vol. 2 p. 546
- ↑ Falls 1930 Vol. 2 p. 512
- ↑ War Diary of Anzac Mounted Division AWM4-1-60-31 Part 2 p. 3
- ↑ Falls 1930 Vol. 2 p. 550
- ↑ Powles 1922 p. 245
- 1 2 Falls 1930 Vol. 2 p. 552
- ↑ Downes 1938 p. 722
- ↑ Falls 1930 Vol. 2 p. 556
- ↑ Downes 1938 pp. 723–4
- ↑ Falls 1930 Vol. 2 p. 487
- ↑ Falls 1930 Vol. 2 p. 460
- ↑ Hill 1978 p. 165
- ↑ Cutlack 1941 pp. 155–6
- ↑ Cutlack 1941 p. 158
- ↑ Cutlack 1941 pp. 159–61
- ↑ Cutlack 1941 p. 162
- ↑ Cutlack 1941 pp. 165–6
- ↑ Cutlack 1941 p. 166
- ↑ Falls 1930 Vol. 2 p. 503
- ↑ Cutlack 1941 p. 168
References
- "5th Light Horse Brigade War Diary". First World War Diaries AWM4, 10-5-2. Canberra: Australian War Memorial. September 1918. Archived from the original on 19 April 2012. Retrieved 28 April 2012.
- "Anzac Mounted Division General Staff War Diary". First World War Diaries AWM4, 1-60-31 Part 2. Canberra: Australian War Memorial. September 1918. Archived from the original on 21 March 2011.
- "Anzac Mounted Division Admin Staff, Headquarters War Diary". First World War Diaries AWM4, 1-61-31. Canberra: Australian War Memorial. September 1918.
- Baly, Lindsay (2003). Horseman, Pass By: The Australian Light Horse in World War I. East Roseville, Sydney: Simon & Schuster. OCLC 223425266.
- Battles Nomenclature Committee (1922). The Official Names of the Battles and Other Engagements Fought by the Military Forces of the British Empire during the Great War, 1914–1919, and the Third Afghan War, 1919: Report of the Battles Nomenclature Committee as Approved by The Army Council Presented to Parliament by Command of His Majesty. London: Government Printer. OCLC 29078007.
- Blenkinsop, Layton John; Rainey, John Wakefield, eds. (1925). History of the Great War Based on Official Documents Veterinary Services. London: H.M. Stationers. OCLC 460717714.
- Bou, Jean (2009). Light Horse: A History of Australia's Mounted Arm. Australian Army History. Port Melbourne: Cambridge University Press. ISBN 978-0-521-19708-3.
- Bruce, Anthony (2002). The Last Crusade: The Palestine Campaign in the First World War. London: John Murray. ISBN 978-0-7195-5432-2.
- Carey, G. V.; Scott, H. S. (2011). An Outline History of the Great War. Cambridge University Press. ISBN 978-1-107-64802-9.
- Carver, Michael, Field Marshal Lord (2003). The National Army Museum Book of The Turkish Front 1914–1918: The Campaigns at Gallipoli, in Mesopotamia and in Palestine. London: Pan Macmillan. ISBN 978-0-283-07347-2.
{{cite book}}: CS1 maint: multiple names: authors list (link) - Cutlack, Frederic Morley (1941). The Australian Flying Corps in the Western and Eastern Theatres of War, 1914–1918. Official History of Australia in the War of 1914–1918. Vol. VIII (11th ed.). Canberra: Australian War Memorial. OCLC 220900299.
- Downes, Rupert M. (1938). "The Campaign in Sinai and Palestine". In Butler, Arthur Graham (ed.). Gallipoli, Palestine and New Guinea. Official History of the Australian Army Medical Services, 1914–1918: Volume 1 Part II (2nd ed.). Canberra: Australian War Memorial. pp. 547–780. OCLC 220879097.
- Erickson, Edward J. (2001). Ordered to Die: A History of the Ottoman Army in the First World War. No. 201 Contributions in Military Studies. Westport Connecticut: Greenwood Press. OCLC 43481698.
- Erickson, Edward J. (2007). Ottoman Army effectiveness in World War I : a comparative study. London: Routledge. ISBN 978-0-203-96456-9. OCLC 99997016.
- Falls, Cyril (1930). Military Operations Egypt & Palestine from June 1917 to the End of the War. Official History of the Great War Based on Official Documents by Direction of the Historical Section of the Committee of Imperial Defence: Volume 2 Part II. A. F. Becke (maps). London: H.M. Stationery Office. OCLC 256950972.
- Great Britain; Army; Egyptian Expeditionary Force (1918). Handbook on northern Palestine and southern Syria. Cairo: Government Press. OCLC 23101324.
- Griffiths, William R. (2003). The Great War, The West Point Military History Series. Square One Publishers, Inc. ISBN 978-0-7570-0158-1.
- Barker, David; Gullett, Henry; Barrett, Charles (1919). Australia in Palestine. Sydney: Angus & Robertson. OCLC 224023558.
- Hall, Rex (1975). The Desert Hath Pearls. Melbourne: Hawthorn Press. OCLC 677016516.
- Hart, Basil (1989). Lawrence of Arabia. The Perseus Books Group. ISBN 978-0-306-80354-3.
- Hill, Alec Jeffrey (1978). Chauvel of the Light Horse: A Biography of General Sir Harry Chauvel, GCMG, KCB. Melbourne: Melbourne University Press. OCLC 5003626.
- Hughes, Matthew, ed. (2004). Allenby in Palestine: The Middle East Correspondence of Field Marshal Viscount Allenby June 1917 – October 1919. Army Records Society. Vol. 22. Phoenix Mill, Thrupp, Stroud, Gloucestershire: Sutton Publishing. ISBN 978-0-7509-3841-9.
- Jukes, Geoffrey (2003). The First World War: The War To End All Wars: Volume 2 of Essential Histories Specials. Osprey. ISBN 978-1-84176-738-3.
- Keogh, E. G.; Joan Graham (1955). Suez to Aleppo. Melbourne: Directorate of Military Training by Wilkie & Co. OCLC 220029983.
- Kinloch, Terry (2007). Devils on Horses in the Words of the Anzacs in the Middle East,1916–19. Auckland: Exisle Publishing. ISBN 978-0-908988-94-5.
- Massey, William Thomas (1920). Allenby's Final Triumph. London: Constable & Co. OCLC 345306.
- Maunsell, E. B. (1926). Prince of Wales' Own, the Seinde Horse, 1839–1922. The Regimental Committee. OCLC 221077029.
- Powles, C. Guy; A. Wilkie (1922). The New Zealanders in Sinai and Palestine. Official History New Zealand's Effort in the Great War. Vol. III. Auckland: Whitcombe & Tombs. OCLC 2959465.
- Preston, R. M. P. (1921). The Desert Mounted Corps: An Account of the Cavalry Operations in Palestine and Syria 1917–1918. London: Constable & Co. OCLC 3900439.
- Pugsley, Christoper (2004). The Anzac Experience New Zealand, Australia and Empire in the First World War. Auckland: Reed Books. ISBN 978-0-7900-0941-4.
- Wavell, Field Marshal Earl (1968) [1933]. "The Palestine Campaigns". In Sheppard, Eric William (ed.). A Short History of the British Army (4th ed.). London: Constable & Co. OCLC 35621223.
- Woodward, David R. (2006). Hell in the Holy Land: World War I in the Middle East. Lexington: The University Press of Kentucky. ISBN 978-0-8131-2383-7.