| Charge at Irbid | |||||||
|---|---|---|---|---|---|---|---|
| Part of the Middle Eastern theatre of World War I | |||||||
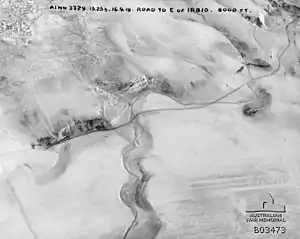
 Aerial photograph of the road and wadi east of Irbid | |||||||
| |||||||
| Belligerents | |||||||
|
| |||||||
| Commanders and leaders | |||||||
|
|
| ||||||
| Units involved | |||||||
|
2nd Lancers Central India Horse 10th Cavalry Brigade 4th Cavalry Division Desert Mounted Corps Egyptian Expeditionary Force |
Remnants of the Fourth Army Yildirim Army Group | ||||||
The Charge at Irbid occurred on 26 September 1918 as a consequence of the victory at the Battle of Megiddo during the subsequent inland pursuit by Desert Mounted Corps to capture Damascus in the Sinai and Palestine Campaign of World War I. The charge occurred when the 2nd Lancers of the 10th Cavalry Brigade, 4th Cavalry Division, attacked the Ottoman Army garrison defending the town of Irbid.
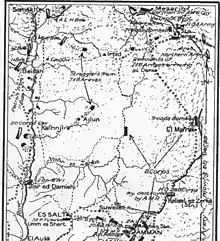
Remnants of the Ottoman Seventh and Eighth Armies were retreating in columns towards Damascus from the Judean Hills via Samakh, Jisr Benat Yakub, Kuneitra and Kaukab, followed by the Australian Mounted and the 5th Cavalry Divisions, while remnants of the Ottoman Fourth Army were retreating in columns towards Damascus along the Pilgrims' Road through Deraa.
The 4th Cavalry Division at Jisr el Mejamie and Beisan was ordered to march east to intercept this remnant of the Fourth Army. At Irbid the 2nd Lancers charged Ottoman rearguard units but were strongly counter-attacked and defeated. By the next morning the Ottoman force had withdrawn from the town.
Background
Liman von Sanders and Fourth Army withdraws

Otto Liman von Sanders commander of the Yildirim Army Group arrived at Deraa on the morning of 21 September, on his way to Damascus after escaping from Nazareth the morning before. At Deraa he received a report from the Fourth Army, which he ordered to withdraw to the Yarmuk to Irbid to Deraa line.[2][3][4] He had found Deraa "fairly secure,"[5] due to the actions of its commandant Major Willmer, placing him in temporary command of the new front stretching from Deraa. During the evening of 21 September Liman von Sanders met the leaders of several thousand druses, who agreed to remain neutral.[5]
By 26 September the Fourth Army's Amman garrison (less the rearguard captured at Amman) had not been "heavily engaged,"[6] and "was still intact as a fighting force even though it was in rapid retreat."[7]
Sherifial Army
Three quarters of Feisal's 4,000 strong force including Nuri esh Shalaan's camel force, were irregulars.[8] As remnants of the Ottoman Fourth Army retreated northward via Deraa towards Damascus they were pursued by Arab forces.[9][10]
4th Cavalry Division

During the cavalry phase of the Battle of Sharon the 4th Cavalry Division had captured Afulah and Beisan, closing the last crossing points along the Jordan River between Jisr ed Damieh and Beisan, garrisoning Beisan and the Jisr el Mejamie crossing of the Jordan River north of Beisan.[11]
On 25 September the Central India Horse,[Note 1] 10th Cavalry Brigade, which had been garrisoning Jisr el Mejamie since 23 September, was joined by the remainder of the 10th Cavalry Brigade. They arrived from Beisan with orders to advance as quickly as possible to Irbid and Deraa, and to contact Feisal's Sherifial Army. The brigade began their advance to Deraa on 26 September, when they left Jisr el Mejamie and crossed the Jordan River, while the remainder of the 4th Cavalry Division followed, leaving Beisan for Jisr el Mejamie. The division's rearguard; the 11th Cavalry Brigade arrived at Jisr el Mejamie at 18:30 on 26 September.[12][13][14]
Prelude
The 4th Cavalry Division, Egyptian Expeditionary Force (EEF) began the pursuit by Desert Mounted Corps to Damascus via Deraa 140 miles (230 km) away, the day before the Australian Mounted Division with the 5th Cavalry Division in reserve, began their 90 miles (140 km) pursuit around the northern end of the Sea of Galilee to Damascus.[15][Note 2]
Battle

Late in the afternoon of 26 September, the 10th Cavalry Brigade was attacked by the Fourth Army's flank guard which held the country round Irbid in force.[7] With the 2nd Lancers leading, the EEF's 10th Cavalry Brigade, 4th Cavalry Division, left Jisr el Mejamie at 08:00 on 26 September. As the regiment negotiated a "difficult defile in the gorge of the Wadi el Ghafr,"[16] 3 miles (4.8 km) west of Irbid they came under rifle fire from the plateau above. As a consequence the regimental commander ordered an immediate attack.[16] The 2nd Lancers attempted a mounted attack; the charge failing when they suffered severe losses.[6]
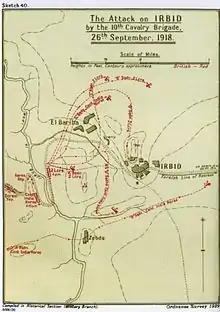
The 2nd Lancers' "C" Squadron was ordered to advance through the village of Bariha 1 mile (1.6 km) north-west of Irbid and get into position to attack Irbid from the east, "B" Squadron was to follow and attack mounted from the north while a third squadron (probably D Squadron), simultaneously attacked Irbid from the south with "A" Squadron in reserve. The machine gun squadron was to target attacking machine guns. (See Falls Sketch Map 40 for movements of "A" and "D" Squadrons)[1]
"C" Squadron became lost, mistaking Bariha for Irbid and played no part in the attack. "B" Squadron was held up by machine gun fire and failed to get into position; instead taking up a position 1,200 yards (1,100 m) north of Irbid, from which they fired Hotchkiss light machine guns in support of "D" Squadron's attack. After dismounting its Hotchkiss troop to provide covering fire, the approach of the, by now 48 strong "D" squadron, without its Hotchkiss troop, was heavily fired on by machine guns from the northern edge of Irbid. The ground was too rough for a charge, the squadron swinging west to attack the north-western corner of the town, but the leading troop continued straight on, to be annihilated. Only eight NCOs and men of "D" Squadron managed to retreat.[1]
The Berkshire Battery Royal Horse Artillery (RHA) did not get into position until 17:00; too late to help "D" Squadron, 2nd Lancers. However, hearing heavy firing the Central India Horse reached the plateau but its "C" Squadron, following the 2nd Lancers' "C" Squadron to Bariha also became useless, while "D" Squadron Central India Horse' advance towards Irbid was forced to move to the south. They reached a hill due south of Irbid with "B" Squadron Central India Horse in the same area, "A" Squadron 2nd Lancers had taken cover in a wadi on the western side of Irbid, when darkness ended the engagement. The 2nd Lancers and the Central India Horse suffered 46 killed and wounded, mainly from "D" Squadron 2nd Lancers.[17]
Aftermath
After holding its ground until dark, the Fourth Army remnant withdrew from Irbid during the night of 26 September, to Er Remte.[6][7]
During the night the scattered squadrons of the 2nd Lancers and Central India Horse established contact and at dawn on 27 September, patrols found Irbid "clear of the enemy."[18]
The 10th Cavalry Brigade had now moved on Deraa, but we saw the dead horses of the fight that had taken place at Irbid the day previously. In this [a] squadron of the 2nd Lancers had struck a snag and had lost over half its strength.
This was the first failed attack by the 4th Cavalry Division since 19 September.[17] "Haste to force the issue before dark, allied with the confidence born of many victorious actions, had caused the usual precautions to go by the board ... there had been little or no reconnaissance of the ground; no one had any idea of the strength of the enemy force."[19]
Feisal's 4,000 strong force including Nuri esh Shalaan's camel force made a forced march overnight on 26/27 September, crossing the railway north of Deraa and tearing up rails to arrive at Sheikh Sa'd 15 miles (24 km) north north-west of Deraa, at dawn on 27 September. Auda abu Tayi captured a train and 200 prisoners at Ghazale Station, while Talal took Izra' a few miles to the north. They captured a total of 2,000 prisoners between noon on 26 September and noon on 27 September, when the Anazeh an Arab tribal confederation, attacked the rearguard defending Deraa. Fighting in the town continued into the night.[8]
Between 6,000 and 7,000 German and Ottoman soldiers remaining from the Ottoman Fourth, Seventh and Eighth Armies had managed to retreat via Tiberias or Deraa towards Damascus, before these places were captured by Desert Mounted Corps on 25 and 27 September respectively, and were at or north of Muzeirib.[20][21]
Notes
- ↑ This is the 38th King George's Own Central India Horse not to be confused with the 39th King George's Own Central India Horse which had remained in India [Preston 1921, p.335, Falls 1930 Vol. 2, p. 667]
- ↑ These advances have been characterised as a "race for Damascus". [Gullett 1919 pp. 39–40, Falls 1930 Vol. 2 p. 567]
Citations
- 1 2 3 Falls 1930 Vol. 2 p. 578
- ↑ Falls 1930 Vol. 2 pp. 511, 545
- ↑ Keogh 1955 p. 251
- ↑ Wavell 1968 p. 223
- 1 2 Falls 1930 Vol. 2 p. 545
- 1 2 3 Wavell 1968 pp. 224–5
- 1 2 3 Bruce 2002 p. 241
- 1 2 Falls 1930 Vol. 2 pp. 566–7
- ↑ Wavell 1968 p. 221
- ↑ Woodward 2006 p. 201
- ↑ Falls 1930 Vol. 2 pp. 513–522, 533, 539–42
- 1 2 Maunsell 1926 p. 231
- ↑ Preston 1921 p. 252
- ↑ Gullett 1919 p. 39
- ↑ Keogh 1955 pp. 252–3
- 1 2 Falls 1930 Vol. 2 pp. 577–8
- 1 2 Falls 1930 Vol. 2 pp. 579–80
- ↑ Falls 1930 Vol. 2 p. 579
- ↑ Falls 1930 Vol. 2 p. 580
- ↑ Cutlack 1941 pp. 167–8
- ↑ Falls 1930 Vol. 2 p. 567
References
- Bruce, Anthony (2002). The Last Crusade: The Palestine Campaign in the First World War. London: John Murray Ltd. ISBN 978-0-7195-5432-2.
- Falls, Cyril (1930). Military Operations Egypt & Palestine from June 1917 to the End of the War. Official History of the Great War Based on Official Documents by Direction of the Historical Section of the Committee of Imperial Defence. Vol. 2 Part II. A. F. Becke (maps). London: H.M. Stationery Office. OCLC 256950972.
- Henry S. Gullett; Charles Barnet; David Baker, eds. (1919). Australia in Palestine. Sydney: Angus & Robertson Ltd. OCLC 224023558.
- Keogh, E. G.; Joan Graham (1955). Suez to Aleppo. Melbourne: Directorate of Military Training by Wilkie & Co. OCLC 220029983.
- Maunsell, E. B. (1926). Prince of Wales' Own, the Seinde Horse, 1839-1922. Regimental Committee. OCLC 221077029.
- Preston, R. M. P. (1921). The Desert Mounted Corps: An Account of the Cavalry Operations in Palestine and Syria 1917–1918. London: Constable & Co. OCLC 3900439.
- Wavell, Field Marshal Earl (1968) [1933]. "The Palestine Campaigns". In Sheppard, Eric William (ed.). A Short History of the British Army (4th ed.). London: Constable & Co. OCLC 35621223.
- Woodward, David R. (2006). Hell in the Holy Land World War I in the Middle East. Lexington: The University Press of Kentucky. ISBN 978-0-8131-2383-7.
External links
- F. M. Cutlack (1941). "The Australian Flying Corps in the Western and Eastern Theatres of War, 1914–1918". Official History of Australia in the War of 1914–1918 (11th ed.). Canberra: Australian War Memorial. Archived from the original on 9 October 2012. Retrieved 26 August 2012.
- Henry Gullett (1941). "The Australian Imperial Force in Sinai and Palestine, 1914–1918". Official History of Australia in the War of 1914–1918 (10th ed.). Canberra: Australian War Memorial. Archived from the original on 7 October 2012. Retrieved 26 August 2012.