| Battle of Nazareth | |||||||
|---|---|---|---|---|---|---|---|
| Part of the Middle Eastern theatre of World War I | |||||||
.jpg.webp) British Empire cavalry at Mary's Well, Nazareth | |||||||
| |||||||
| Belligerents | |||||||
|
| |||||||
| Commanders and leaders | |||||||
|
|
| ||||||
| Units involved | |||||||
|
Egyptian Expeditionary Force Desert Mounted Corps 5th Cavalry Division 13th Cavalry Brigade | Yildirim Army Group | ||||||
The Battle of Nazareth began on 20 September 1918, during the Battle of Sharon, which together with the Battle of Nablus formed the set piece Battle of Megiddo fought during the last months of the Sinai and Palestine Campaign of the First World War. During the cavalry phase of the Battle of Sharon the Desert Mounted Corps rode to the Esdraelon Plain (also known as the Jezreel Valley and the plain of Armageddon) 40 and 50 miles (64 and 80 km) behind the front line in the Judean Hills. At Nazareth on the plain, the 13th Cavalry Brigade of the 5th Cavalry Division attempted to capture the town and the headquarters of the Yildirim Army Group which was eventually captured the following day after the garrison had withdrawn.
The Egyptian Expeditionary Force (EEF) attack on Nazareth was made possible by the British Empire infantry attack on 19 September which began the Battle of Sharon. The EEF infantry attacked along an almost continuous front from the Mediterranean Sea, across the Plain of Sharon and into the Judean Hills. The XXI Corps's British Indian Army infantry captured Tulkarm and the headquarters of the Ottoman Eighth Army. During the course of this attack, the infantry created a gap in the Ottoman front line defences through which the Desert Mounted Corps rode northwards to begin the cavalry phase of the battle. Subsequently, the infantry also captured Tabsor, Et Tire and Arara to outflank the Eighth Army. Meanwhile, the Desert Mounted Corps advanced to capture the communications hubs of Afulah, Beisan and Jenin on 20 September, cutting the main Ottoman withdrawal routes along their lines of supply and communications.
The 5th Cavalry Division had been assigned the task of capturing Nazareth, which was the site of the General Headquarters of the Central Powers' Yildirim Army Group, on 20 September. However, due to the rough and narrow Shushu Pass over the Mount Carmel Range, they were forced to leave behind one brigade and the divisional artillery. Instead of both the 13th and 14th Cavalry Brigades advancing across the Esdrealon Plain to capture the Nazareth, the 14th Cavalry Brigade went directly to Afulah, the objective of the 4th Cavalry Division. By the time the 13th Cavalry Brigade attacked Nazareth, it had been reduced to two squadrons and was not strong enough to capture the Yilderim Army Group headquarters and secure the town. During the attack the German commander of the Yildirim Army Group, Generalleutnant (Major General) Otto Liman von Sanders and his senior staff officers escaped. The following day, after the Ottoman garrison retreated, Nazareth was occupied by the 13th Cavalry Brigade.
Background
Following the First Transjordan and the Second Transjordan attacks by the Egyptian Expeditionary Force (EEF) in March/April and April/May 1918, the EEF commanded by General Edmund Allenby occupied the Jordan Valley and the front line, which extended across the Judean Hills to the Mediterranean. Most of the British infantry and yeomanry cavalry regiments were redeployed to the Western Front to counter Ludendorff's German spring offensive and were replaced by British India Army infantry and cavalry. As part of reorganisation and training, these newly arrived soldiers carried out a series of attacks on sections of the Ottoman front line during the summer months. These attacks were aimed at pushing the front line to more advantageous positions in preparation for a major attack and to acclimatise the newly arrived India Army infantry. It was not until the middle of September that the consolidated force was ready for large-scale operations. During this time the Occupation of the Jordan Valley continued.[1]
By the afternoon of 19 September, it was clear that the breakthrough attacks in the Battle of Sharon by the XXI Corps commanded by Lieutenant General Edward Bulfin had been successful and the XX Corps commanded by Lieutenant General Philip Chetwode was ordered to begin its attack, supported by an artillery barrage, against the well-defended Ottoman front line. The attacks continued until midday on 21 September, when a successful flanking attack by the XXI Corps, combined with the XX Corps assault, forced the Seventh and Eighth Armies to disengage. The Ottoman Seventh Army retreated from the Nablus area towards the River Jordan crossing at the Jisr ed Damieh bridge before the rearguard at Nablus was captured. The Desert Mounted Corps commanded by Lieutenant General Harry Chauvel advanced through the gap provided by the infantry on 19 September to almost encircle the fighting in the Judean Hills, capturing Nazareth, Haifa, Afulah, Beisan, Jenin and Samakh, before advancing to Tiberias. During this time, Chaytor's Force commanded by Major General Edward Chaytor captured part of the retreating Ottoman and German column at the Jisr ed Damieh bridge to cut this line of retreat across the Jordan River. To the east of this river, as the Fourth Army began its retreat, Chaytor's Force advanced to capture Es Salt on 23 September. Amman was captured on 25 September during the Second Battle of Amman when a strong Fourth Army rearguard was defeated there on 25 September.[2]
Deployment

The Desert Mounted Corps, commanded by Chauvel, consisted of the 4th and 5th Cavalry, the Australian Mounted Divisions, less the 5th Light Horse Brigade temporarily attached to the infantry 60th Division, and less the Anzac Mounted Division assigned to Chaytor's Force. The three cavalry divisions concentrated near Ramleh, Ludd (Lydda) and Jaffa, where they dumped surplus equipment in preparation for their advance, before concentrating behind the XXI Corps' infantry divisions between the Mediterranean coast and the railway line from Ludd to Tulkarm.[3][4][5]
Each of the three divisions was made up of three brigades, each with three regiments. The 4th and 5th Cavalry Divisions which had transferred from France, consisted of one British yeomanry regiment and two British Indian Army cavalry regiments, one of which was usually lancers. Except the 15th (Imperial Service) Cavalry Brigade which had three regiments of Indian Imperial Service Troops lancers. Some of the cavalry regiments were armed, in addition to their Lee–Enfield rifles, bayonets and swords, with lances. The 5th Cavalry Division consisted of three lancer regiments while the Australian Mounted Division consisted of three light horse brigades. Each of these brigades had three regiments made up of a headquarters and three squadrons, totalling 522 men and horses in each regiment, who were armed with swords, Lee–Enfield rifles and bayonets. In contrast, the Anzac Mounted Division detached to Chaytor's Force was armed only with rifles and bayonets, and would remain so throughout the war.[6][7] These divisions were supported by machine guns, three batteries from the Royal Horse Artillery or Honourable Artillery Company, and light armoured car units; two Light Armoured Motor Batteries, and two Light Car Patrols.[6][8]
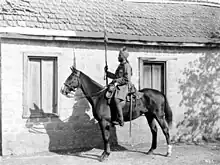
By 17 September the Desert Mounted Corps's leading division, the 5th Cavalry Division, was deployed north-west of Sarona 8 miles (13 km) from the front line. Ready to follow; the 4th Cavalry Division was located in orange groves to the east of Sarona, 10 miles (16 km) from the front, and the Australian Mounted Division was in reserve near Ramleh and Ludd 17 miles (27 km) from the front line.[9][10] All movement had been restricted to night time culminating in a general move forwards on the night of 18/19 September when the 4th and 5th Cavalry Divisions moved to a position close behind the infantry, while the Australian Mounted Division moved forward to Sarona. The three cavalry divisions concentrated with their supplies carried in massed horse-drawn transport and on long trains of camels.[11][12] The divisions carried one iron ration and two days' special emergency rations for each man, and 21 pounds (9.5 kg) of grain for each horse, all of which were carried on the horses, with an additional day's grain for the horses carried on the first line transport in limbered wagons.[13]
Desert Mounted Corps objectives
The cavalry divisions were to ride northwards up the coastal Plain of Sharon, then eastwards over the Mount Carmel Range and onto the Esdraelon Plain (also known as the Jezreel Valley and the plain of Armageddon), to block the line of retreat of the Ottoman Seventh and Eighth Armies fighting the XX and XXI Corps in the Judean Hills.[14] If the Esdraelon Plain could be quickly captured, while the two Ottoman armies continued fighting the British Empire infantry, the lines of retreat by railway and road could be cut.[15] The success of this plan depended on a rapid advance to simultaneously almost encircle the Seventh and Eighth Armies in the Judean Hills and capture Liman von Sanders and the Yilderim Army Group general headquarters.[3][4][16] Further, in order to consolidate their success, the cavalry would be required to hold these places for some time. Operating many miles from their base, they would be dependent on rations being quickly and efficiently transported forward from base.[15]
Esdraelon Plain
The lines of supply for the two Ottoman armies fighting in the Judean Hills depended on the main road and railway networks which crossed the Esdraelon Plain. (See Falls Map 21 Cavalry advances detail below)[17][18] The plain stretches from Lejjun. in the west, 10 miles (16 km) to the white houses of Nazareth in the foothills of the Galilean Hills in the north, to Afulah in the centre of the plain and on to Beisan on its eastern edge close to the Jordan River, and to Jenin on its south edge at the foot of the Judean Hills.[19]
The main route from the Plain of Sharon to the Esdrealon Plain was across the Mount Carmel Range via the Musmus Pass which enters the plain near Lejjun. This area is dominated by the site of the ancient fortress of Megiddo on Tell al Mutesellim. A small force on this prominent ground could control the routes to the north and across the plain where Egyptians, Romans, Mongols, Arabs, Crusaders and the army of Napoleon had marched and fought.[20] Yet no defensive works had been identified on the plain, or covering the approaches to it, during aerial reconnaissances, except German troops garrisoning Yildirim Army Group headquarters.[21][22][Note 1] Liman von Sanders took steps to correct this failure at 12:30 on 19 September, by ordering the 13th Depot Regiment at Nazareth and the military police, a total of six companies and twelve machine guns to occupy Lejjun and defend the Esdrealon Plains exit of the Musmus Pass.[23]
Prelude
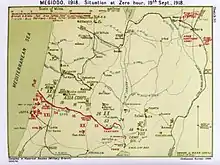
According to Woodward, "concentration, surprise, and speed were key elements in the blitzkrieg warfare planned by Allenby."[24][Note 2] Success at the Battle of Megiddo depended on an intense British Empire artillery barrage covering a successful attack on the front line by infantry who were required to also drive a gap in the front line. The gap was required for the cavalry to advance quickly to the Esdraelon Plain, 50 miles (80 km) behind the Ottoman front line, during the first day of battle. The Royal Air Force (RAF) and Australian Flying Corps (AFC) were required to win control of the skies by destroying or dominating German aircraft activity and reconnaissances. These two flying arms carried out constant bombing raids on Afulah and the Seventh and Eighth Army headquarters at Tulkarm and Nablus respectively to cut communications with Liman von Sanders at Nazareth.[15][25]
Desert Mounted Corps advance
During the initial cavalry advance up the coastal Plain of Sharon to Litera on Nahr el Mefjir, the Desert Mounted Corps were to advance, as Wavell writes, "strictly disregarding any enemy forces that did not directly bar its path."[26] Then turning north-east, the cavalry were to cross the Mount Carmel Range through two passes and ride onto the Plain of Esdraelon. The 5th Cavalry Division was to move through the more difficult northern pass from Sindiane to Abu Shusheh, 18 miles (29 km) south-east of Haifa, and on to Nazareth. The 4th Cavalry Division was to follow northwards until they reached the southern pass known as the Musmus Pass which would take them to Lejjun on the plain; their objective was to capture Afulah. In reserve, the Australian Mounted Division was to follow the 4th Cavalry Division to Lejjun.[3][4][16][27]
5th Cavalry Division
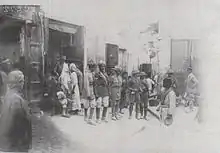
The 5th Cavalry Division consisted of the 13th, 14th and 15th Cavalry Brigades, Essex and Nottinghamshire Batteries, Royal Horse Artillery, 5th Field Squadron, Royal Engineers, 5th Cavalry Division Signal Squadron,[8] the 12th Light Armoured Motor Battery and the 7th Light Car Patrol. The division was to lead the advance north riding along the beach under the cover of some cliffs, past Nahr el Faliq on their way through Mukhalid and up the Plain of Sharon.[27][28][29] Their advance guard, the 13th Cavalry Brigade and the 12th Light Armoured Motor Battery, were on the beach just south of Arsuf when Major General H. J. Macandrew the divisional commander, was informed at 07:00 by the 60th Division that Ottoman shelling had ceased south of Nahr el Faliq, clearing the way for the cavalry. An hour later the 9th Hodson's Horse leading its brigade, reached Nahr el Faliq, but the horses were "somewhat blown" by their quick journey across the soft sand. Macandrew had seen the speed the 13th Cavalry Brigade set and galloped after them, hoping to slow them down, but could not catch them.[30]
By 10:00 the rest of the division had passed Nahr el Faliq. Although the division had been ordered to avoid conflict until they reached the entrenched line near Liktera, leading squadrons attacked 200 Ottoman infantry in a large orchard east of Basse el Hindi. Here they captured about 60 prisoners, two guns and many wagons at the cost of one man killed and two wounded. Another isolated machine gun was captured further north. Near Mukhalid, the 9th Hodson's Horse outflanked another Ottoman position, and another at Nahr Iskanderun at 10:15. A total of 110 prisoners, 2 artillery pieces and 12 wagons were captured.[28][31][32]
The entrenched Ottoman position at Liktera was garrisoned by the Eighth Army Depot Regiment. It stretched from about Jelameh, through El Mejdel and Liktera, to the sea near the mouth of Nahr el Mefjir. Seeing the mounted divisions approaching up the plain, the garrison withdrew to Qaqun where 126 prisoners were later captured by the 4th Cavalry Division.[27][32][33] The 5th Cavalry Division crossed Nahr Iskanderun to arrive at Liktera 10 miles (16 km) north-west of Tulkarm, on Nahr el Mefjir at 11:00, an hour ahead of schedule.[31][32][34] Having ridden 25 miles (40 km), the horses were fatigued, some being unfit for further service; the 18th Lancers (13th Cavalry Brigade) destroyed five horses and were forced to leave ten behind. The 9th Hodson's Horse did not record the number of horses they destroyed or left behind but it was probably more.[31]
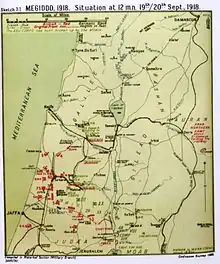
The divisions rested here when the men, horses and several hundred Ottoman prisoners were watered and fed.[35][36] During this time a squadron led by armoured cars went ahead to reconnoitre the track across the Mount Carmel Range from Sindiane through the Abu Shusheh Pass.[27][34][36][37] The reconnaissance group reported the track across the Abu Shusheh pass rough and in a bad repair. Macandrews informed Chauvel that his division would not be ready to move from Liktera before 18:15 when the 13th and 14th Cavalry Brigades would advance without wheels to negotiate the pass at night. As a consequence the 15th (Imperial Service) Cavalry Brigade remained to guard the guns. The artillery and the Jodhpur and 1st Hyderabad Lancers, were to follow at daylight on 20 September, while the Mysore Lancers waited at Liktera for the division's transport, which they were to guard.[36][38][39] Chauvel arrived at Liktera after midnight on 19/20 September when he ordered the 15th (Imperial Service) Cavalry Brigade to take the 5th Cavalry Division's guns via J'ara and Abu Shushe. They arrived at Abu Shusheh at 03:00 and rejoin their division at Afulah during the night.[40]
Approach to Nazareth
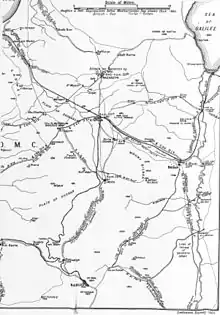
The 13th and 14th Cavalry Brigades, commanded by Brigadier Generals Kelly and Clarke respectively, successfully rode through the Abu Shusheh Pass during the night of 19/20 September without incident.[38][39] The 18th Lancers, 13th Cavalry Brigade, had taken the vanguard from the 9th Hodson's Horse, advancing north along Napoleon's route to Ez Zerganiya 3.5 miles (5.6 km) north-west of Kerkur to the Wadi Qudrah, which they followed north of Subbarin village. They turned east to enter the Abu Shusheh Pass, moving in single file for most of the way along the rough, narrow track following the Wadi el Fuwar to J'ara on the northern side of the watershed at 01:00 on 20 September. Two squadrons of the 9th Hodson's Horse were deployed at J'ara in a rearguard position to defend the pass from an attack from Haifa. The front of the long column reached Abu Shusheh at 02:15 where they remained until 03:00 while the brigades concentrated. Having entered the Esdrealon Plain they cut a 100 yards (91 m) section of the Haifa to Afulah railway line which was blown up and destroyed.[35]
Desert Mounted Corps plans
Once on the Esdraelon Plain, the objectives of the 5th Cavalry Division were to attack and capture Nazareth, Liman von Sanders and his headquarters 70 miles (110 km) from the Asurf, before clearing the plain to Afulah. Meanwhile, the 4th Cavalry Division's objective after arriving on the Esdraelon Plan through the Musmus Pass was to capture Afulah. Later the same day, this division was to advance eastwards across the plain, to capture Beisan and occupy the road and railway bridges to the north, over the Jordan River. In particular, they were to hold or destroy the Jisr Majami bridge 12 miles (19 km) north of Beisan and 97 miles (156 km) from the front line. In reserve, the Australian Mounted Division was to enter the Esdraelon Plain and occupy Lejjun while the 3rd Light Horse Brigade advanced to capture Jenin 68 miles (109 km) from the front line.[4][27]
Battle
At daylight a reconnaissance by No. 1 Squadron aircraft reported three British armoured cars halfway across the Esdraelon Plain on their way to Afulah, a cavalry brigade at Lejjun and two brigades just entering the plain advancing on a broad front.[41] The 5th Cavalry Division had ordered the 14th Cavalry Brigade to Afulah.[38] This brigade reached the Afulah to Nazareth road at about 05:30, and at 07:15 after attacking a German or Ottoman force, the 20th Deccan Horse captured Afulah railway station and about 300 prisoners.[42] The division's artillery, which had moved through the Abu Shusheh pass during the morning, rejoined the 5th Cavalry Division at Afulah later in the day.[43]
The 5th Cavalry Division's remaining brigade; the 13th Cavalry Brigade reached Nazareth at 05:30, having been weakened by diversions and a number of detachments.[38] One squadron of 9th Hodson's Horse had lost touch during the night march. Two troops of lancers were clearing the village of Yafa. The 18th Lancers surrounded and captured 200 sleeping Ottoman soldiers in the village of El Mujeidil at 03:30, which they had mistaken for Nazareth.[42] While the rest of the brigade were collecting prisoners, the only unit available to attack Nazareth, the Gloucester Hussars, was ordered to take over the advanced guard and attack Nazareth, closely followed by one squadron and three troops of the 18th Lancers.[42]
Nazareth
Nazareth had a population of 15,000 living in homes built at the bottom and on the steep sides of a depression in the Galilean Hills. These homes were dominated by buildings on top of the hills to the north-west, while the roads from Afulah and Haifa winding their way up the steep hillside towards the town, joined 0.75 miles (1.21 km) from Nazareth's southern edge. On the left of the main road into the town, the Yildirim Army Group's mess was located in the Hotel Germania, while 500 yards (460 m) further on the General Headquarters and Liman von Sanders offices were in the Monastery of Casa Nuova.[42]
My Cavalry are now in rear of the Turkish Army ... One of my Cavalry Divisions surrounded Liman von Sanders' Headquarters, at Nazareth, at 03:00 today; but Liman had made a bolt, at 19:00 yesterday.
— Allenby letter to his wife 20 September 1918[44]
Between 05:00 and 05:30 on 20 September, the leading troop of the Gloucester Hussars, after riding more than 80 kilometres (50 mi), arrived at Nazareth with swords drawn. They captured many prisoners at the Hotel Germania and a mass of documents were found in houses nearby. Meanwhile, the bulk of Yilderim Army Group's records were being burned at the Monastery of Casa Nuova.[45][46] The commander of 13th Cavalry Brigade requested the assistance of the 14th Cavalry Brigade through 5th Cavalry Division's headquarters at 06:50. He reported the 13th Cavalry Brigade had captured many prisoners and material but that Liman von Sanders had left the evening before.[47] The 14th Cavalry Brigade (5th Cavalry Division) was unable to assist the attack on Nazareth. The brigade had captured 1,200 prisoners during their advance southwards to capture Afulah where they joined the leading troops of the 10th Cavalry Brigade (4th Cavalry Division).[34][48]
At Nazareth, the initial attack by the Gloucester Hussars was strongly opposed during street fighting.[49] The Congestion created by prisoners was increased by numerous German lorries parked along the narrow streets. As they were continuing their attack, the Gloucester Hussars were fired on by machine guns from the buildings on the high ground to the north-west and from balconies and windows. At 08:00 the Gloucester Hussars were reinforced by two squadrons and three troops of the 18th Lancers followed by a squadron of the 9th Hodson's Horse. They were subsequently counter-attack by German office workers who, despite being almost annihilated by the 13th Cavalry Brigade's machine guns, held off the British cavalry attack.[50]
At 10:55 divisional headquarters replied to the 13th Brigade's request for assistance that the 14th Cavalry Brigade could not be sent to Nazareth because of "the state of the horses." The 13th Cavalry Brigade was ordered to withdraw to the north of Afulah, taking with them 1,250 prisoners, having ridden 50 miles (80 km) in 22 hours.[51] The Gloucester Hussars suffered 13 men killed and 28 horses and the 9th Hodgson's Horse suffered 9 men killed.[47] Kelly, the commander of 13th Cavalry Brigade, had failed to capture Nazareth; failed to force a way through the town to cut the road from Nazareth to Tiberias and failed to capture Liman von Sanders. He was held responsible and lost his command as a result.[48][50][52]
Aftermath
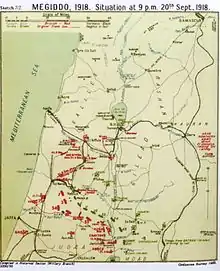
The 13th Cavalry Brigade moved to cut the Nazareth to Tiberias road to the north of the town, before being ordered to return and occupy the town the next morning.[53][54] By then the German and Ottoman forces had retired towards Tiberias from Nazareth which was occupied without opposition.[31]
The 4th Cavalry Division, which had advanced to capture Beisan in the afternoon of 20 September, now controlled the area north along the River Jordan, while the 5th Cavalry Division garrisoned Afulah and the Nazareth area.[43][55] Here motor ambulances, which had been working in the Judean Hills, rejoined their division on 22 September.[56] The Australian Mounted Division's 3rd Light Horse Brigade occupied Jenin. In consequence, all direct routes northwards were now controlled by the Desert Mounted Corps, forcing the retreating Ottoman Seventh Army and what remained of the Eighth Army to withdraw along minor roads and tracks heading eastwards across the Jordan River, towards the Hedjaz railway.[43][55][Note 3]
During the first 36 hours of the Battle of Sharon; between 04:30 on 19 September and 17:00 on 20 September, the German and Ottoman front line had been cut by infantry and the cavalry had passed through the gap to reach their objectives at Afulah, Nazareth and Beisan. The continuing infantry attack from the south forced the Ottoman Seventh and Eighth armies in the Judean Hills to withdraw northwards.[57]
By the end of 20 September, the main achievements of the British infantry during the Battle of Tulkarm were the expulsion of the Eighth Army from the coastal Plain of Sharon and to capture the Eighth Army headquarters at Tulkarm. The 60th Division also captured Anebta in the Judean Hills, while their attached 5th Light Horse Brigade cut the Jenin railway south of Arrabe. During the Battle of Tabsor the 7th (Meerut) Division captured the village of Beit Lid and controlled the crossroads at Deir Sheraf.[58][59]
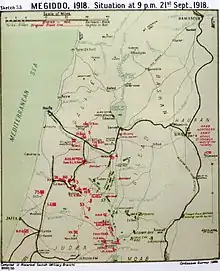
By this time the Desert Mounted Corps blocked the Seventh Army and what remained of the Eighth Army's main lines of retreat north from the Judean Hills. A large proportion of a retreating column seen withdrawing from Nablus in the direction of Beisan, would be captured at Jenin after the 3rd Light Horse Brigade's Capture of Jenin.[58][59] By dusk 4,000 prisoners had been captured and brigade transport following the cavalry divisions was 20 miles (32 km) inside Ottoman territory.[60] After negotiating the heavy sand at Arsuf and at Nahr Iskanderun, the Desert Mounted Corps' transport wagon train reached Liktera at 09:00 on 20 September. They were escorted through the Musmus Pass and arrived at Afulah at noon on 21 September.[40]
Liman von Sanders and his headquarters' staff escaped by motor vehicle along the road from Nazareth to Tiberias on the Sea of Galilee. From there they drove on to Samakh in the afternoon, where Liman von Sanders organised a strong rearguard which would be attacked by Australian light horse on 25 September during the Battle of Samakh.[34][61] Liman von Sanders ordered the Samkh garrison, under German command and supported by German machine guns, to prepare for an attack; they were to fight "to the last man".[61][62][63][64] During early stages of his journey, Liman von Sanders could not communicate with his armies, leaving the Fourth, Seventh and Eighth Armies without orders or direction.[65]
Notes
- ↑ The only available German and Ottoman sources are Liman von Sanders' memoir and the Asia Corps' war diary. Ottoman army and corps records seem to have disappeared during their retreat. [Falls 1930 Vol. 2 pp. 494–5]
- ↑ The issue of whether or not it was Allenby's plan has been raised in the literature. [Erickson 2007 pp. 141–2] According to Chauvel, Allenby had already decided on his plan before the Second Transjordan attack in April/May which had confirmed the Ottoman determination to defend the Deraa railway junction and the difficulties for mounted operations in the area. [Hill 1978 p. 161]
- ↑ See Falls Map 21 which shows the journey of the Seventh Army and the Asia Corps.
Citations
- ↑ Falls 1930 Vol. 2 pp. 302–446
- ↑ Falls 1930 Vol. 2 pp. 447–555
- 1 2 3 Maunsell 1926 p.213
- 1 2 3 4 Carver 2003 p. 232
- ↑ Falls 1930 Vol. 2 pp. 484, 673
- 1 2 DiMarco 2008 p. 328
- ↑ Hill 1978 p. 162
- 1 2 Hanafin, James. "Order of Battle of the Egyptian Expeditionary Force, September 1918" (PDF). orbat.com. Archived from the original (PDF) on 9 January 2015. Retrieved 11 November 2011.
- ↑ Falls 1930 Vol. 2 p. 463
- ↑ Paget 1994 p. 257
- ↑ Gullett 1919 p. 28
- ↑ Wavell 1968 p. 208
- ↑ Maunsell 1926 p. 238
- ↑ Powles 1922 p. 239
- 1 2 3 Gullett 1919 pp. 25–6
- 1 2 Blenkinsop 1925 p. 236
- ↑ Wavell 1968 p. 205
- ↑ Keogh 1955 pp. 242–4
- ↑ Falls 1930 Vol. 2 p. 516
- ↑ Hill 1978 pp. 162–3
- ↑ Powles 1922 p. 233
- ↑ Dinning 1920 p. 81
- ↑ Falls 1930 Vol. 2 p. 495
- ↑ Woodward 2006 p. 191
- ↑ Falls 1930 Vol. 2 pp. 487–8
- ↑ Wavell 1968 p. 199
- 1 2 3 4 5 Preston 1921 pp. 200–1
- 1 2 Bruce 2002 pp. 227–8
- ↑ Falls 1930 Vol. 2 p. 522
- ↑ Falls 1930 Vol. 2 pp. 522–3, note
- 1 2 3 4 Falls 1930 Vol. 2 p. 523
- 1 2 3 Wavell 1968 pp. 199, 208
- ↑ Falls 1930 Vol. 2 pp. 514–5
- 1 2 3 4 Carver 2003 p. 235
- 1 2 Falls 1930 Vol. 2 p. 524
- 1 2 3 Bruce 2002 p. 228
- ↑ Wavell 1968 pp. 208–9
- 1 2 3 4 Wavell 1968 p. 209
- 1 2 Falls 1930 Vol. 2 pp. 524, 667
- 1 2 Falls 1930 Vol. 2 pp. 528–9
- ↑ Cutlack 1941 p. 155
- 1 2 3 4 Falls 1930 Vol. 2 p. 525
- 1 2 3 Bruce 2002 p. 231
- ↑ in Hughes 2004 p. 179
- ↑ Bou 2009 p. 194
- ↑ Falls 1930 Vol. 2 pp. 525–6
- 1 2 Falls 1930 Vol. 2 p. 527
- 1 2 DiMarco 2008 p. 330
- ↑ Bruce 2002 pp. 228–9
- 1 2 Falls 1930 Vol. 2 p. 526
- ↑ Blenkinsop 1925 p. 242
- ↑ Hill 1978 p. 169
- ↑ Wavell 1968 p. 214
- ↑ Carver 2003 p. 238
- 1 2 Maunsell 1926 p. 221
- ↑ Downes 1938 p. 719
- ↑ Blenkinsop 1925 p. 241
- 1 2 Cutlack 1941 p. 157
- 1 2 Bruce 2002 p. 232
- ↑ Gullett 1918 p. 10
- 1 2 Keogh 1955 p. 251
- ↑ Grainger 2006 p. 235
- ↑ Bruce 2004, p. 240
- ↑ Hill 1978 p. 172
- ↑ Falls 1930 Vol. 2 p. 511
References
- Blenkinsop, Layton John; Rainey, John Wakefield, eds. (1925). History of the Great War Based on Official Documents Veterinary Services. London: HM Stationers. OCLC 460717714.
- Bou, Jean (2009). Light Horse: A History of Australia's Mounted Arm. Australian Army History. Port Melbourne: Cambridge University Press. ISBN 978-0-521-19708-3.
- Bruce, Anthony (2002). The Last Crusade: The Palestine Campaign in the First World War. London: John Murray. ISBN 978-0-7195-5432-2.
- Carver, Michael, Field Marshal Lord (2003). The National Army Museum Book of The Turkish Front 1914–1918: The Campaigns at Gallipoli, in Mesopotamia and in Palestine. London: Pan Macmillan. ISBN 978-0-283-07347-2.
{{cite book}}: CS1 maint: multiple names: authors list (link) - DiMarco, Louis A. (2008). War Horse: A History of the Military Horse and Rider. Yardley, Pennsylvania: Westholme Publishing. OCLC 226378925.
- Downes, Rupert M. (1938). "The Campaign in Sinai and Palestine". In Butler, Arthur Graham (ed.). Gallipoli, Palestine and New Guinea. Official History of the Australian Army Medical Services, 1914–1918. Vol. 1 Part II (2nd ed.). Canberra: Australian War Memorial. pp. 547–780. OCLC 220879097.
- Dinning, Hector W.; James McBey (1920). Nile to Aleppo. New York: MacMillan. OCLC 2093206.
- Falls, Cyril (1930). Military Operations Egypt & Palestine from June 1917 to the End of the War. Official History of the Great War Based on Official Documents by Direction of the Historical Section of the Committee of Imperial Defence. Vol. 2 Part II. A. F. Becke (maps). London: H.M. Stationery Office. OCLC 256950972.
- Grainger, John D. (2006). The Battle for Palestine, 1917. Woodbridge: Boydell Press. ISBN 978-1-84383-263-8.
- Gullett, Henry; Barnet, Charles (1919). Australia in Palestine. Sydney: Angus & Robertson. OCLC 224023558.
- Gullett, Henry S. (1941). The Australian Imperial Force in Sinai and Palestine, 1914–1918. Official History of Australia in the War of 1914–1918. Vol. VII (11th ed.). Canberra: Australian War Memorial. OCLC 220900153.
- Hill, Alec Jeffrey (1978). Chauvel of the Light Horse: A Biography of General Sir Harry Chauvel, GCMG, KCB. Melbourne: Melbourne University Press. OCLC 5003626.
- Hughes, Matthew, ed. (2004). Allenby in Palestine: The Middle East Correspondence of Field Marshal Viscount Allenby June 1917 – October 1919. Army Records Society. Vol. 22. Phoenix Mill, Thrupp, Stroud, Gloucestershire: Sutton Publishing. ISBN 978-0-7509-3841-9.
- Keogh, E. G.; Joan Graham (1955). Suez to Aleppo. Melbourne: Directorate of Military Training by Wilkie & Co. OCLC 220029983.
- Maunsell, E. B. (1926). Prince of Wales' Own, the Seinde Horse, 1839–1922. Regimental Committee. OCLC 221077029.
- Paget, G.C.H.V Marquess of Anglesey (1994). Egypt, Palestine and Syria 1914 to 1919. A History of the British Cavalry 1816–1919. Vol. 5. London: Leo Cooper. ISBN 978-0-85052-395-9.
- Powles, C. Guy; A. Wilkie (1922). The New Zealanders in Sinai and Palestine. Official History New Zealand's Effort in the Great War. Vol. III. Auckland: Whitcombe & Tombs. OCLC 2959465.
- Preston, R. M. P. (1921). The Desert Mounted Corps: An Account of the Cavalry Operations in Palestine and Syria 1917–1918. London: Constable & Co. OCLC 3900439.
- Wavell, Field Marshal Earl (1968) [1933]. "The Palestine Campaigns". In Sheppard, Eric William (ed.). A Short History of the British Army (4th ed.). London: Constable & Co. OCLC 35621223.