| Battle of Sio | |||||||
|---|---|---|---|---|---|---|---|
| Part of World War II, Pacific War | |||||||
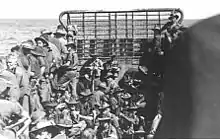
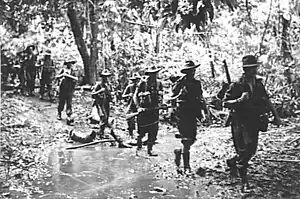 Australian troops of B Company, 30th Infantry Battalion crossing a shallow creek between Weber Point and Malalamai. They have been advancing from Roinji over muddy swamps, Kunai grass and innumerable rivers to link up with American troops at Yagomai. | |||||||
| |||||||
| Belligerents | |||||||
|
|
| ||||||
| Commanders and leaders | |||||||
|
|
| ||||||
| Strength | |||||||
| ~15,000[1] | ~8,000[2] | ||||||
| Casualties and losses | |||||||
|
83 killed 186 wounded[3] |
1,421 killed 2,198 found dead 76 captured[3] | ||||||
The Battle of Sio, fought between December 1943 and March 1944, was the break-out and pursuit phase of General Douglas MacArthur's Huon Peninsula campaign, part of the New Guinea campaign of World War II.
After the defeat of the Japanese in the Battle of Sattelberg, Australian Army forces broke through the Japanese positions around Finschhafen. Constant pressure from US Navy PT boats, Australian land forces and Allied aircraft brought the Japanese logistical system to the brink of collapse, resulting in disease, malnutrition, and privation for the Japanese soldiers. Meanwhile, the Allied supply system grappled with the problems of terrain and climate, particularly inclement weather and rough monsoonal seas that hampered and occasionally prevented delivery of supplies by sea.
Australian and Papuan troops advanced along the coast of the Huon Peninsula, using infantry, tanks, and air strikes against the Japanese positions, which were generally sited at creek crossings in the jungle. The advancing infantry kept strictly within range of the supporting artillery, which was liberally employed in the early stages of the operation. Using tactics that exploited the firepower of Australian artillery and armour, the Australian and Papuan troops inflicted heavy and disproportionate casualties on the Japanese as they advanced, ultimately linking up with the American forces at Saidor. Hundreds of Japanese soldiers were killed; thousands more died from disease, malnutrition, exhaustion and suicide. The Allies failed to seize the opportunity to completely destroy the Japanese forces.
During the advance, Australian troops captured Japanese cryptographic materials. This had an important effect on the subsequent course of the war against Japan in the South West Pacific, as it permitted codebreakers in Australia and the United States to read Japanese Army messages on a much greater scale than previously. This major intelligence windfall led to MacArthur accelerating the South West Pacific's timetable by over three months, starting with the Admiralty Islands campaign in February followed by the landings at Hollandia and Aitape in April far behind enemy lines.
Background
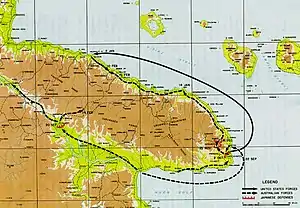
General Douglas MacArthur's Operation Cartwheel began with spectacular victories in the landing at Lae and the landing at Nadzab but then faltered in the face of inclement weather, unfavourable terrain, and—above all—tenacious and aggressive Japanese opposition on land and in the air.[4] The initiative passed to Major General Hatazō Adachi's Eighteenth Army which launched a series of counter-attacks against Major General George Wootten's 9th Division in the Battle of Finschhafen.[5] At the Battle of Sattelberg, Wootten finally inflicted a crushing defeat on Adachi.[6]
Although beaten, the Japanese did not leave the area. Lieutenant General Shigeru Katagiri, the commander of the Japanese 20th Division, ordered the 80th Infantry Regiment to hold the Wareo area to protect the withdrawal of the 79th Infantry Regiment and other units. The 2nd Battalion, 238th Infantry Regiment was to act as a rearguard on the coast.[7] Lieutenant General Frank Berryman, the commander of Australian II Corps, now urged Wootten to commence a coastal advance to cut the Japanese supply lines and force Adachi to retreat from the Huon Peninsula if he were not already doing so. Wootten took a more cautious approach.[8] The Battle of Wareo proved that the Japanese intended to defend the area. After a fierce fight, Wootten managed to drive the Japanese from the high ground around Sattelberg and Gusika. In early December, Adachi ordered all his troops to withdraw to Sio. Wareo was captured by the Australians on 8 December and the last Japanese rearguards left the area on 15 December.[9] Meanwhile, Berryman's coastal advance had commenced on 5 December.[8]
Prelude
Offensive against the Japanese supply system
Early in October 1943, a special staff was established at II Corps Headquarters to study the Japanese supply system. It did not include an officer with experience in maintaining a large force over a native carrier line, and therefore took time to realise that the Japanese force could not be maintained over an inland track, as was first assumed. Operations soon confirmed that the Japanese were dependent on a coastal supply line. During the Battle of Sattelberg, the Allies set out to cut this supply line.[10] A three-pronged approach was taken:
- Collecting centres for native foodstuffs and tracks leading from the coast were bombed by the US Fifth Air Force. This reduced food stocks available to the Japanese, and also drove away the native carriers that the Japanese depended on to carry their supplies up from the coast.[10]
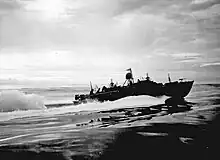
- PT boats of Task Group 70.1 attempted to interdict barge traffic along the coast by night, while Fifth Air Force fighters conducted sweeps for barges by day.[10]
- The land forces attempted to physically cut the Japanese supply lines. The 9th Division captured Pabu, thereby cutting the most convenient inland track,[10] while the landing on Long Island occupied an important barge staging area.[11]
By December, the pitiful condition of Japanese prisoners confirmed for the Australians that "the Japanese logistic system was in the final stages of breakdown".[7][10] Between 9 and 13 December, PT boats sank 23 barges, most of them south of Sio.[12] On 7 January, the PT boats also attacked a submarine. No less than twelve barges were destroyed on the night of 8 January, one of which was loaded with ammunition and another with around 70 troops. On 9 January, PT boats attacked a group of six barges, which attempted to fight back. One barge was seen to sink. Another patrol engaged eight barges and destroyed two. A third patrol found six barges on a beach and destroyed them. Then on 10 January, three PT boats sank three troop-carrying barges, taking one Japanese prisoner. The same night, two barges were also sunk north of Sio Island.[13] When General Berryman saw Vice Admiral Thomas C. Kinkaid, the commander of the Allied Naval Forces, on 14 December, he made a point of congratulating him on the work his PT boats were doing.[14]
Lieutenant General Tsutomu Yoshihara, Chief of Staff of the Japanese Eighteenth Army recalled:
At this time the air at 20th Division H.Q. was one of fatigue. The troops, short of food and ammunition, were searching for vegetables left in the native gardens around them and were so hungry they were eating banana and pawpaw roots. Since these abandoned gardens were right in the front line or inside the enemy's positions, the troops penetrated the enemy positions to obtain vegetables. And they fought exposed to the enemy shells, committing their bodies to trenches in which the rain of days after days had accumulated.
So the fact that 20th Division was not able to fulfil the idea of its activities were not 20th Division's fault, but ours. With this poverty of supply it made no difference how brave they were; it was a case of "An army marches on its stomach".
Hereupon, as an emergency measure, the Army began to use auxiliary fishing boats from Hansa for transport round the coast of New Guinea; from Hansa, via Karka, Bagubagu, Long [Island...] the transport began and so a direct supply line to Sio was established.
This daring transport was conspicuously successful and brought great rejoicing to the officers and men of 20th Division. It was amazing the courageous deeds these fishing fleets did in the skilful hands of the shipping engineers. With no training, no equipment the captains and crews of these fishing boats braved the front line of the fighting and all the dangerous places, saying, "We are immortal. Bring on your arrows or your guns." When attacked by enemy aircraft, they bravely engaged them and miraculously shot them down. However, this secret transport did not long remain hidden from enemy eyes. With the passage of time they were spotted, and their bases were demolished by bombing and the transport unfortunately ceased.[15]
Tactics and logistics
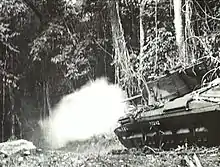
The main Australian advance was by infantry-tank-engineer teams moving along the coastal tracks.[16] Japanese positions were generally sited at creek crossings in the jungle.[17] The advancing infantry kept strictly within range of the supporting artillery, except for short periods during the latter stages of the operation when Japanese opposition was negligible and the difficulty of moving the artillery forward quickly was too great.[18] A secondary outflanking movement was made inland, over the higher ground, which was usually coral cliffs covered by kunai grass and rising as high as 4,000 ft (1,200 m). Since the Japanese intent was to delay rather than fight to the death, a threat to their escape route usually prompted a withdrawal. When this did not occur, the position was reduced by a combination of manoeuvre and tank, mortar, and artillery fire.[16] During the early part of the advance, 4,700 rounds were fired in one day;[17] but during the entire 5th Division advance from Sio to Saidor, only 30 rounds were fired. The advance was made in a series of bounds, the objective of which was usually to secure sheltered beachheads.[18]
Allied supply was entirely by sea. Amphibian scouts from the US 532nd Engineer Boat and Shore Regiment (EBSR) of the US 2nd Engineer Special Brigade, wearing Australian uniforms,[19] advanced with the infantry and reconnoitred beaches from the landward side as they were secured. If a beach looked suitable, a second reconnaissance was made from the sea. Once a beach was selected, a shore party was brought in by landing craft to set up an administrative area. Engineers improved the coastal track to enable supplies to units moving along it to be brought up by jeeps but supplies for units moving inland over the high ground had to be brought by native carriers. Artillery guns were brought forward over the tracks or else were moved by Landing Craft Mechanised (LCMs) of the 532nd EBSR. Tanks normally moved along the tracks but used LCMs to bypass obstacles. As the advance continued, new beachheads were opened up while rearward ones were closed. The advance was halted on occasion to allow for the guns to be brought forward or sufficient supplies to be accumulated at the forward beachhead.[17]
The major problem was the weather. The monsoon caused rough seas that precluded the use of the small Landing Craft, Vehicle, Personnel (LCVPs) and restricted the operations of the larger LCMs. Because of the extremely rough seas—the most difficult that the 532nd EBSR had ever encountered—most supply missions were by night when tidal conditions were most favourable.[20] Wootten insisted that at least seven days' supplies be available in forward areas in case the weather prevented the LCMs from running. II Corps made available two trawlers, manned by the 1st Water Transport Group, to deliver rations. The Australian Army also moved supplies by DUKWs.[17]
Battle
Fortification Point
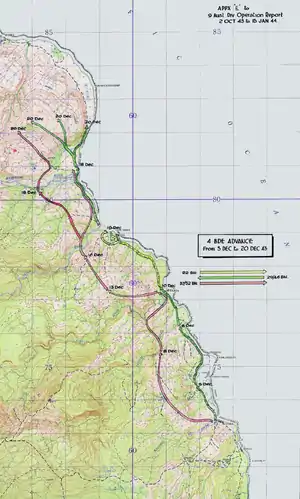
Wootten designated Brigadier C. R. V. Edgar's 4th Infantry Brigade, a Militia formation, for the initial phase of the coastal advance, reserving his veteran Australian Imperial Force brigades for the Battle of Wareo. The brigade consisted of the 22nd and 29th/46th Infantry Battalions from Victoria and the 37th/52nd Infantry Battalion from Tasmania.[21] Each battalion was allotted a team of advisors from the 9th Division.[16] Under Edgar's command was C Squadron, 1st Tank Battalion, with seven Matilda tanks, 9th Platoon, C Company, Papuan Infantry Battalion, and detachments from the 532nd EBSR, Australian New Guinea Administrative Unit (ANGAU), Australian Army Service Corps (AASC) and Australian Army Medical Corps (AAMC). In support were the sappers of the 2/7th Field Company and the 24 25-pounders of the 2/6th Field Regiment. In case Edgar got into trouble, the 20th Infantry Brigade was in reserve, on six hours notice.[17]
To support the advance, a beach maintenance area was prepared at a beach at the mouth of the Kalueng River, which involved removing underwater and landward obstacles. So that the tanks and jeeps could immediately support the advance, a bridge was required over the Kalueng River. A preliminary operation by the 22nd Infantry Battalion on 3 December 1943 secured a crossing area and a log bridge was constructed.[17] The operation jumped off on 5 December, with the 29th/46th Infantry Battalion passing through the bridgehead established by the 22nd. It soon came under sporadic enemy fire, and a tank was disabled by a land mine.[22] In the face of mounting opposition, the advance was halted near the lagoon. It resumed the next day, and the Japanese withdrew after an artillery bombardment, their orders being "while avoiding any decisive engagement" to "carry out successful resistance to try to delay the enemy advance".[23] This became the pattern, with the Japanese preferring to withdraw rather than suffer heavy casualties.[24] On 10 December, Edgar brought all three of his battalions into the line and by 14 December they were closing in on Lakona, a key position on the 20th Division's retreat route.[25]
The tanks had difficulty keeping up with the advance. One obstacle was mines. On the first day, the 2/7th Field Company lifted fourteen mines but a tractor broke a track running over a mine. On 7 December, two more tanks were damaged by mines, one beyond repair. The sappers then cut a new track which they corduroyed.[26] To support the attack on Lakona, the tanks had to cross a creek with steep coral banks, swollen by a torrential downpour. While efforts were made to bring up a compressor, tanks fired into banks and holes were packed with explosives and detonated. On the evening of 16 December, the infantry were joined by five Matilda tanks and overran the Japanese positions. They counted 47 Japanese dead; and killed another 17 in mopping-up operations the next day.[27] On 20 December, aided by four Matilda tanks and 750 rounds from the 25-pounders, the 4th Infantry Brigade occupied the Fortification Point area. Between 5 and 20 December, the 4th Infantry Brigade reported 65 killed and 136 wounded.[28] Japanese casualties were 420 killed and 136 found dead, victims of disease, malnutrition, and suicide. Only six Japanese prisoners were taken.[3]
Sio
On 21 December 1943, the 20th Infantry Brigade passed through the 4th Infantry Brigade and initiated the second stage of the pursuit. Generals Blamey, Berryman and Wootten visited the acting brigade commander, Lieutenant Colonel N. W. Simpson, and emphasised that the brigade was to minimise casualties where possible by employing artillery and tanks. That afternoon, the lead company of the 2/13th Infantry Battalion reached Hubika.[12] The battalion diarist recorded:
Hubika Creek was an indescribable scene. Naked enemy dead everywhere. Evidently used as a dressing station. Forty dead in one small cave. None had been buried. The area was foul and nauseating.[29]
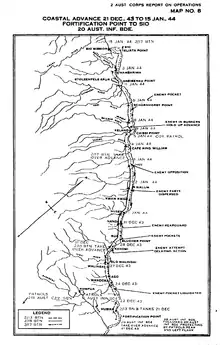
A halt was called for Christmas while supplies were brought up. Units had a rest day. Most dined on turkey, ham, roast potatoes and Christmas pudding, and Christmas services were held. General Blamey insisted that Christmas fare be available to all units, and extraordinary efforts were made to carry out his directive. In one instance, a Piper Cub of No. 4 Squadron RAAF dropped Christmas fare to a Papuan Company on a long-range patrol.[30] The advance resumed on 27 December, preceded by air strikes by 18 B-25 Mitchell and 12 Boston bombers.[30] The 2/15th Infantry Battalion and tanks of A Squadron, 1st Tank Battalion took the lead on 31 December; they reached Sialum on 2 January 1944. This had a sheltered beach which served as a maintenance area. That day, the American landing at Saidor placed a large force across the Japanese escape route.[31]
Before moving over the mountains, the 20th Division headquarters elected to destroy its cryptographic materials rather than carry them. As the wet weather made burning them page by page a slow and difficult process, and a fire might attract the attention of the Allied Air Forces, someone decided to simply bury them in a steel trunk in a stream bed. An Australian sapper checking the stream bed for booby traps with a metal detector discovered it, and it was dug up in the belief that it was a mine. An intelligence officer recognised the contents as code books and soon it was on its way to the Central Bureau in Brisbane. There, the pages were carefully dried out and photographed. On 4 February 1944, Central Bureau codebreakers decrypted a thirteen-part message that laid out the decisions reached at a conference of high-ranking Japanese officers. Copies of the material were quickly sent to Arlington Hall. In January 1944, Arlington Hall had decrypted 1,846 Japanese army messages. In March 1944, with the Sio codebooks in hand, it decrypted 36,000 messages.[32]
On 11 January a platoon of the 2/17th Infantry Battalion replaced a rope ladder, and after climbing it and two wooden ladders reached an area atop a cliff which had once been a Japanese headquarters. It would have been a formidable position if defended, but it was not. The main body of the battalion followed the next day. The Goaling River was crossed in small boats left behind by the Japanese on 13 January and it entered Nambariwa, where one prisoner was taken, six Japanese were shot, and nine found dead. On 15 January, Sio was taken. The Sio-Nambariwa area was found to have been the principal Japanese supply area, and a large number of fuel, supply, and stores dumps were found.[33] During the advance from Fortification Point to Sio, 303 Japanese had been killed or found dead, and 22 captured. The 20th Infantry Brigade had lost 3 killed and 13 wounded, but 958 had been evacuated sick, mostly with malaria, and an epidemic of dengue had also taken its toll. Large quantities of Japanese equipment had been captured, including six 75 mm guns, three 37 mm guns and three 20 mm guns.[34]
Saidor
At 1800 on 20 January 1944, the headquarters of Major General A. H. Ramsay's 5th Division, which had come up from Lae, replaced that of the 9th Division. At the same time the 8th Infantry Brigade replaced the 20th.[3] The 8th Infantry Brigade, which had spent much of the war on garrison duty in Western Australia, began departing Cairns on 10 January.[35] The original intention had been for it to go to Lae to relieve the 29th Infantry Brigade, which had fought in the Salamaua-Lae campaign, but in December it was decided to ship it directly to Finschhafen.[36] The brigade contained three infantry battalions, the 4th, 30th and 35th, all from New South Wales. It also still had the support of the 2/12th Field Regiment, 532nd EBSR, and A Company, Papuan Infantry Battalion. The brigade suffered its first casualties on the night of 21/22 January in a friendly fire incident, which was a common occurrence with units inexperienced in jungle warfare. Two Australians were killed and two wounded by their own comrades.[37]
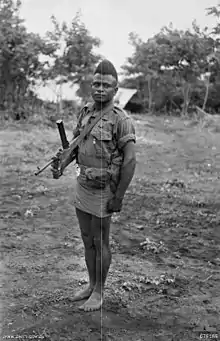
On 22 January a native reported seeing seven Japanese in the hills south-west of Sio and a patrol was sent out under Corporal Bengari to investigate. On arriving in the vicinity on 24 January, a local reported that another 22 Japanese had arrived. The next morning, Bengari and his five companions ambushed the Japanese and killed them all before they could fire a shot.[38] Wirraway and Boomerang aircraft of No. 4 Squadron RAAF scouted ahead of the advance. Its aerial reconnaissance work let the Australians and Papuans know where opposition could be expected, thereby speeding up the advance. The pilots noted Japanese parachutes, signs that the Japanese were receiving supplies by air.[39] On 4 February, the Australians were also forced onto air supply, as swollen rivers washed out a number of bridges.[40]
Each day the Papuans killed 12 to 15 Japanese,[39] but not until 8 February was the Japanese rearguard encountered at Weber Point and a formal attack made. Five Japanese were killed. In all, 53 Japanese were killed and four captured that day. Two Australians were wounded. The next day another 61 Japanese were killed and 9 captured, this time without any Australian casualties.[41] On 10 February, the 30th Infantry Battalion encountered two American soldiers at Yagomai, thereby linking up with the American force at Saidor.[42]
The 8th Infantry Brigade now began to mop up the area. On 18 February, the 35th Infantry Battalion attacked a Japanese force near Gabutamon, killing 40. Finding a force of about 100 Japanese at nearby Tapen, they attacked, killing another 52 Japanese for the loss of one man wounded, while the Papuans on their flanks killed another 51, of whom 43 were accounted for by Corporal Bengari and two other Papuans. The next day, the Papuans found and killed another 39 Japanese in the vicinity. At Tapen, the Australians and Papuans also found evidence that the Japanese had resorted to cannibalism.[43] In the period of 20 January – 1 March 1944, 734 Japanese were killed, 1,775 found dead and 48 were captured. Australian casualties came to four killed and six wounded.[3]
Aftermath
Both sides managed to accomplish their objectives; the Japanese withdrew, while the Australians exacted a terrible toll. The balance of losses was overwhelmingly against the Japanese, both in terms of men and equipment. It seems that only about 4,300 of the 7,000 troops under the command of the Japanese 20th Division who had originally been forward of Sio survived the withdrawal, and many of them were rendered ineffective through wounds, sickness, malnutrition and exhaustion.[44] The opportunity to destroy the Japanese 51st Division was not seized. These troops lived to fight the Americans at the Battle of Driniumor River later in the year, and the Australians in the Aitape–Wewak campaign in 1945. On the other hand, the new base at Finschhafen was no longer threatened by the Japanese and became an important staging point for the Western New Guinea campaign. The capture of the Japanese ciphers at Sio allowed General MacArthur to carry out Operations Reckless and Persecution with a plan based upon sound intelligence rather than just his own intuition.[45]
Notes
- ↑ 9th Division strength returns, December 1943, "War Diary 9th Division AG Branch, December 1943, Australian War Memorial: AWM52 1/5/21" (PDF). p. 88. Archived (PDF) from the original on 12 March 2016. Retrieved 21 November 2015. Includes 1,066 Americans of the 532nd EBSR and 1,712 Papuans. Does not include the 8th Infantry Brigade, or the Finschhafen Base Sub Area.
- ↑ Coates, Bravery Above Blunder, p. 228
- 1 2 3 4 5 "II Corps Report on Operations: October 1943 – March 1944, Australian War Memorial: AWM52 1/4/8" (PDF). pp. 44, 51–52, 56–57. Archived (PDF) from the original on 21 November 2015. Retrieved 21 November 2015.
- ↑ Coates, Bravery Above Blunder, p. 148
- ↑ Coates, Bravery Above Blunder, pp. 149–177
- ↑ Coates, Bravery Above Blunder, p. 227
- 1 2 Coates, Bravery Above Blunder, p. 236
- 1 2 Coates, Bravery Above Blunder, pp. 228–229
- ↑ Dexter, The New Guinea Offensives, pp. 675–679
- 1 2 3 4 5 "II Corps Report on Operations: October 1943 – March 1944, Australian War Memorial: AWM52 1/4/8" (PDF). pp. 59–60. Archived (PDF) from the original on 21 November 2015. Retrieved 21 November 2015.
- ↑ Dexter, The New Guinea Offensives, p. 731
- 1 2 Dexter, The New Guinea Offensives, p. 727
- ↑ Dexter, The New Guinea Offensives, p. 734
- ↑ Berryman diary, 14 December 1943, Australian War Memorial: AWM93 50/2/23/331
- ↑ Yoshihara, Kane, Southern Cross, Australian War Memorial, archived from the original on 19 February 2011, retrieved 16 December 2010
- 1 2 3 Coates, Bravery Above Blunder, p. 243
- 1 2 3 4 5 6 "Report on Operations – 9 Aust Div: Operations from December 1943 – January 1944, Australian War Memorial: AWM52 1/5/20" (PDF). pp. 25–30. Archived (PDF) from the original on 21 November 2015. Retrieved 21 November 2015.
- 1 2 Report on Operations – 5 Aust Div: Operations from Sio to Saidor 20 January – 29 February 1944, Australian War Memorial: AWM54 519/6/48
- ↑ Casey, Amphibian Engineer Operations, p. 97
- ↑ Monthly Historical Report of Operations – 2d ESB, January 1944, U.S. Army Corps of Engineers: X-78 E-20-1
- ↑ Coates, Bravery Above Blunder, p. 241
- ↑ Dexter, The New Guinea Offensives, p. 714
- ↑ Dexter, The New Guinea Offensives, p. 715
- ↑ Dexter, The New Guinea Offensives, p. 718
- ↑ Dexter, The New Guinea Offensives, p. 722
- ↑ Dexter, The New Guinea Offensives, p. 716
- ↑ Dexter, The New Guinea Offensives, pp. 722–724
- ↑ Dexter, The New Guinea Offensives, p. 725
- ↑ Dexter, The New Guinea Offensives, p. 728
- 1 2 Dexter, The New Guinea Offensives, p. 729
- ↑ Dexter, The New Guinea Offensives, p. 730
- ↑ Drea, MacArthur's Ultra, pp. 92–93
- ↑ Dexter, The New Guinea Offensives, pp. 735–736
- ↑ Dexter, The New Guinea Offensives, p. 736
- ↑ "War Diary, 8th Infantry Brigade, 10 January 1944, AWM52 8/2/8" (PDF). Australian War Memorial. p. 3. Archived (PDF) from the original on 21 November 2015. Retrieved 21 November 2015.
- ↑ "War Diary, New Guinea Force, 6 December 1943, AWM52 1/5/51" (PDF). Australian War Memorial. p. 5. Archived (PDF) from the original on 21 November 2015. Retrieved 21 November 2015.
- ↑ Dexter, The New Guinea Offensives, p. 764
- ↑ Dexter, The New Guinea Offensives, p. 765
- 1 2 Dexter, The New Guinea Offensives, p. 766
- ↑ Dexter, The New Guinea Offensives, p. 767
- ↑ "8th Infantry Brigade Report on Operations, 21 February 1944, War Diary, 8th Infantry Brigade, January 1944, AWM52 8/2/8" (PDF). Australian War Memorial. p. 78. Archived (PDF) from the original on 21 November 2015. Retrieved 21 November 2015.
- ↑ Dexter, The New Guinea Offensives, p. 769
- ↑ Dexter, The New Guinea Offensives, p. 770
- ↑ Dexter, The New Guinea Offensives, pp. 732–737
- ↑ Coates, Bravery Above Blunder, pp. 254–255
References
- Casey, H. J., ed. (1959). Volume IV: Amphibian Engineer Operations. Engineers of the Southwest Pacific 1941–1945. Washington, DC: Government Printing Office. OCLC 220327009.
- Coates, John (1999). Bravery Above Blunder: The 9th Division at Finschhafen, Sattelberg and Sio. Singapore: Oxford University Press. ISBN 0-19-550837-8. OCLC 43736921.
- Dexter, David (1961). The New Guinea Offensives. Australia in the War of 1939–1945, Series 1—Army. Volume VI (1st ed.). Canberra: Australian War Memorial. OCLC 2028994. Archived from the original on 17 March 2021. Retrieved 29 July 2015.
- Drea, Edward J. (1992). MacArthur's Ultra: Codebreaking and the War Against Japan 1942–1945. Lawrence, Kansas: University Press of Kansas. ISBN 0-7006-0504-5. OCLC 23651196.